
Humanitarian Architecture Thesis: Chiedza Solar Village
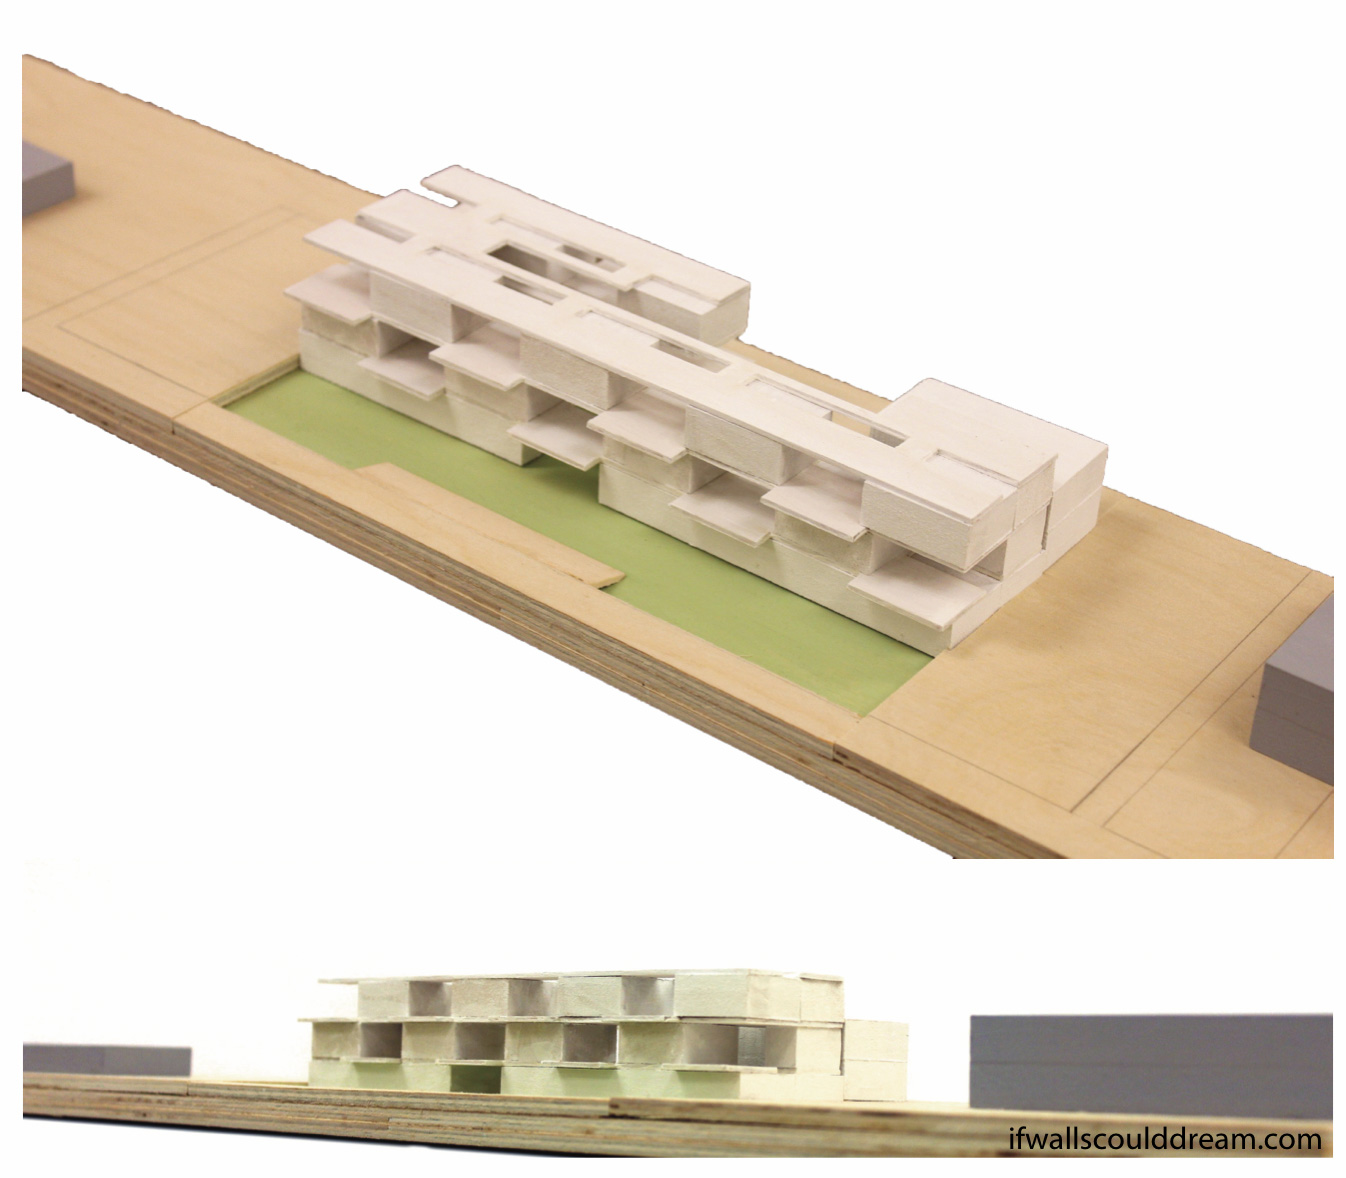
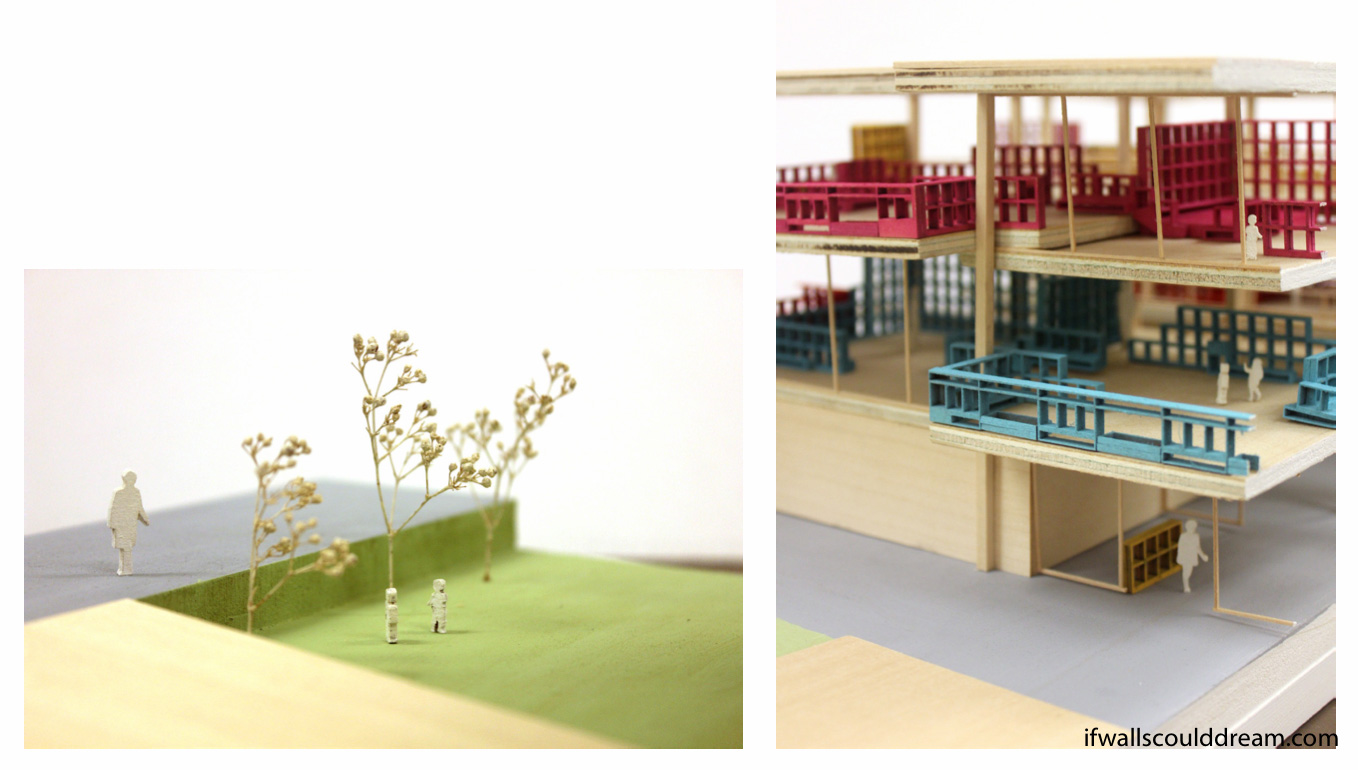
My Bachelor of Architecture Thesis at Cal Poly, San Luis Obispo is a humanitarian project with Journeyman International, a humanitarian design non-profit, to design an agricultural training center in Zimbabwe. We are partnering with two local Zimbabwean companies, Foundations for Farming and Canotek Solar. Their input and advice was crucial to the success of this project, since we weren’t able to visit the site. I was very cautious of cultural appropriation during the project. Often, humanitarian projects have good intentions but fail to actually listen to what the local community needs. I prioritized listening to my local partners and doing a lot of research on Zimbabwean culture in order to design something that was in tune with their needs and their context. I am also partnering with an architectural engineering student from Cal Poly to engineer the project.
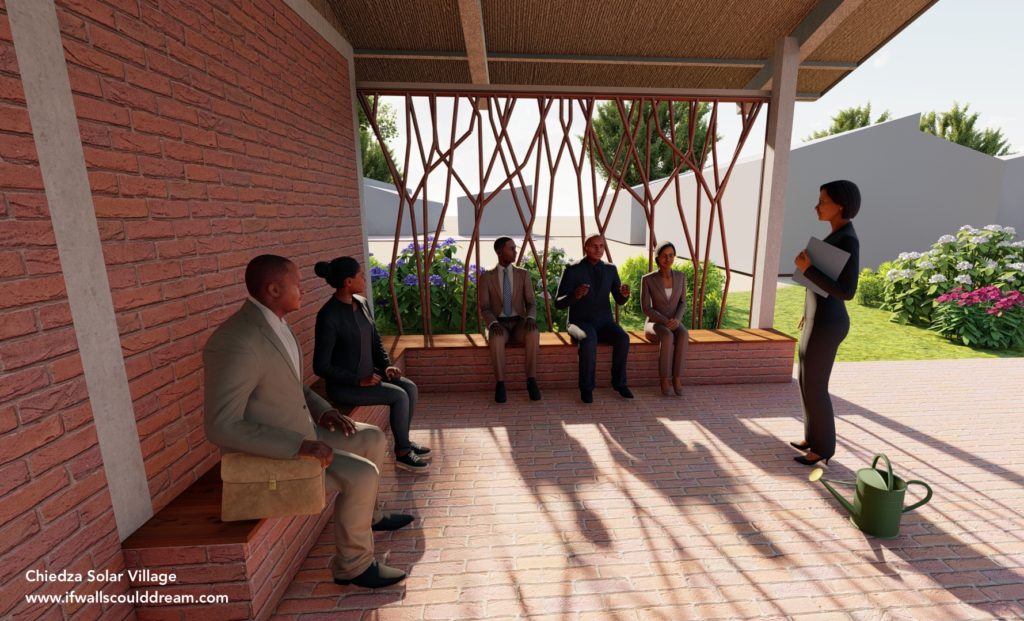
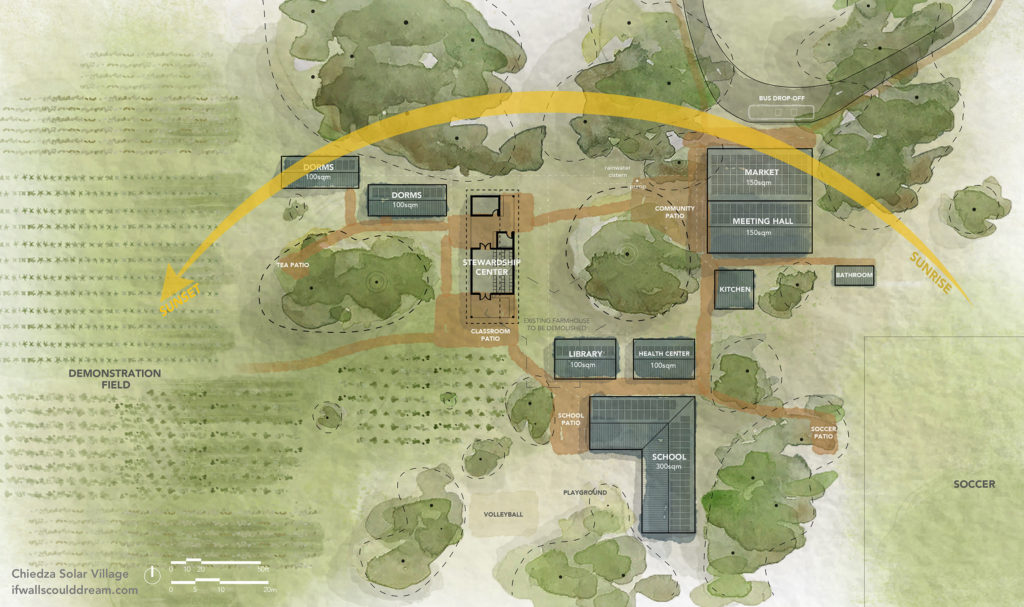
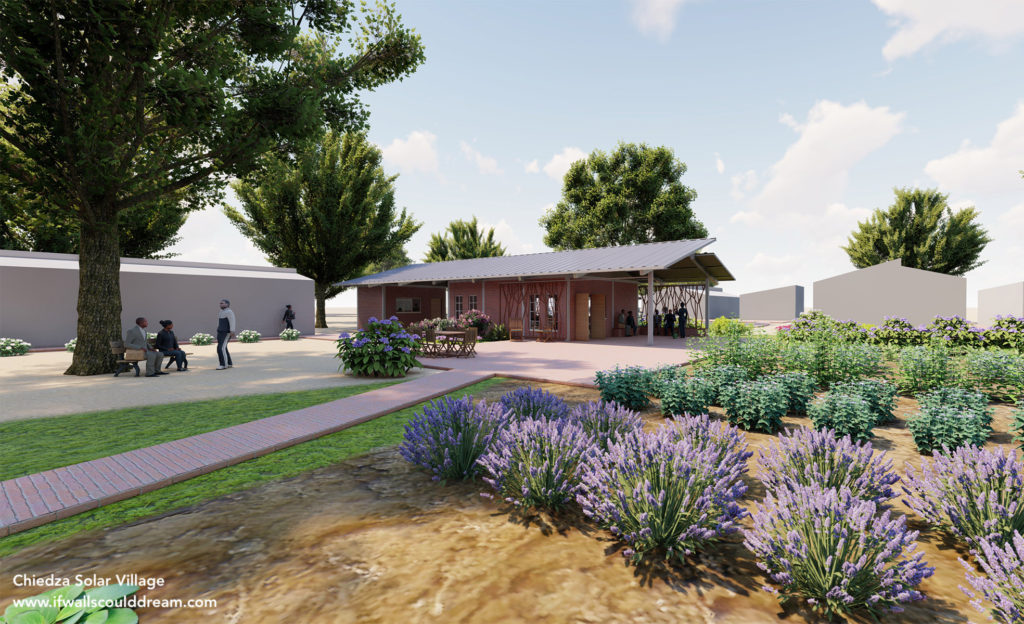
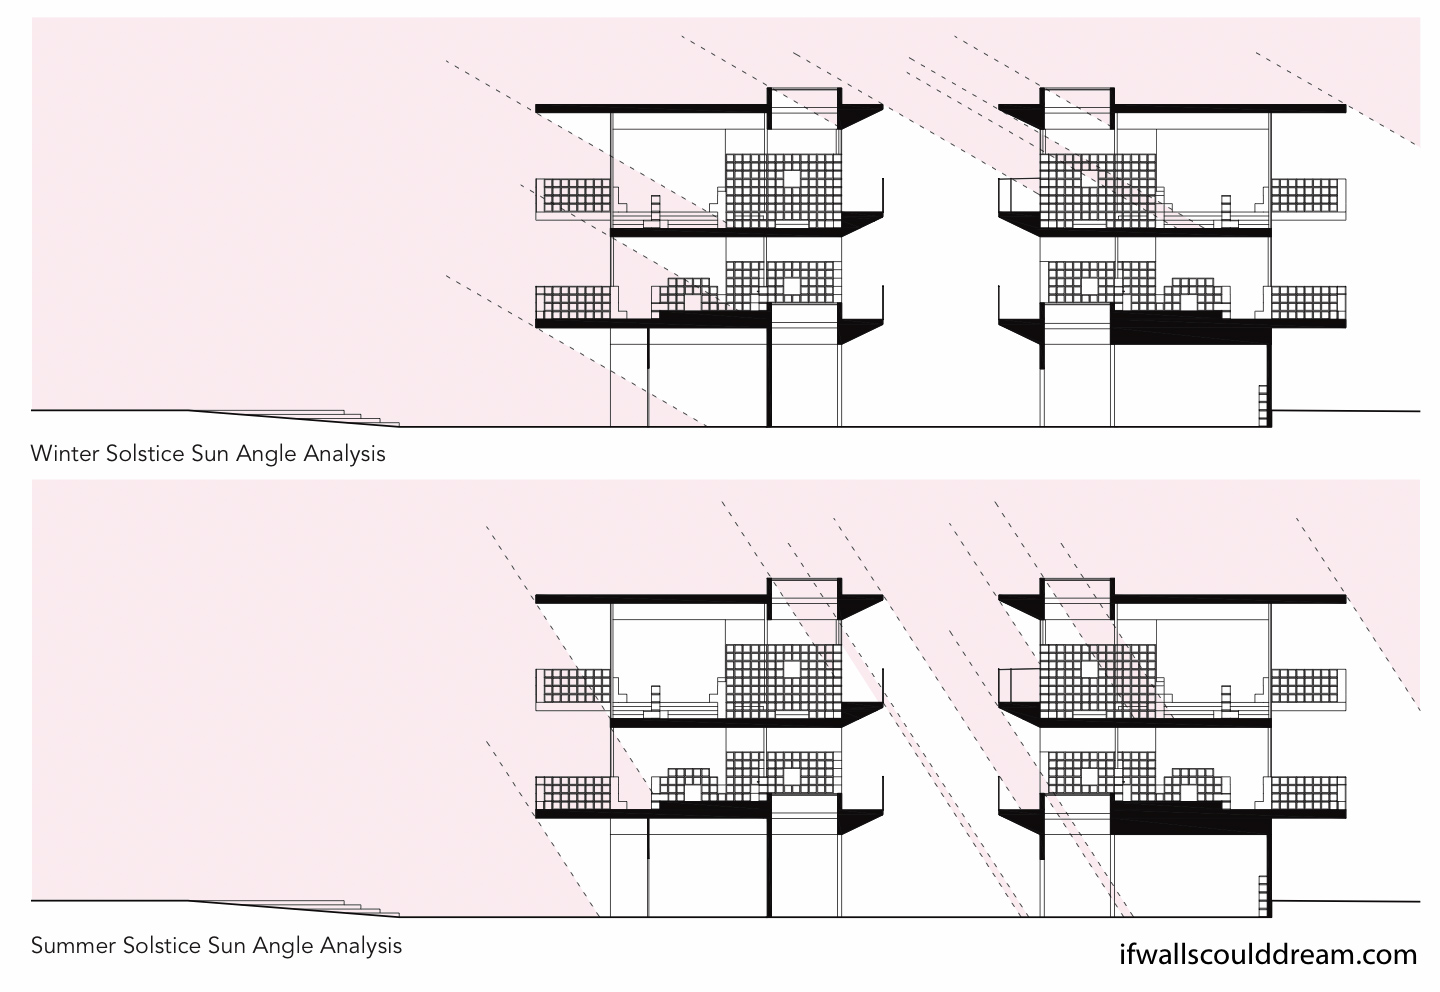
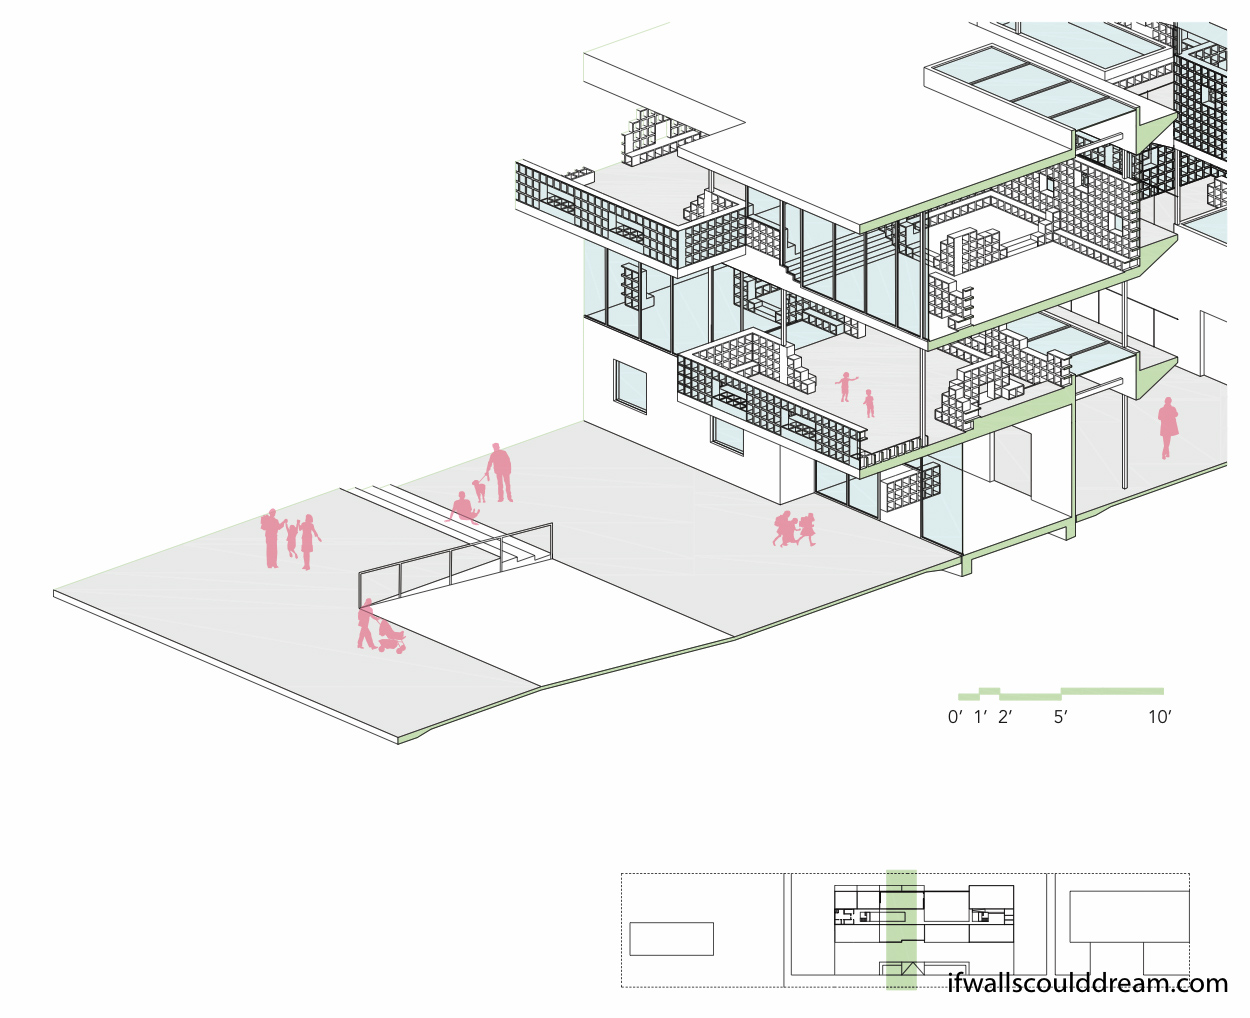
This project consists of master planning the development, and then zooming in to design in detail the Stewardship Center, where Foundations for Farming will train locals in sustainable agriculture techniques. The locals will then host trainings at the Stewardship Center for poor farmers throughout Zimbabwe. This project will serve as a hub for the resurgence of agriculture in Zimbabwe and foster relationships with nature, one’s community, oneself, and beyond. Some key design features of the project are indoor-outdoor spaces and views to the demonstration field. Our partner at Foundations for Farming said that their trainings are held half indoors and half outdoors so having a covered outdoor classroom is really important to them. I want people to feel a strong connection to nature when they visit this building.
The last quarter of my thesis was virtual because of the coronavirus pandemic. Although it was disappointing to not get to showcase our thesis projects at the annual Chumash show in person, the virtual format pushed me to expand my rendering skills and to publish a website about my thesis which you can visit here!
Real World Impact
Most college students pour their heart into their thesis project for a whole year, but it only lives on in their portfolio. I wanted to have a greater impact with my thesis. Because my project is partnered with Journeyman International and has real clients in Zimbabwe, when I finished my design, I handed it back to them. My design has two major benefits to the non-profits. First, the renderings and plans will help them secure funding for the project. Second, the design will serve as a starting point for the local architect once the project is ready to be built. I produced a design book and preliminary construction documents for the project. The local architect might change my design a lot or only a little, but it provides a strong and well-researched place for them to start. I am so excited to see where this project goes and hope to be able to visit it in Zimbabwe someday!
If walls could dream… they’d dream of building an agricultural training center in Zimbabwe!

Humanitarian Thesis Trip to Rwanda
I am volunteering with Journeyman International (JI) to design a humanitarian agricultural training center for my thesis and I got to visit JI in Rwanda over winter break. Two other student volunteers from Cal Poly and one JI employee from San Luis Obispo went on the trip with me. It was a great experience to meet people I’m working with remotely, see projects that JI and has completed, and get a taste of African culture.
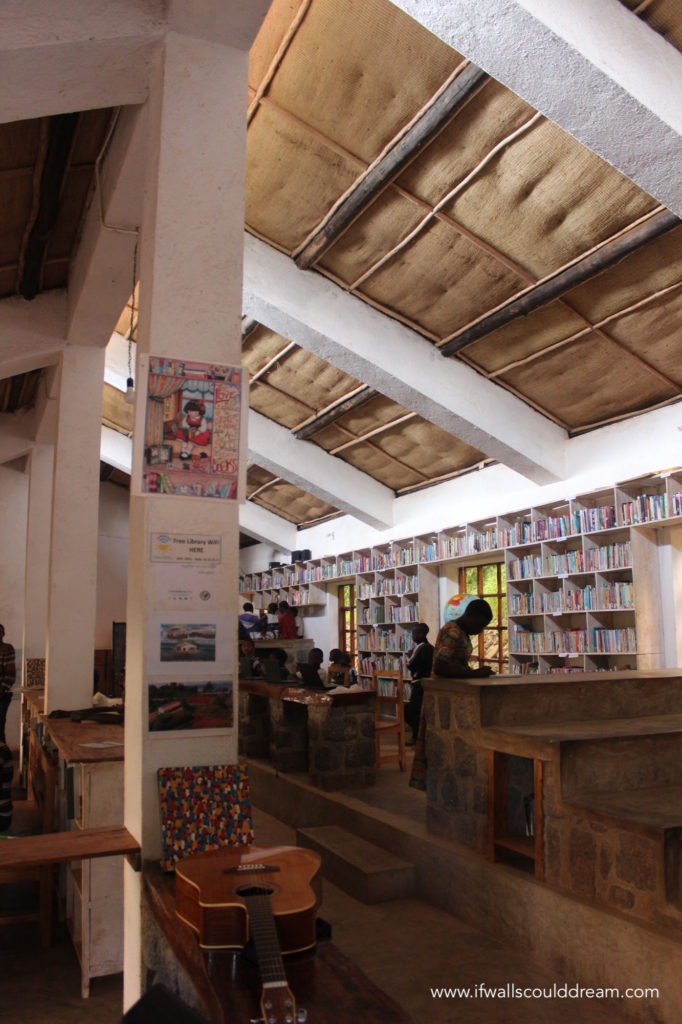
My favorite project we visited was the Sunzu library, pictured above, which Journeyman International finished a few years ago. The library has a lot of natural light from the clerestory windows and built-in benches for the kids to sit on and read or study. It was also inspiring how the building brought the community together and how proud they were of it. I hope that my thesis building will also help its local community come together and feel empowered by the design.

Even though we weren’t able to visit my site in Zimbabwe, this trip was so helpful for my thesis. I know that African cultures are very diverse and shouldn’t be generalized, but Zimbabwean culture is a lot closer to Rwandan culture than anything else I’ve experienced. This trip gave me a deeper understanding of their sense of time and their use of space and materials.
If walls could dream… they’d dream of empowering local communities through design!

Overlapping Transparency
This quarter, I got to design a mixed use homeless housing project in Los Angeles. This project is based on the housing first model of the Skid Row Housing Trust (SRHT) in Los Angeles. We got to tour SRHT projects and get a feel for the Skid Row and Arts District neighborhoods of LA.
The housing first model seeks to end homelessness by giving people houses. It’s that easy. No strings attached to employment or substance abuse, you give them a house and that gives them the solid foundation to rebuild their life.
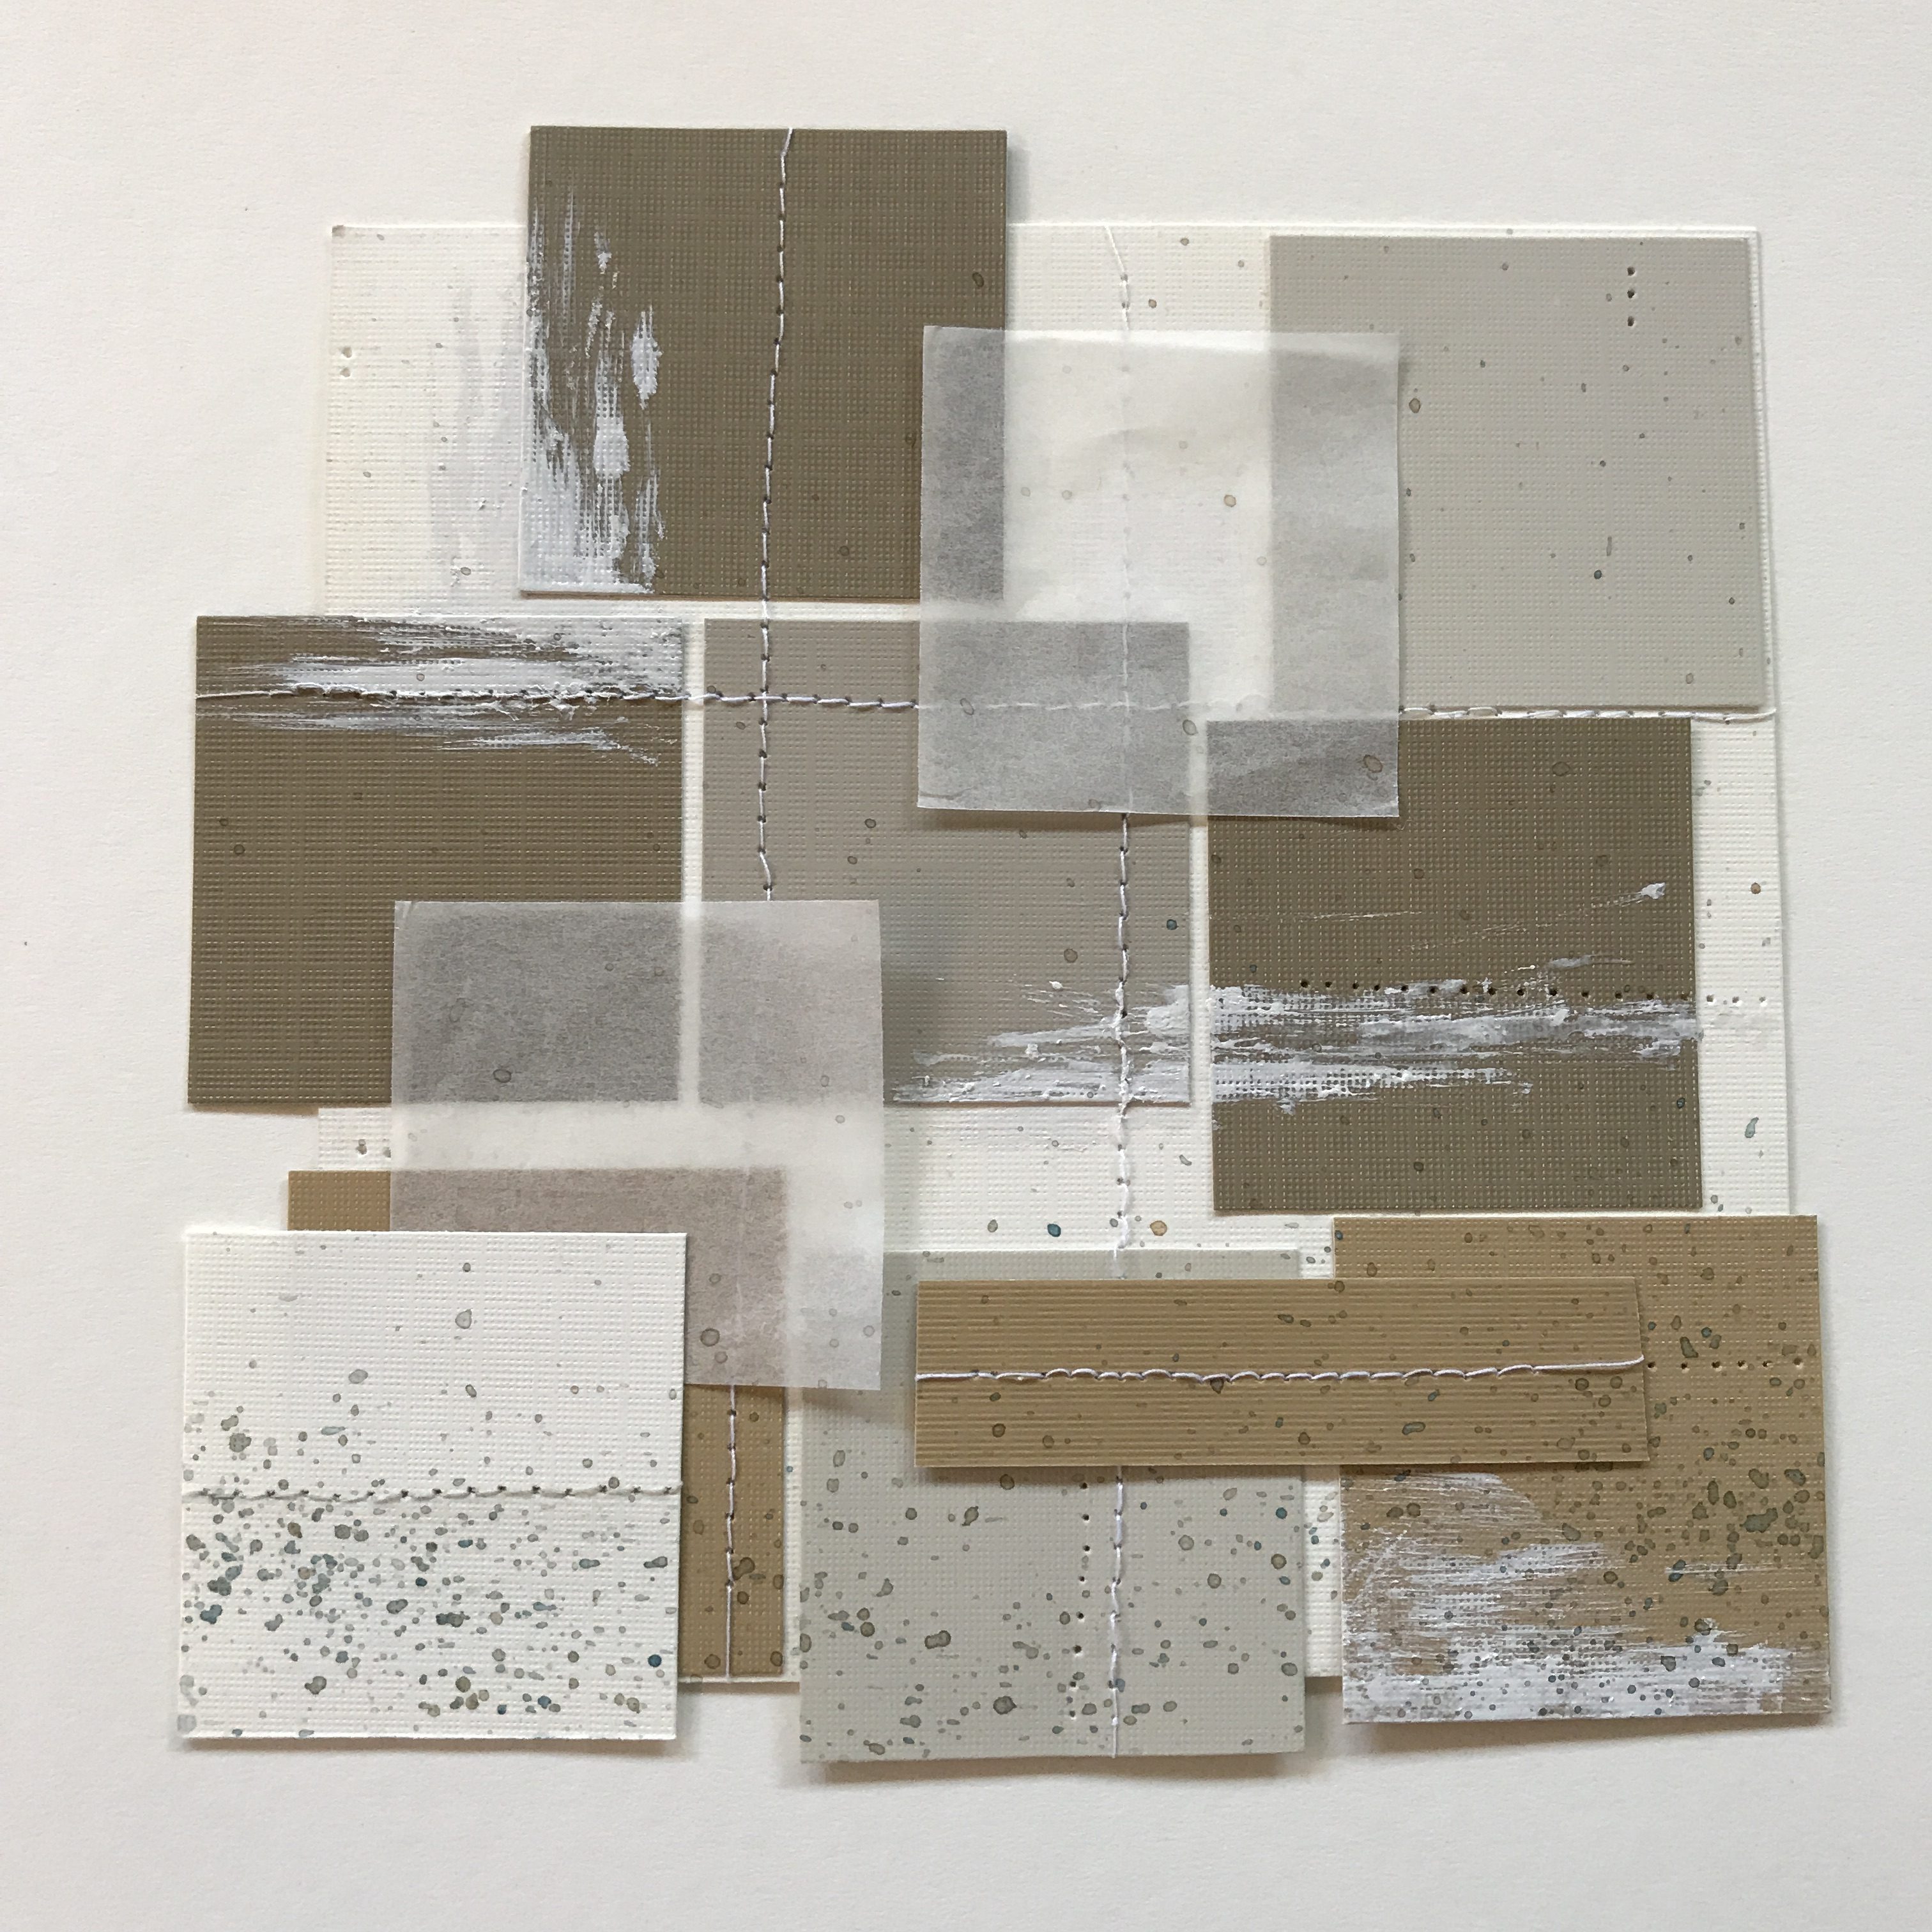
We started the quarter out by making collages and I created this piece based on the idea of stitching together various different programs to see how they can overlap and work together to create something new and better than being on their own.
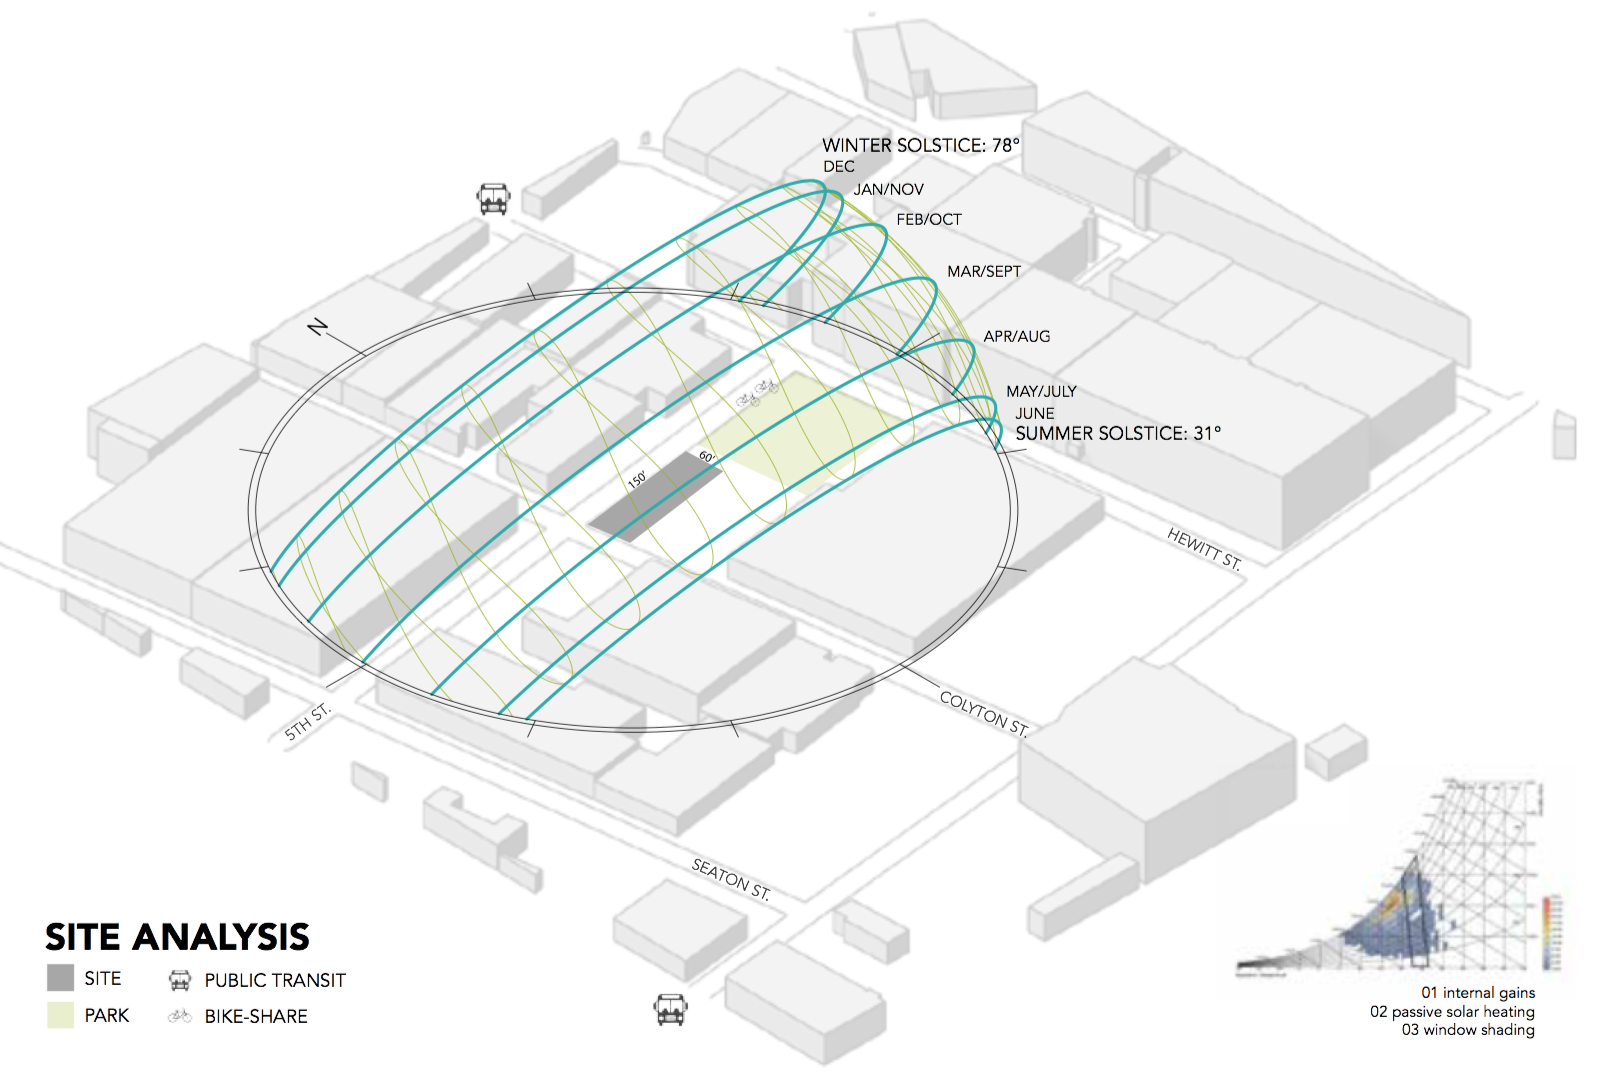
Our site, in the Arts District of Los Angeles, has access to public transportation, great southern sun exposure, and a park next door. When we visited, there were lots of great artist spaces, coffee shops, and restaurants in this area.
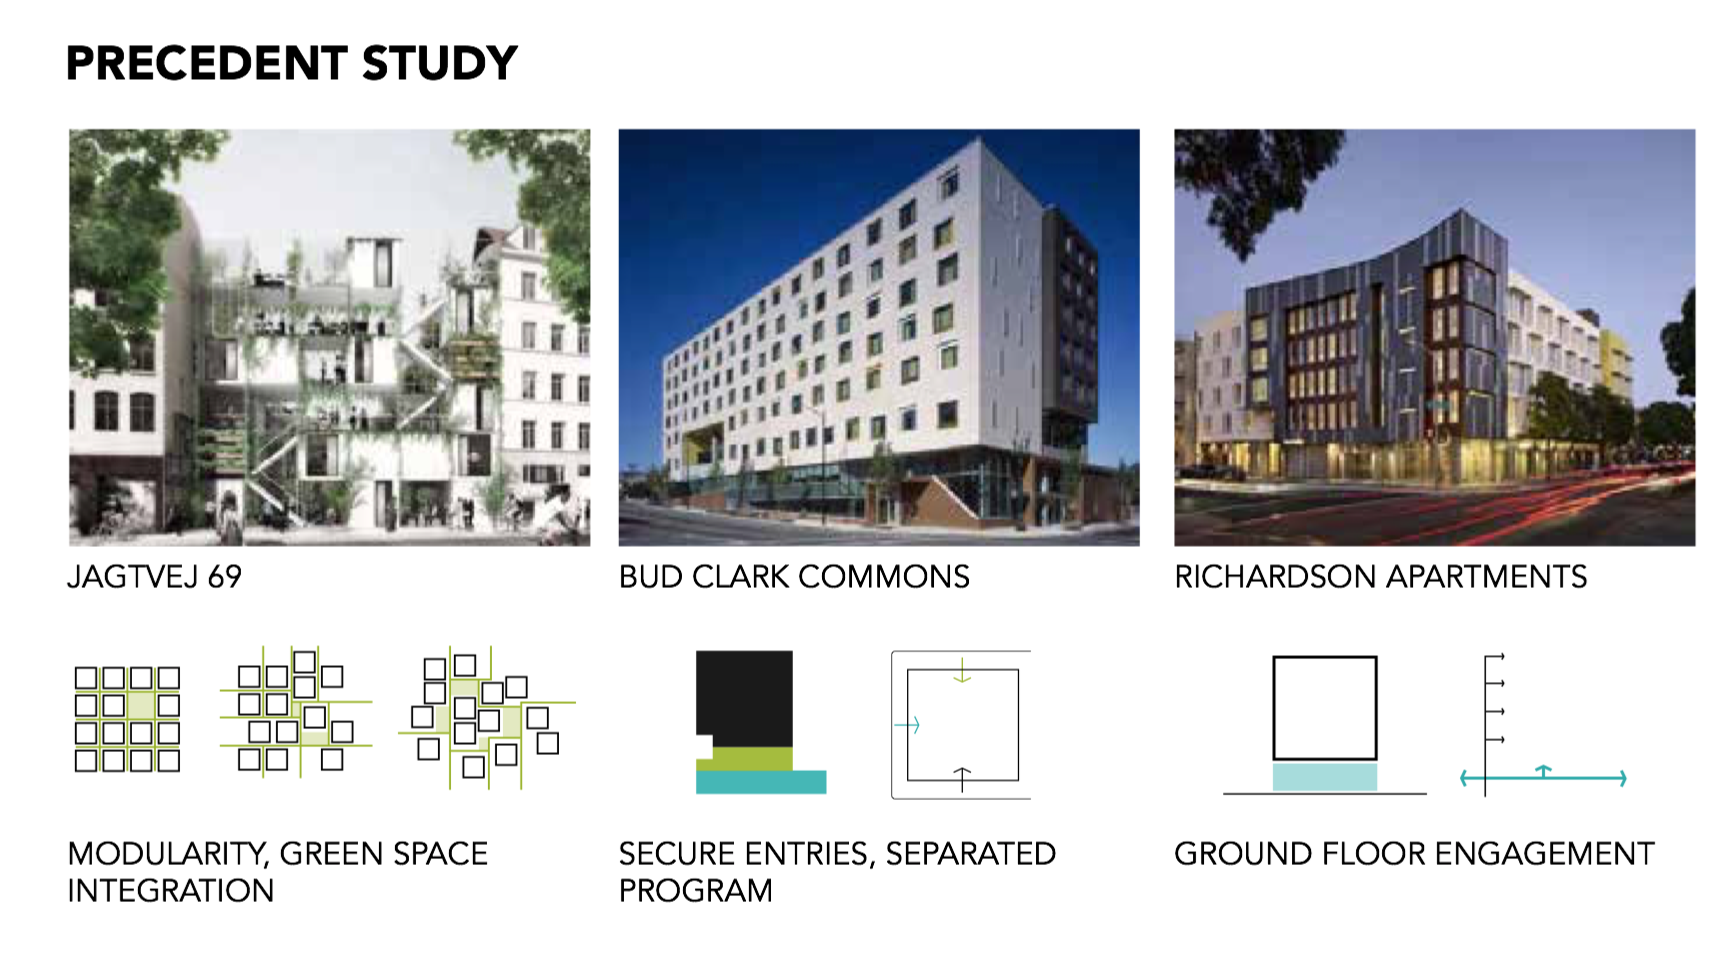
We studied precedents of mixed use homeless housing to see how other architects integrated green space, provided security, and public engagement.
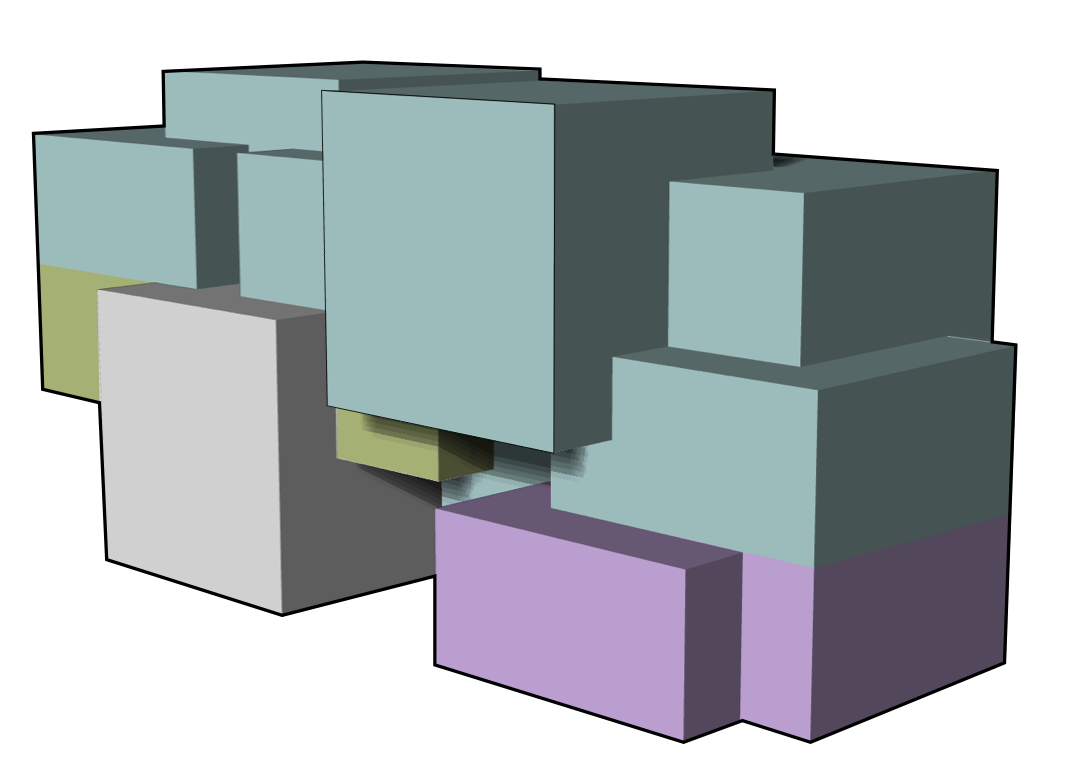
I created the massing for my building using overlapping cubes. In the diagram below, the grey is the restaurant, purple is the ceramics studio, green is the health clinic, and blue is the apartments. I like how this massing creates covered areas on the ground floor and patios on the upper floors.
In addition to a massing scheme, the idea of overlapping plays out in the program. This building is all about what happens when you combine different programs in one building. How can you build symbiotic relationships between seemingly different groups of people and functions within a building?
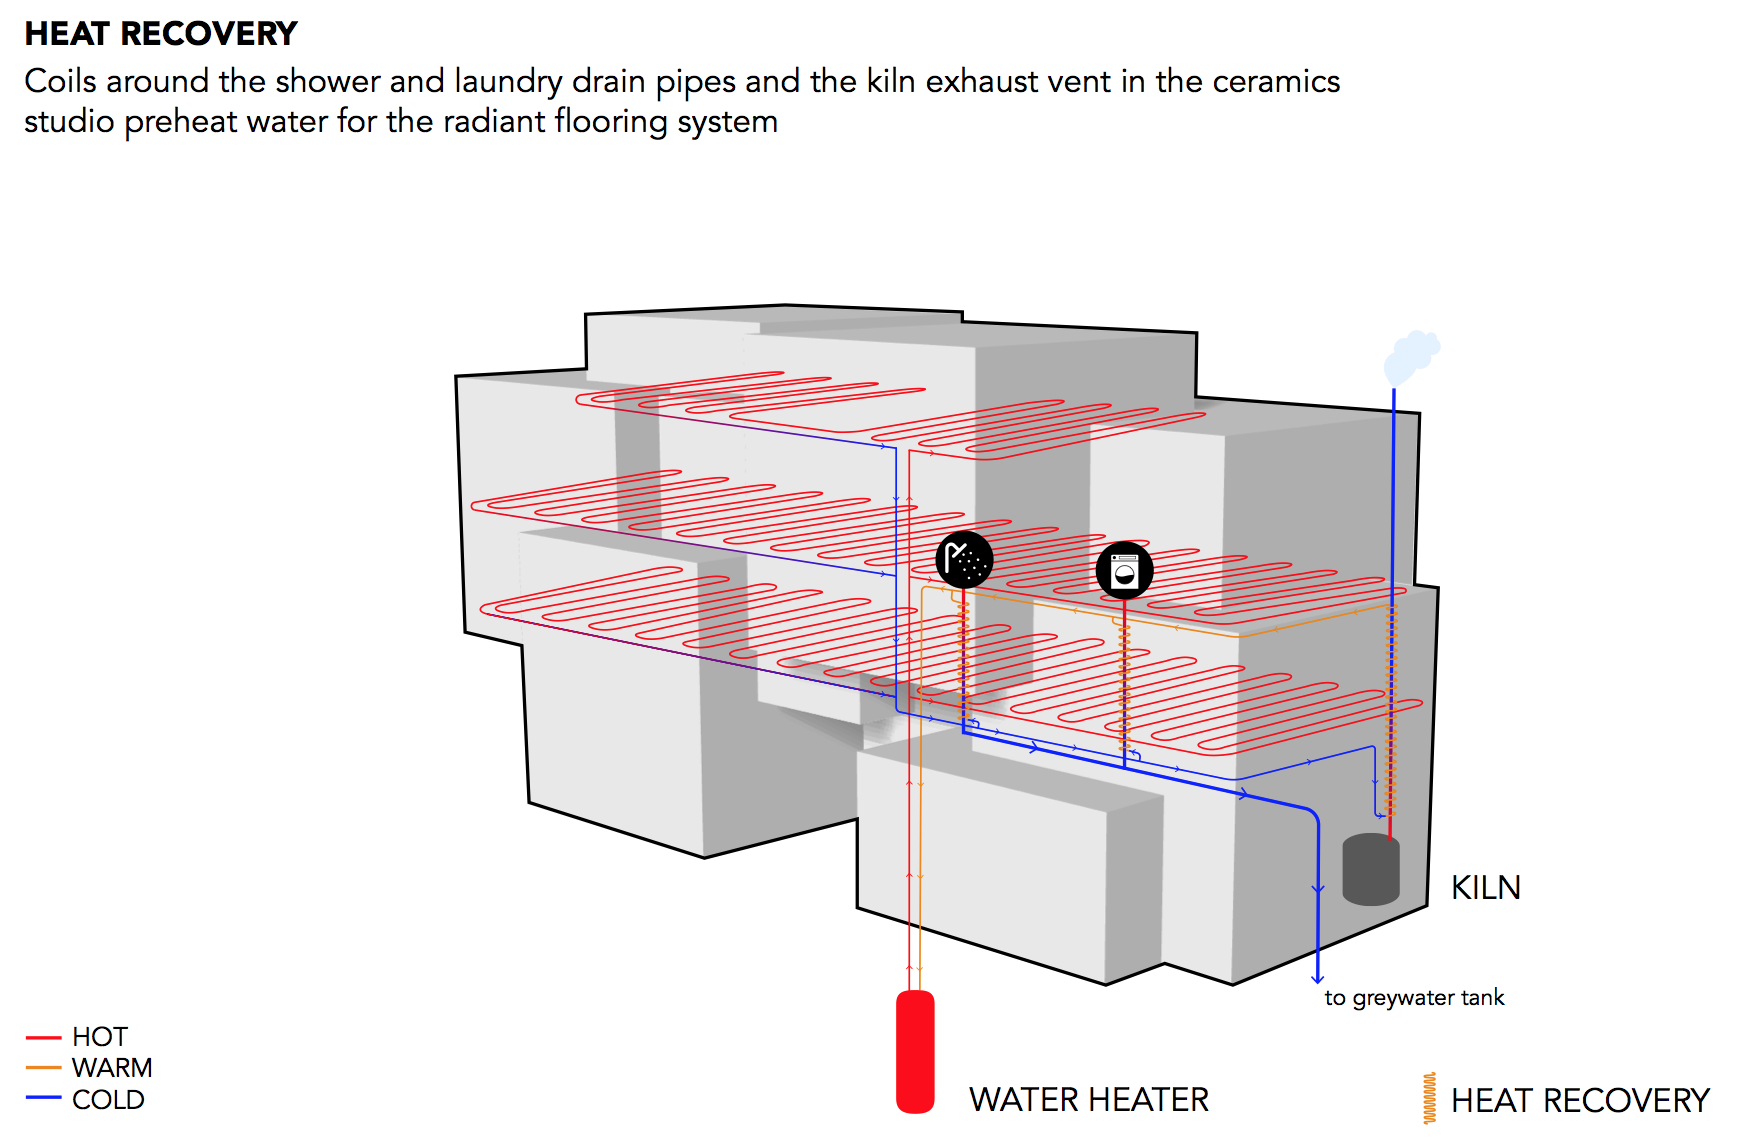
The building design includes heat recovery, using waste heat from the ceramics kiln to provide radiant floor heating in the apartments.
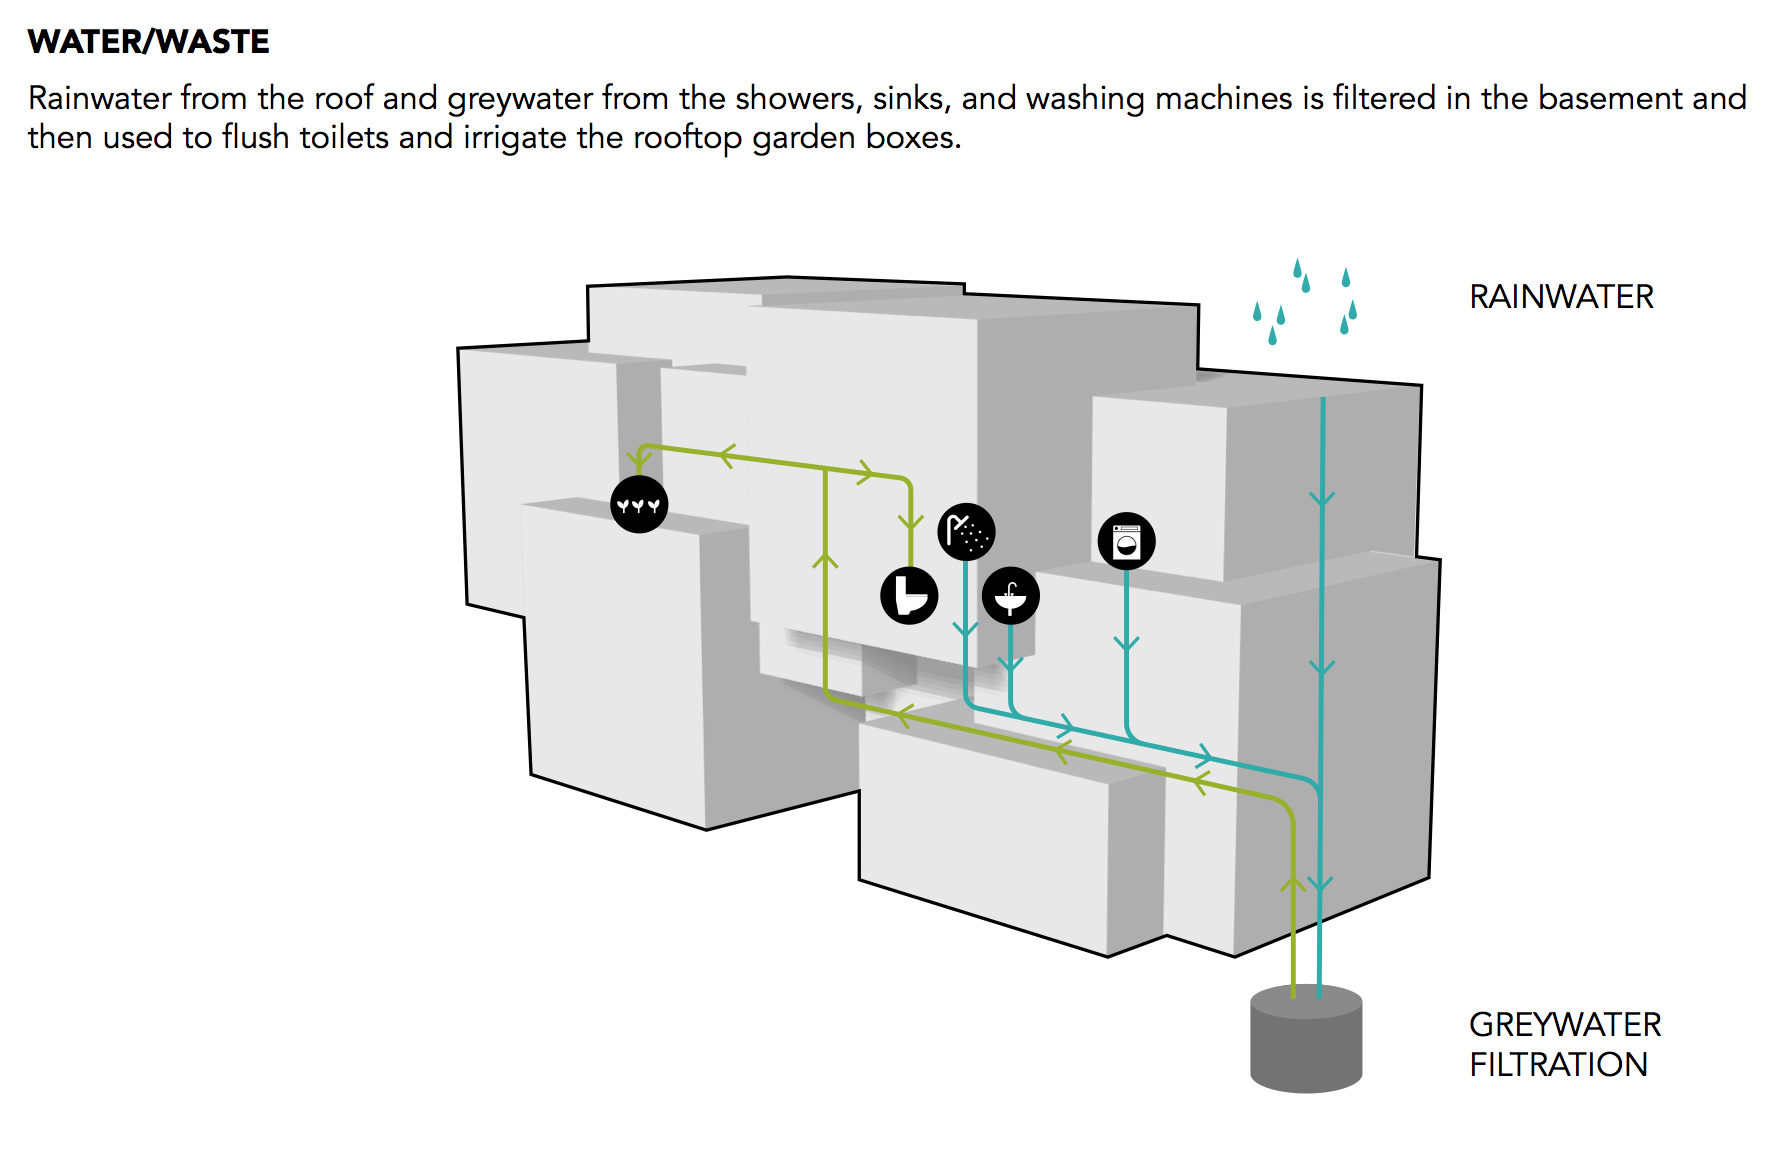
The building also has a water recycling system. Rainwater from the roof and grey water from the showers, sinks, and washing machines, are filtered and reused to flush toilets and irrigate planters.
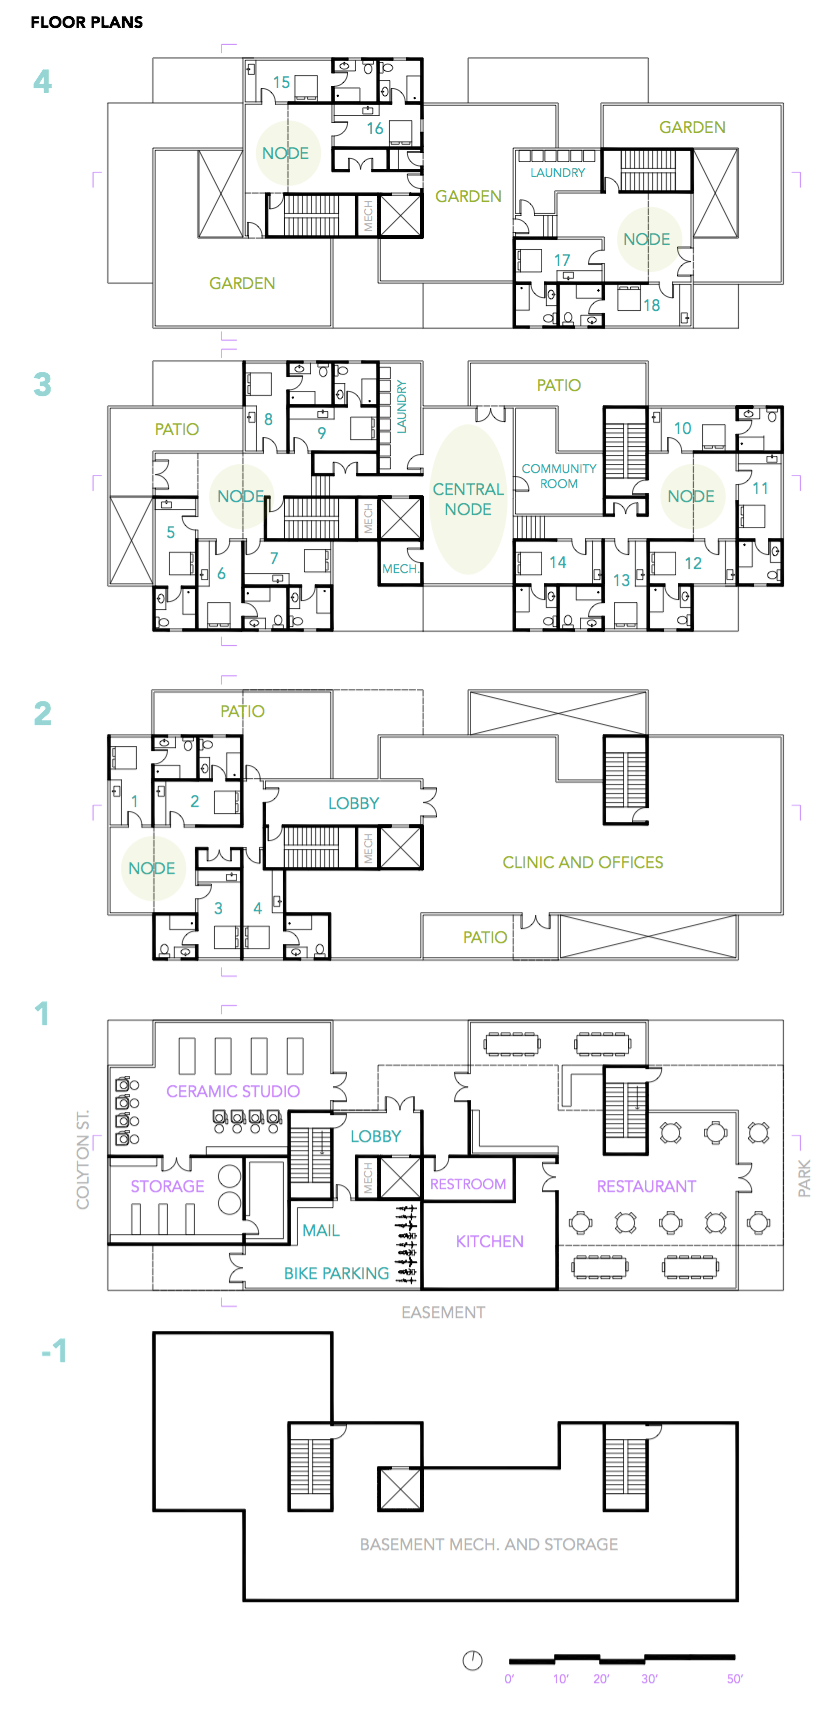
The floor plan for the building, below, shows the different programs in the building. The apartments on the upper floors each open on to a common “node” space that can be used like a shared living room. It encourages residents to get to know their neighbors, have dinner parties, and build community.
The ceramics studio on the first floor helps to connect the Art District community with the formerly homeless residents through art therapy and community events. My vision for this space is that they would have classes where community members could learn alongside residents. They could have an annual fundraising dinner and auction off pieces made by the residents.
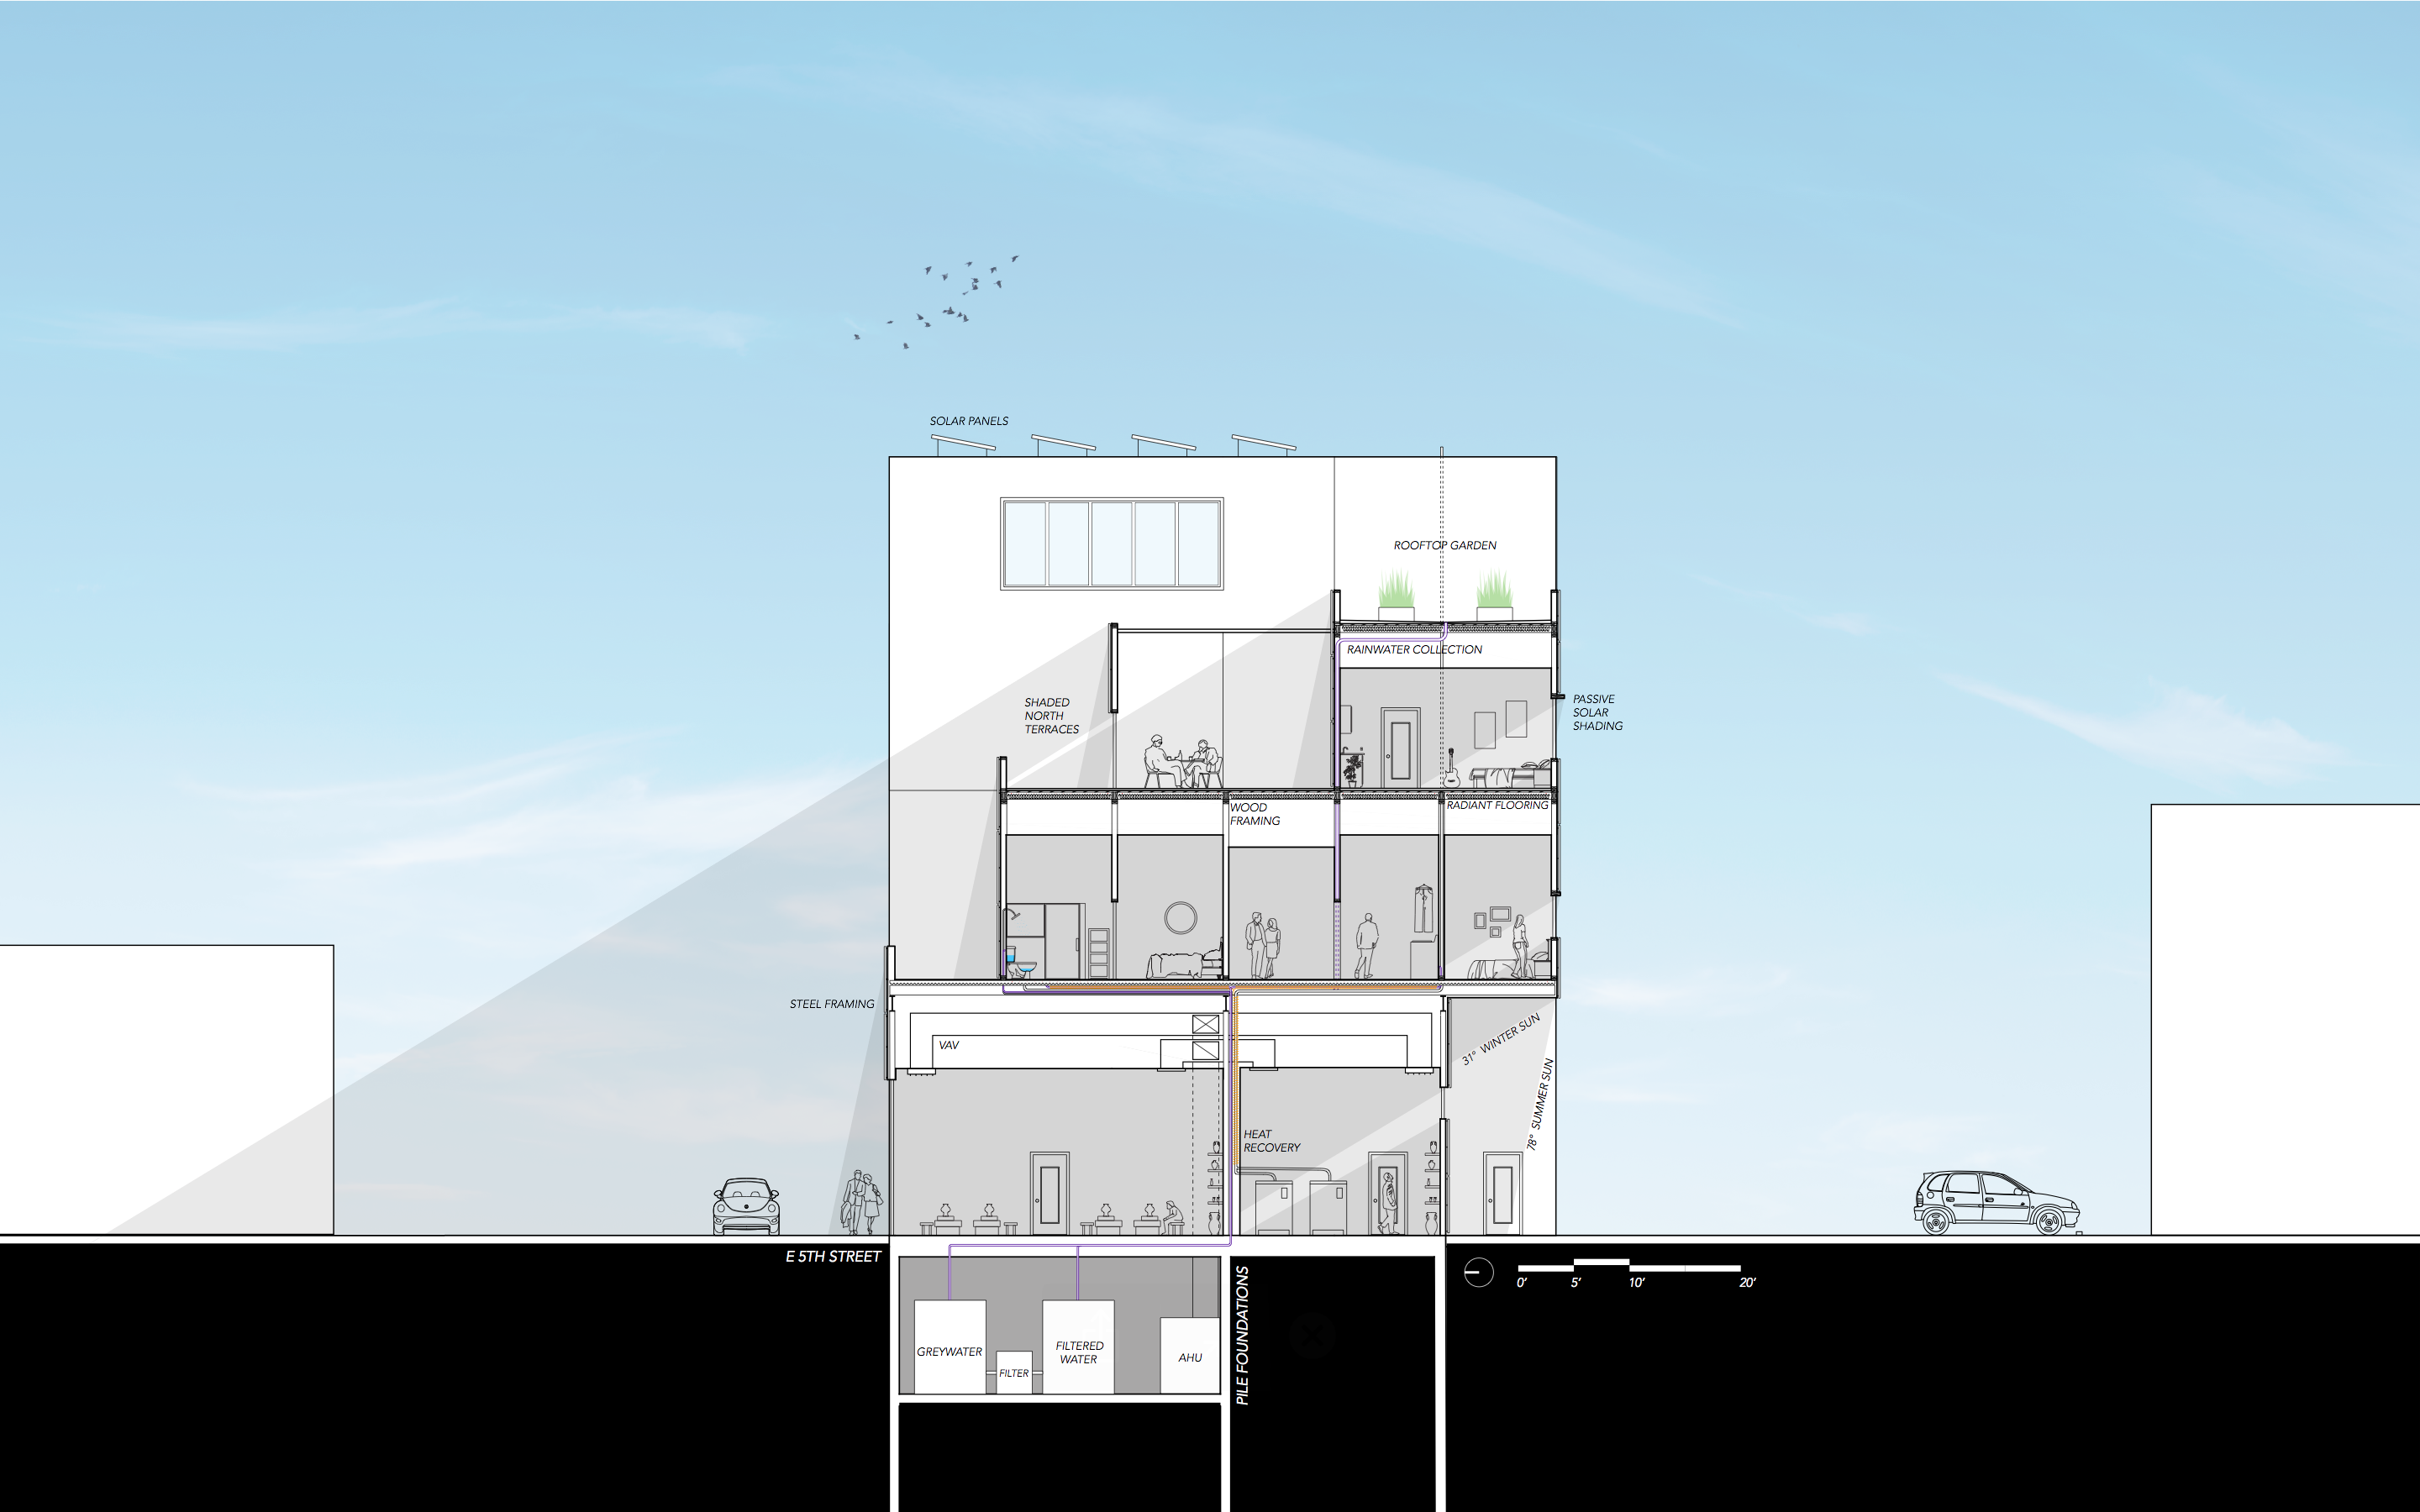
The building section, below, shows the integration of the mechanical systems as well as the passive shading and solar panels on the roof.
If walls could dream… they’d dream of giving homeless people homes.

I MET PETER ZUMTHOR
Some teenagers fangirl over celebrities or musicians. Me? I fangirl over architects.
Peter Zumthor, the Pritzker Prize winning architect of Saint Benedict Chapel, Kunsthaus Bregenz, Bruder Klaus Field Chapel, and Therme Vals, to name a few, has been one of my favorite architects for a while.

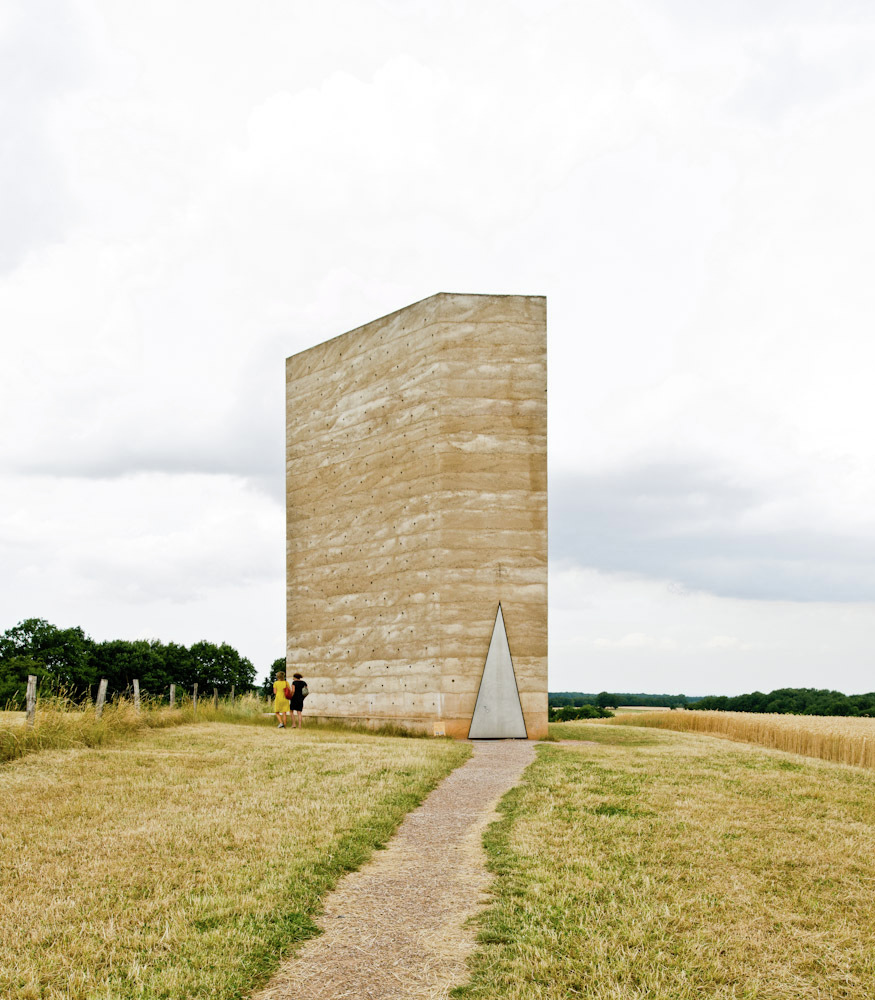
Photos above from ArchDaily.
I had the incredible opportunity to attend a lecture by Peter Zumthor at LACMA about his firm’s proposed addition to the art museum. It was fascinating to hear how his vision for the lighting and materiality really drove the design process. After the lecture, my friends and I got to meet him and get a picture with him! It was a dream come true!
If walls could dream… they’d dream of meeting their favorite architects!

Oakland Library
The fall quarter of my third year, I decided to take a studio that focuses on massing and designing in section. Our program was to design a library in Oakland, California. After the Less Shape, More Geometry warm-up project, we took a similar approach to the massing of our library project, using simple shapes to create more complex, geometric, site-responsive building masses.
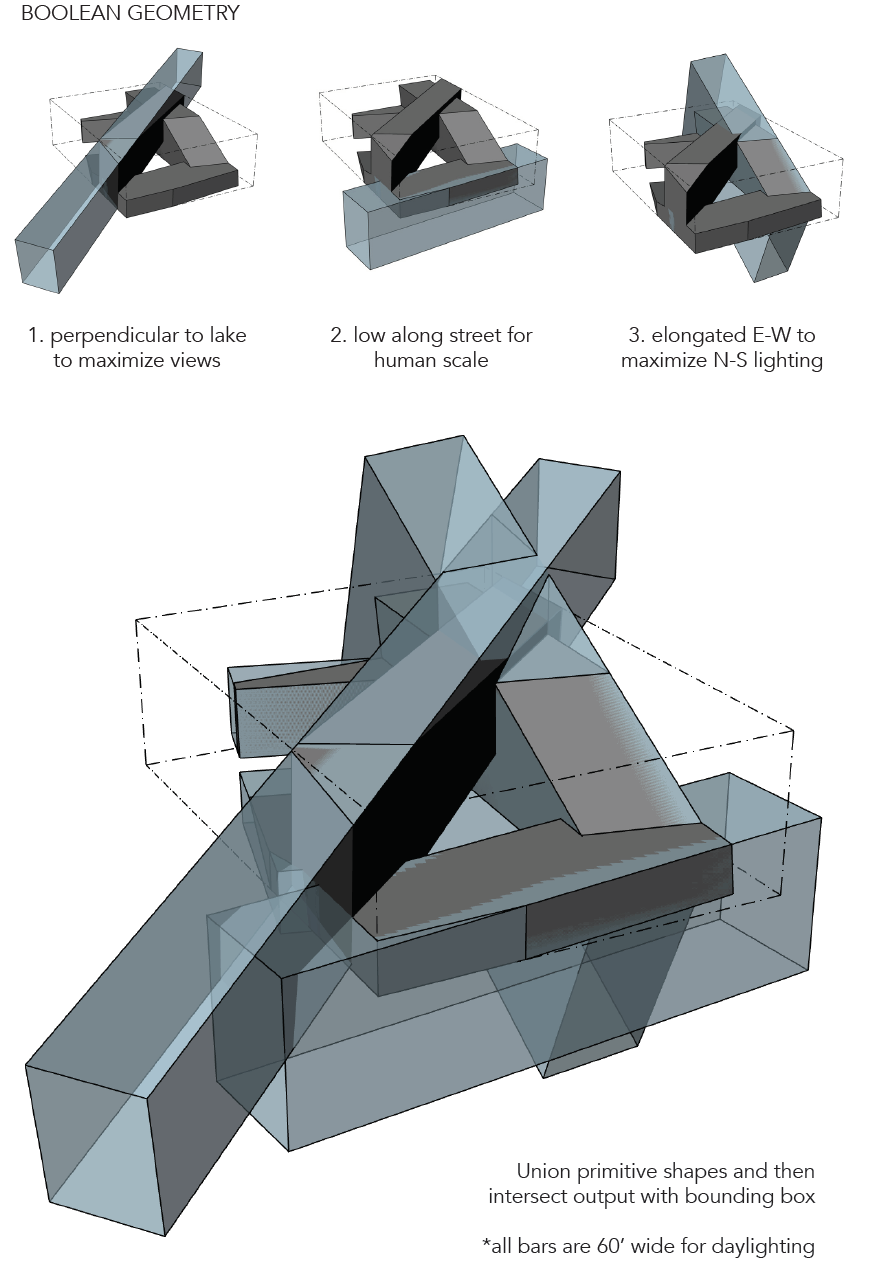
I chose this form because it responds to the views of Lake Merritt on the site as well as incorporating the “bridge” idea from my Less Shape, More Geometry project.
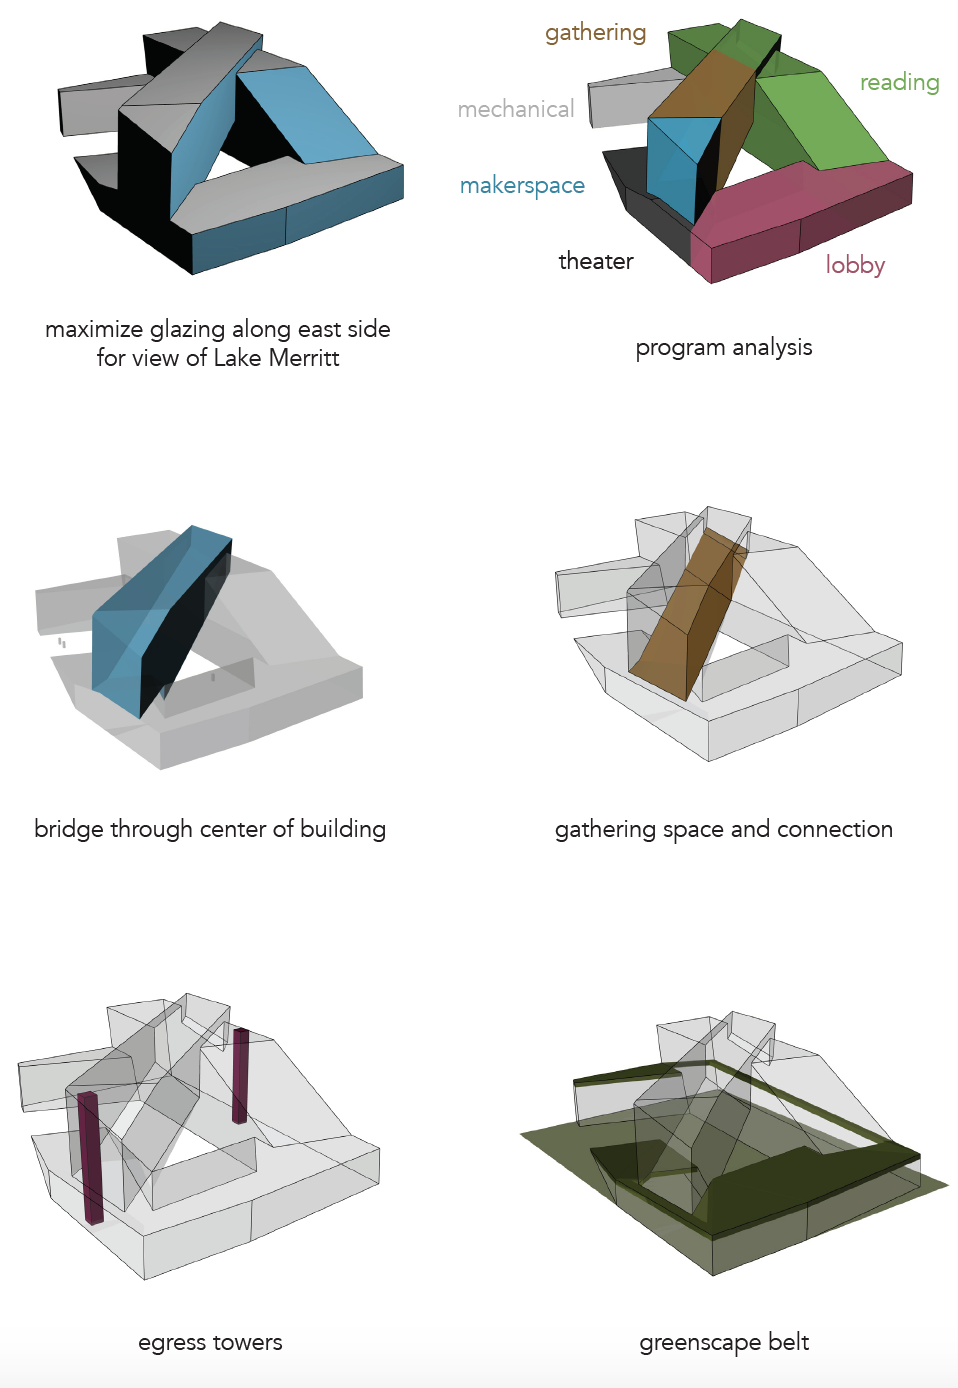
The form seems to settle in to the site, higher on the corners where there are taller buildings and lower on the front corner where there is a small, historic building and a park across the street with Lake Merritt just past the park.

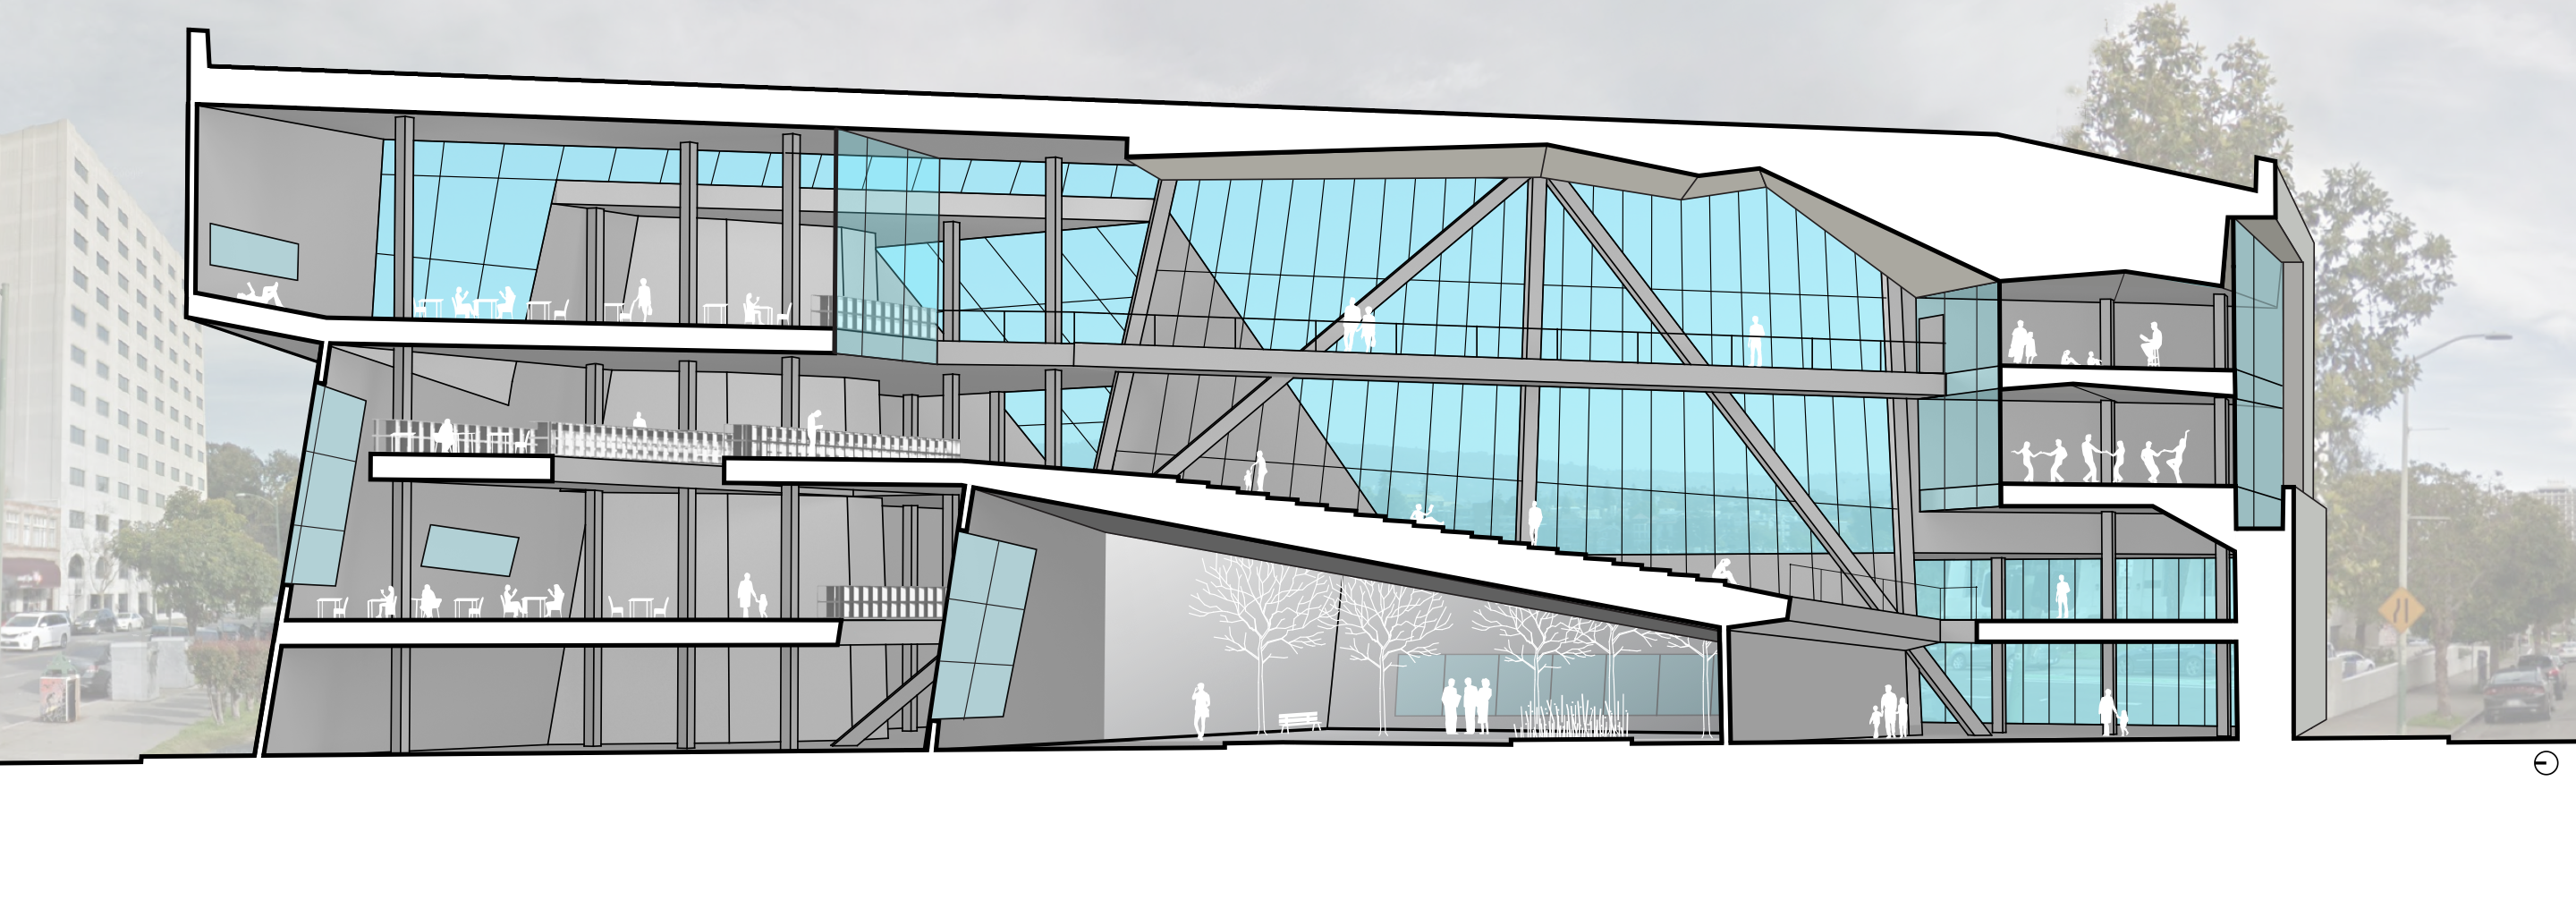
Another important quality of the library is the lighting and mood of different rooms. The section drawing below shows a variety of reading rooms with different lighting qualities.
The finished version of the section drawing, below, shows the bridge space in the center of the building, an open space for community events or casual interactions. The bridge connects the book stacks on the left side of the building with the community arts spaces on the right side of the building. All of the spaces have expansive views of Lake Merritt and plenty of glass.
If walls could dream… they’d dream of site-responsive building massing.

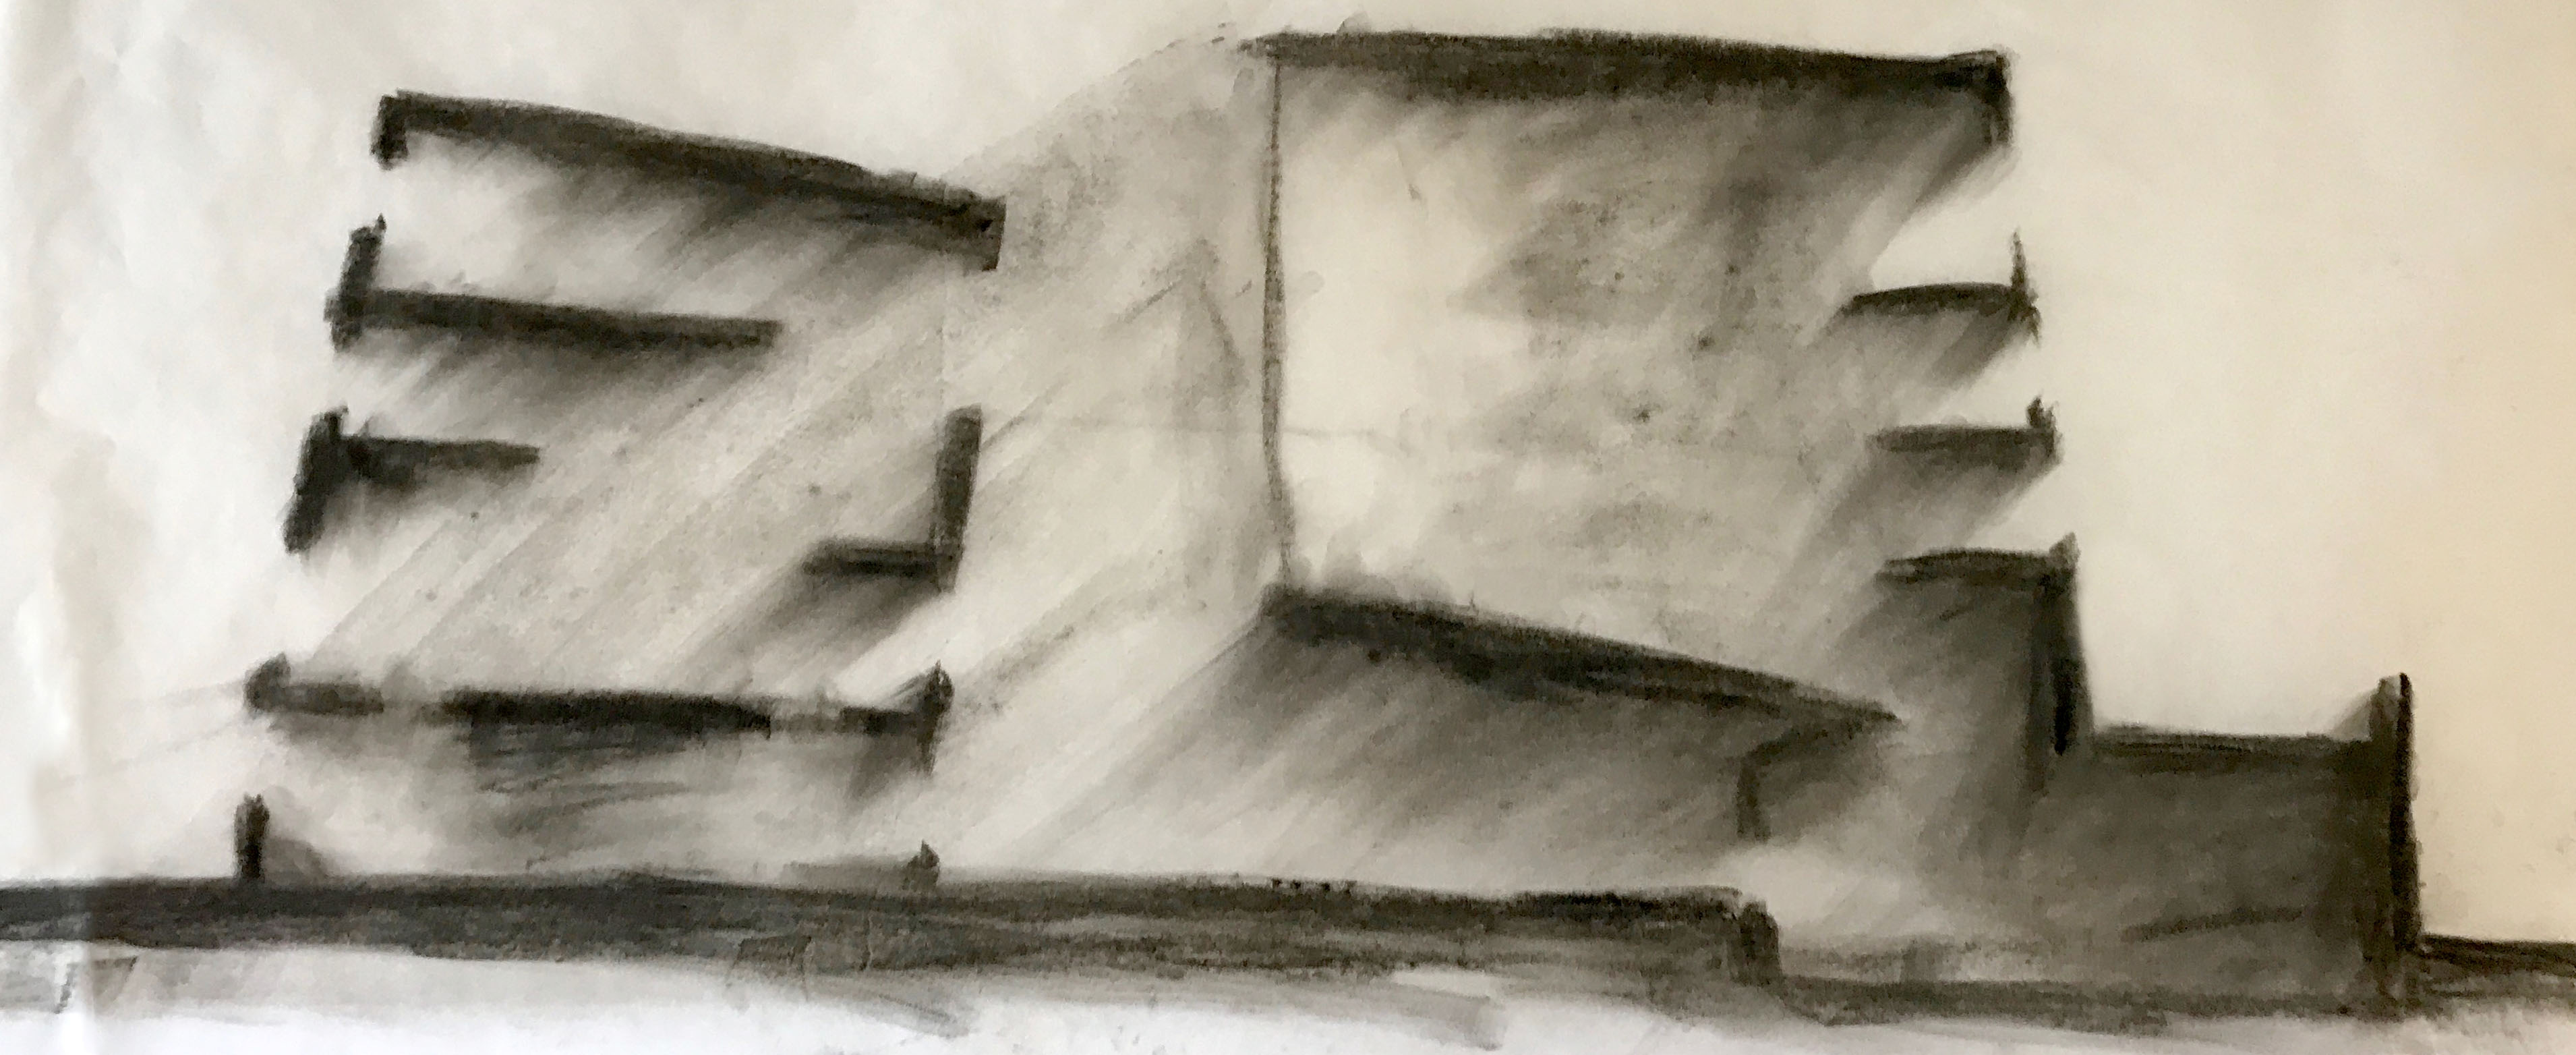
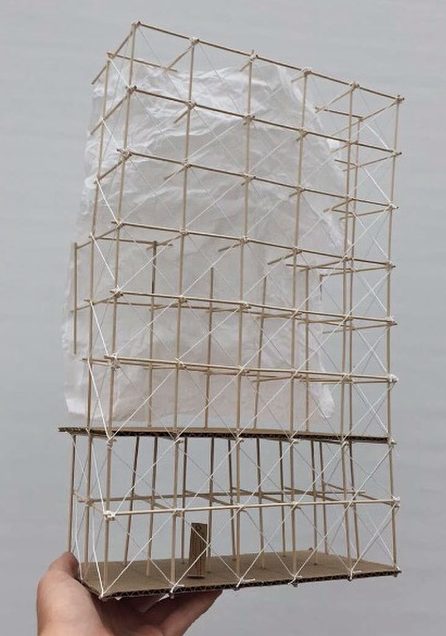
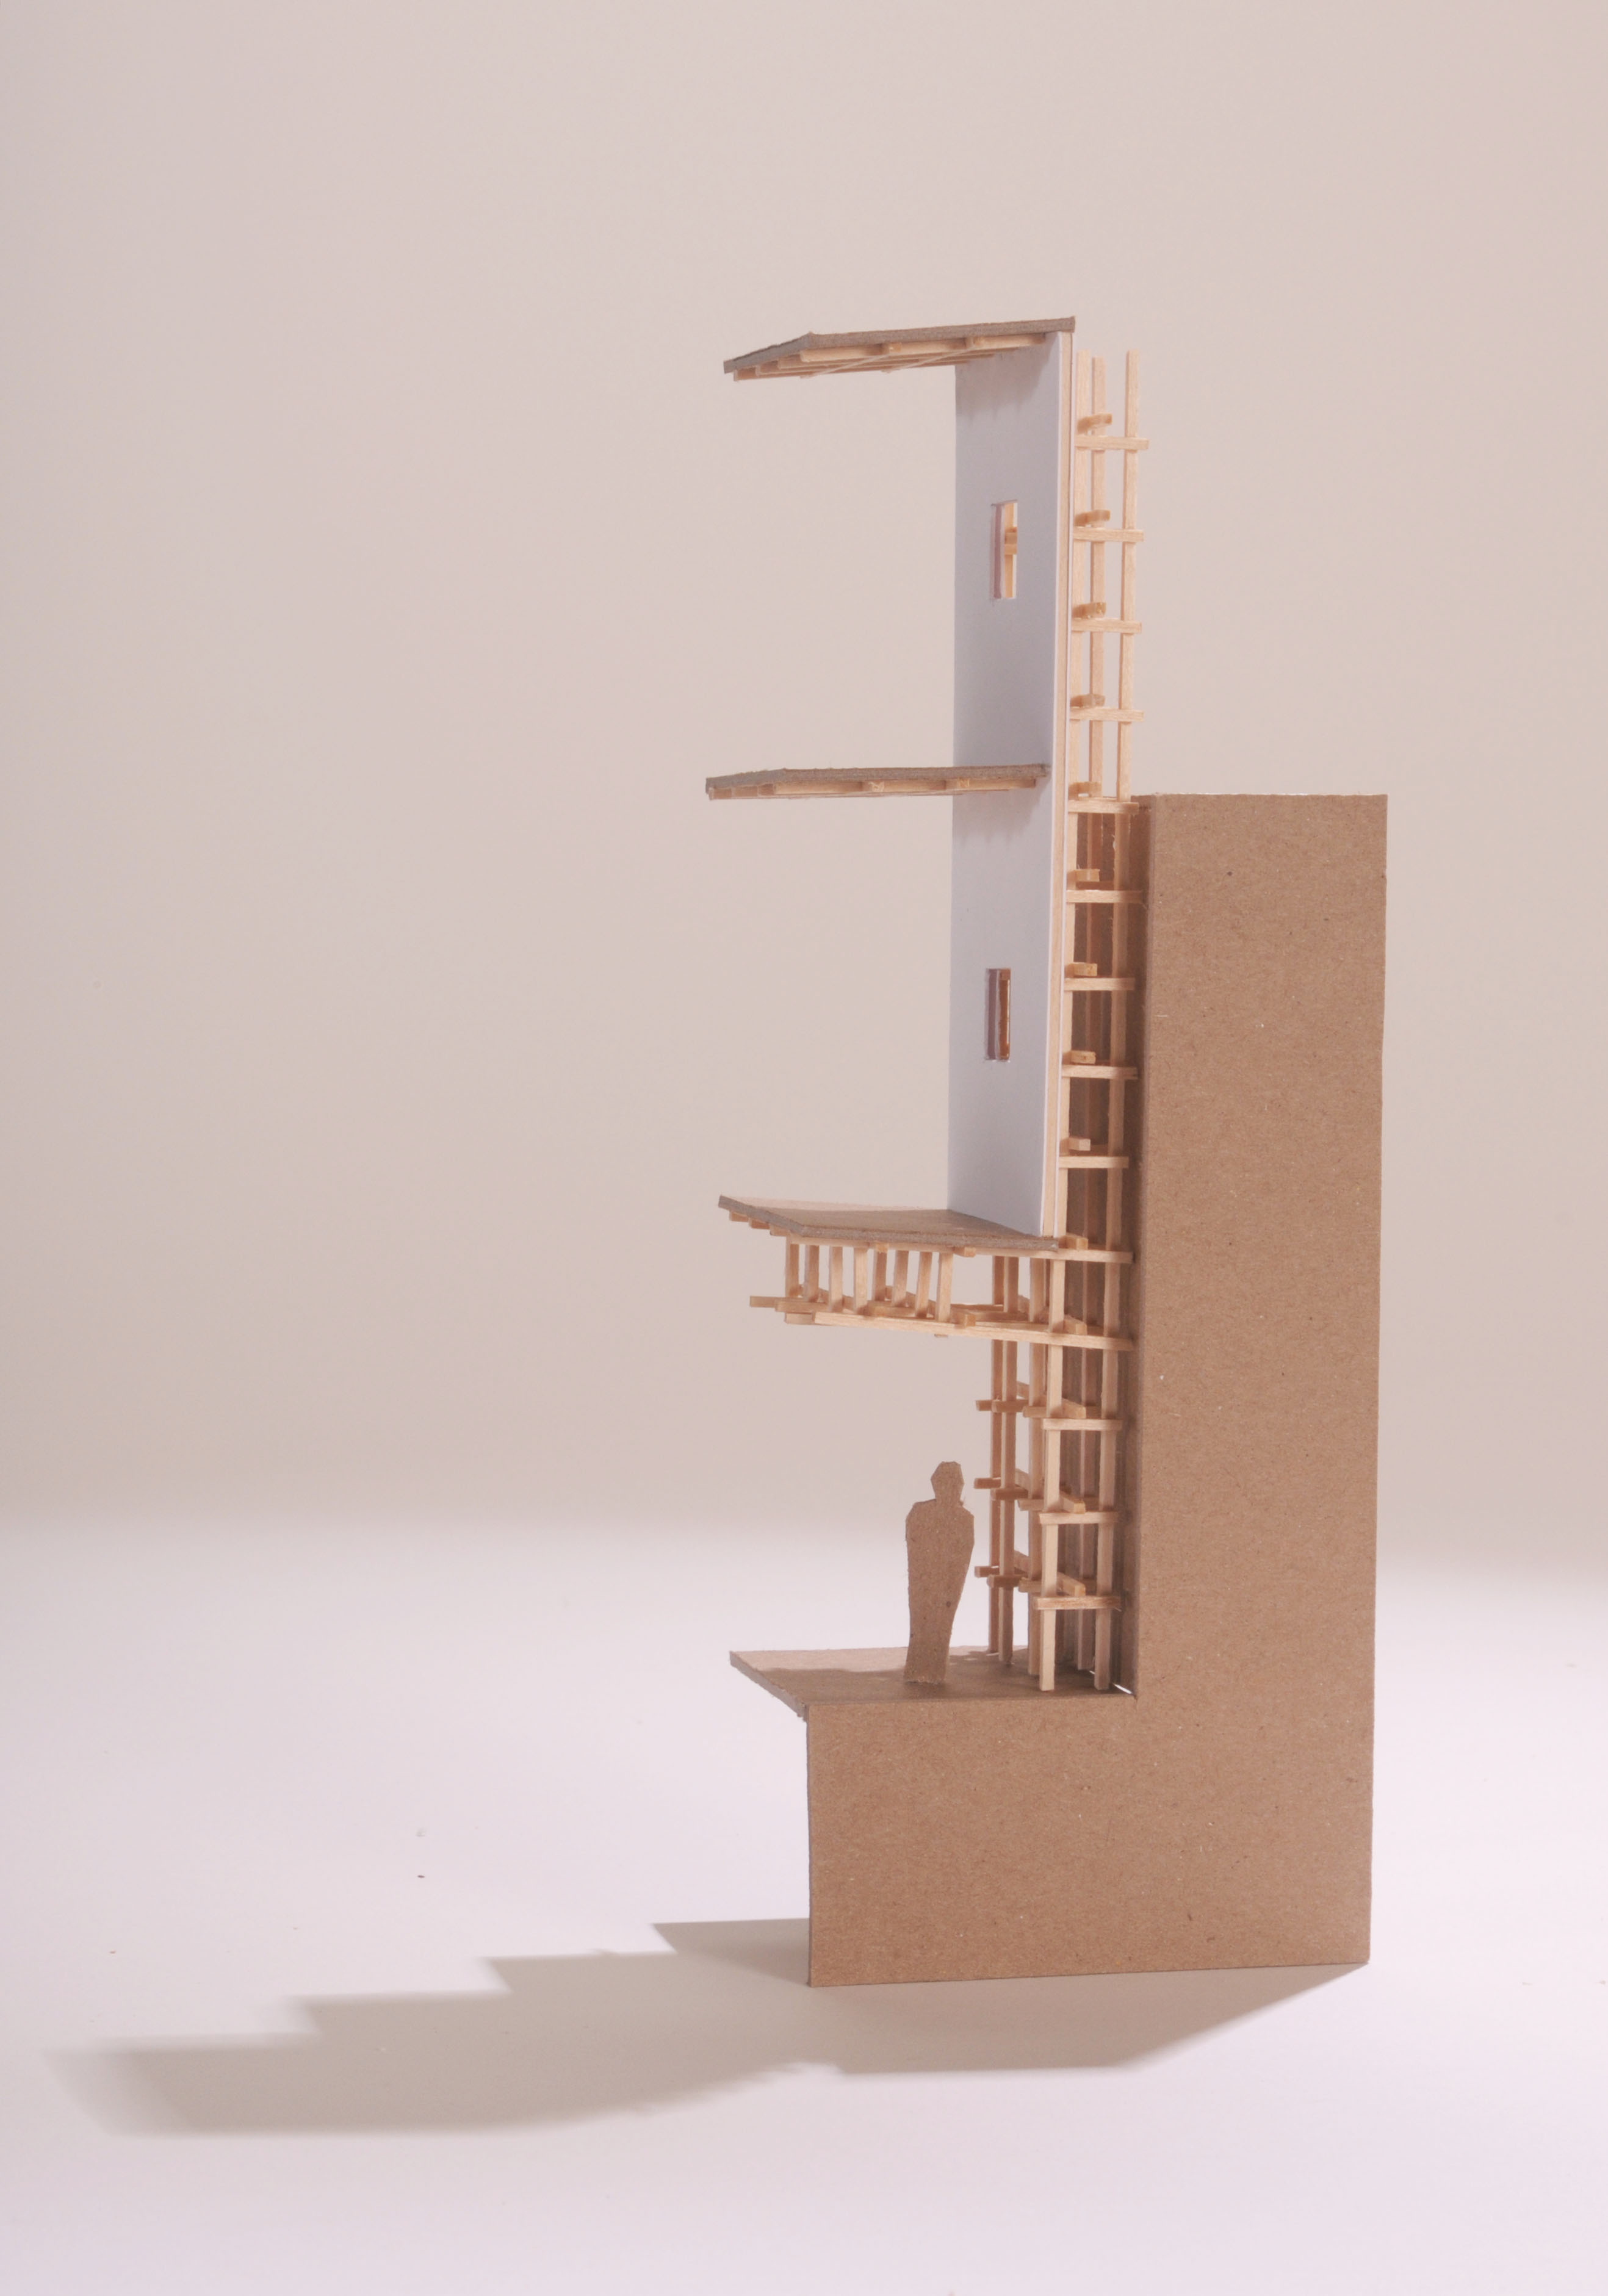
Less Shape, More Geometry
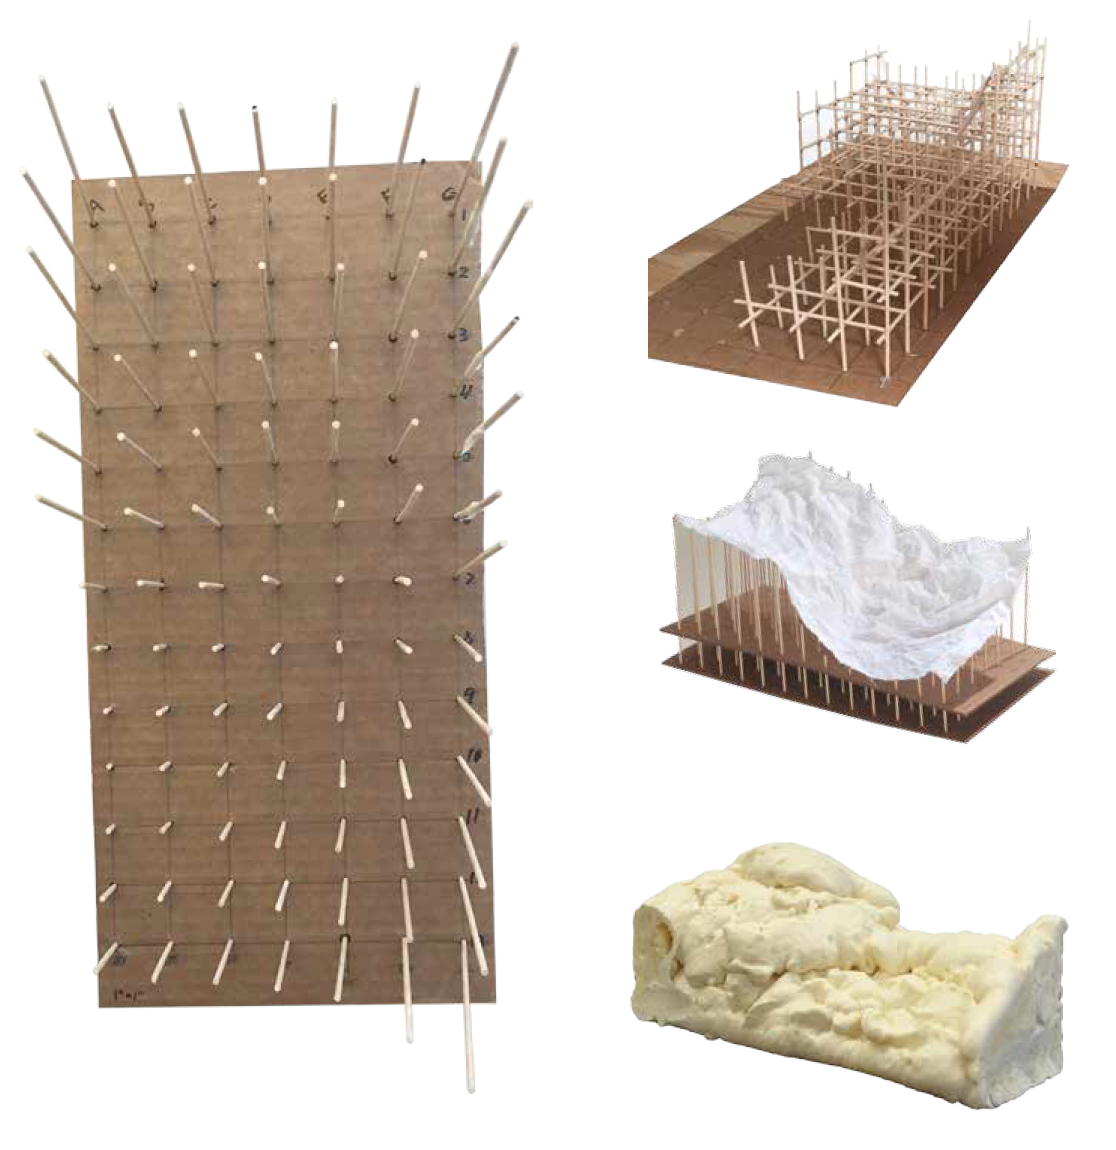
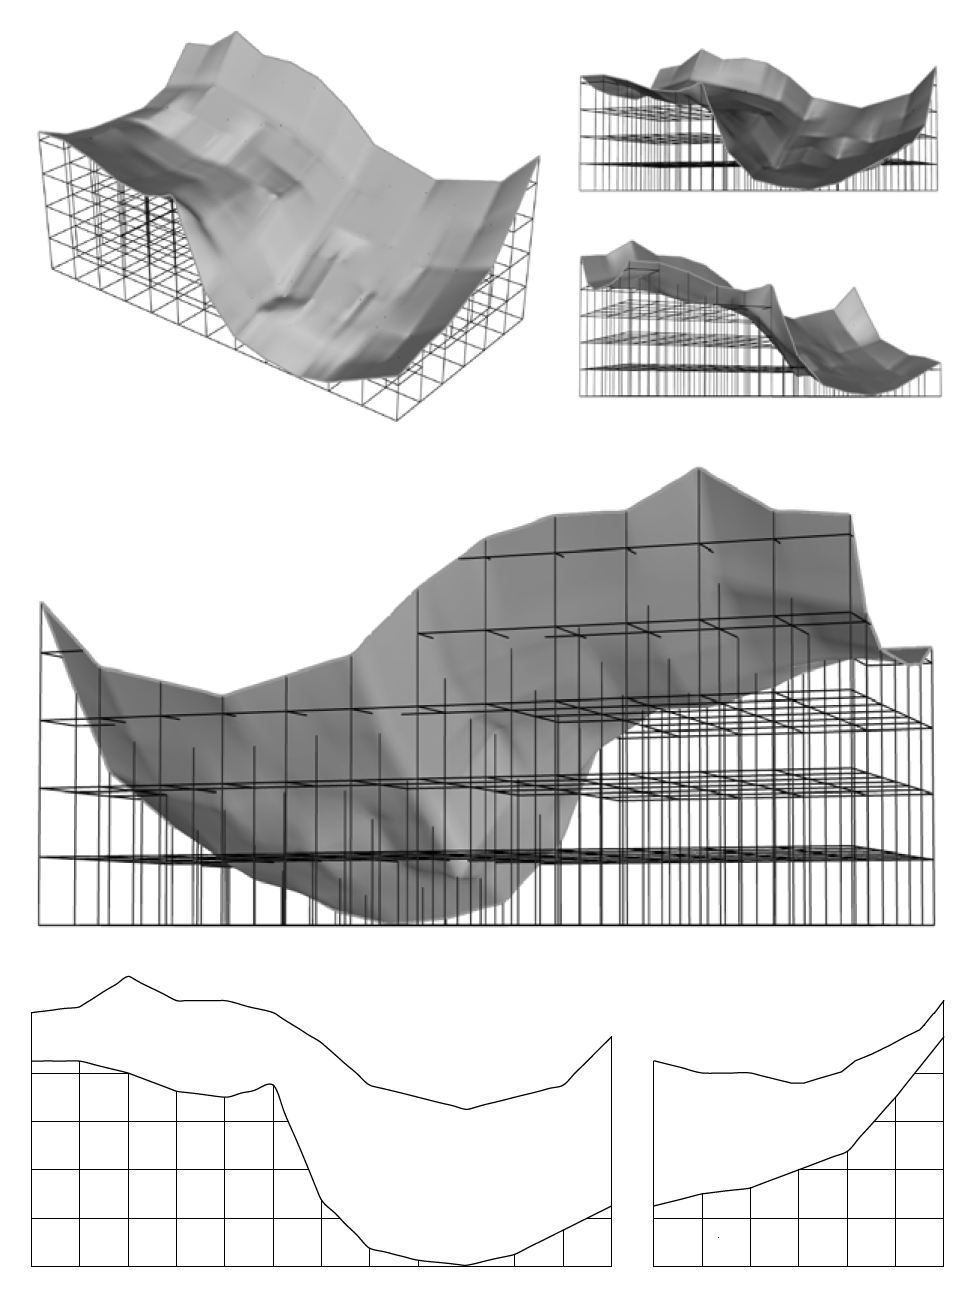
As a warm-up project my fall quarter of third year, and to introduce us to Grasshopper, an algorithmic modeling software in Rhino, my professor had us make complex geometries by adding and subtracting primitive shapes such as boxes, cones, pyramids, cylinders, and spheres. The motto for this studio was, “less shape, more geometry”!
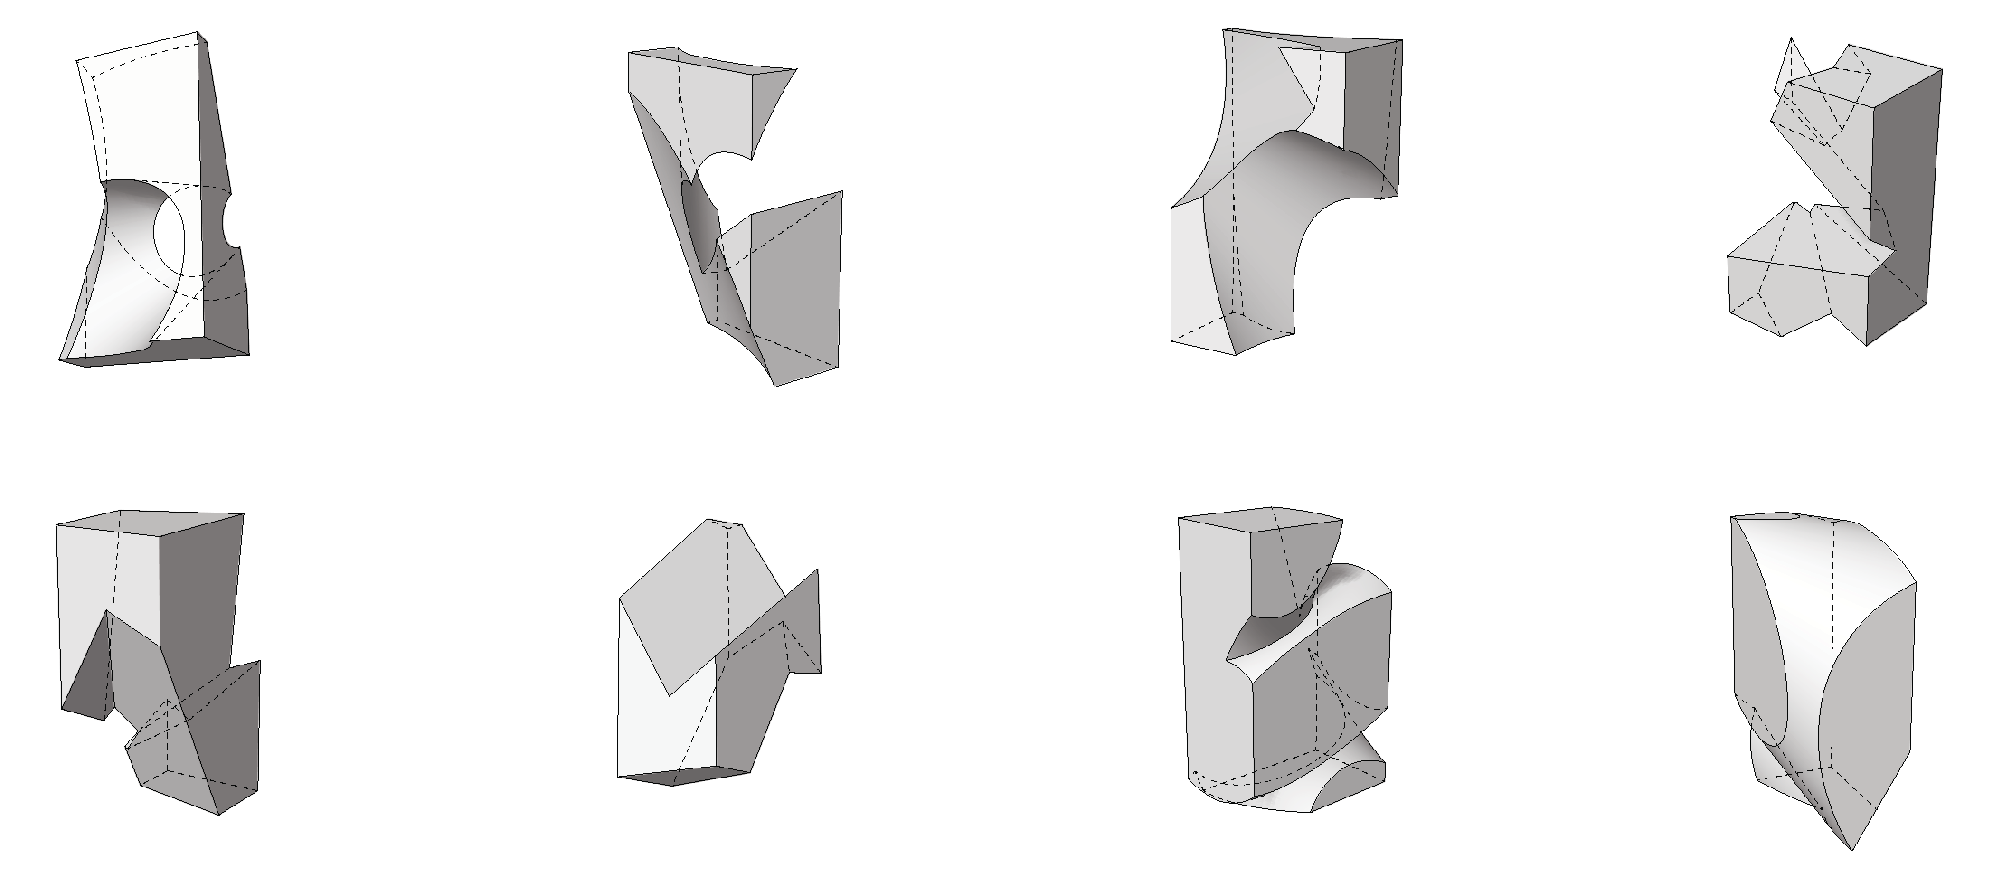
Throughout the process, I made study models by laser cutting and stacking chipboard, folding bristol, and 3d printing. It was helpful to be able to get out of the computer and see the shapes in real life.

After a lot of iteration, I settled on using pyramids because they have straight sides so they are easier to build but more dynamic than boxes.
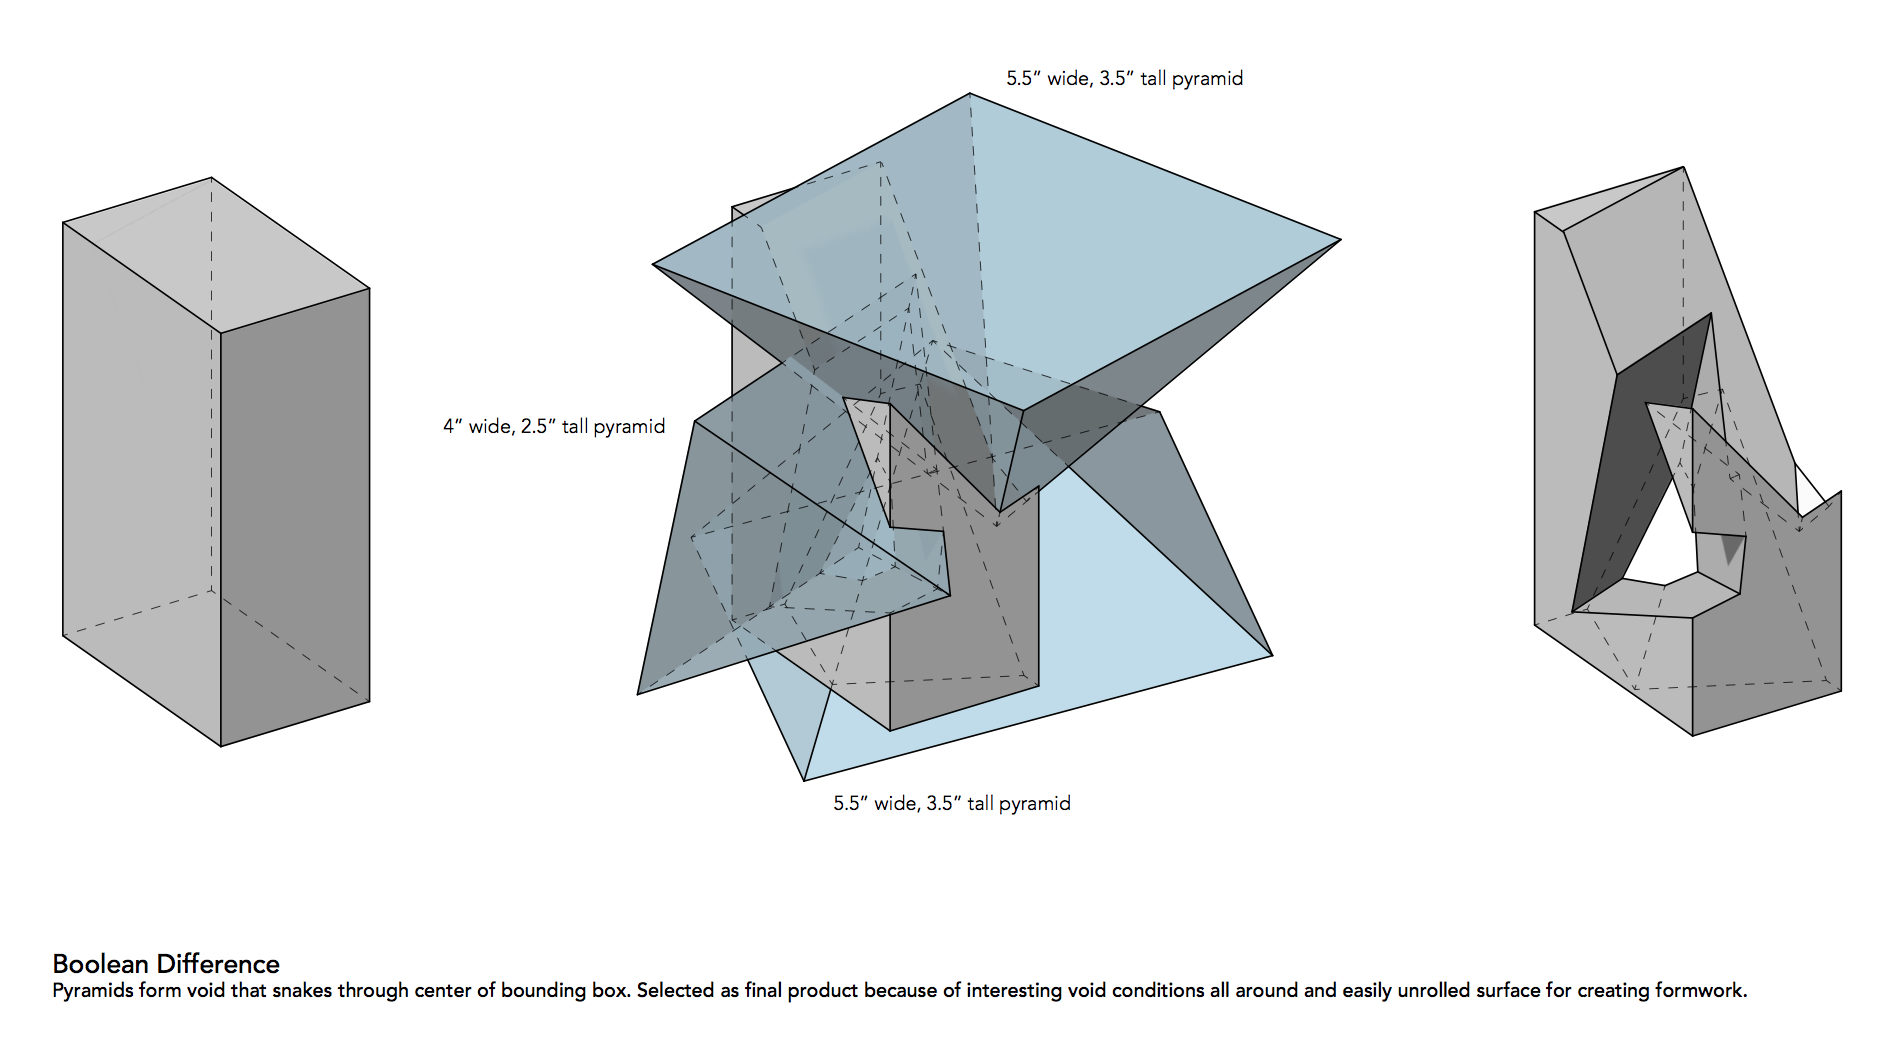
I constructed the form out of laser cut bristol. I also made the void of that form out of rockite.
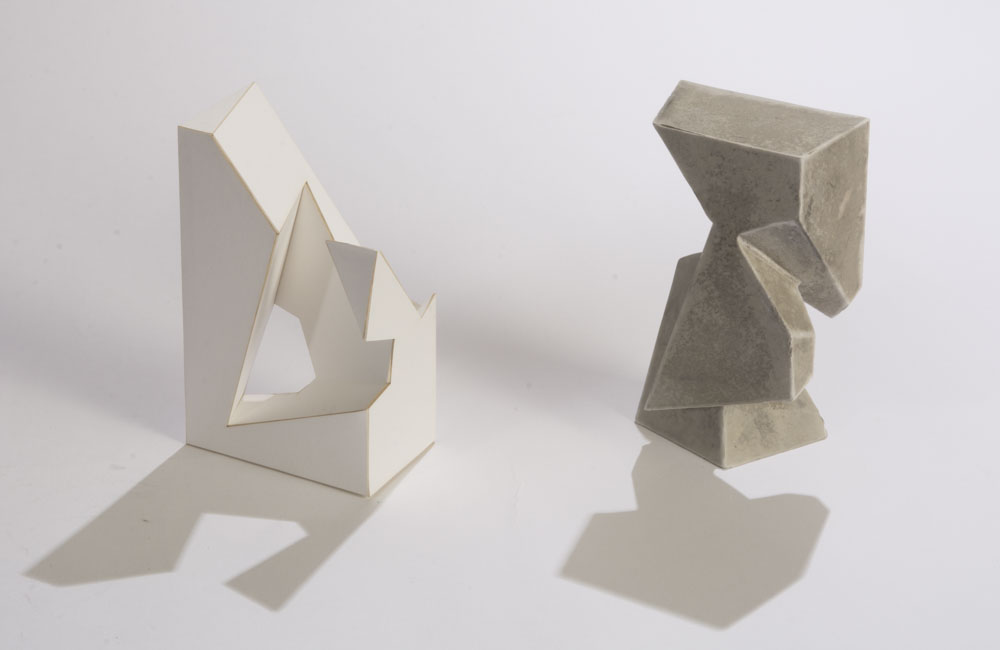
The final step in the project was to create a site for one of the previous models, so I used the rockite void as my model. I took the lines from the model and cut them out of stacked chipboard. The void became a bridge.
I learned so much in this short project and I am really happy with the results.
If walls could dream… they’d dream of less shape and more geometry!

Summer Workshop RA
This was my third year working as an RA for the Cal Poly Summer Architecture Career Workshop. I attended the program when I was a junior in high school and it was a big influence on my decision to come to Cal Poly. Being an RA for the program is a great opportunity to give back to the next generation of architecture students. The RA’s organize evening and weekend activities for the students and are great resources for their questions about college applications and college life.
 One of the highlights of the workshop each year is doing a site design project with the students in Poly Canyon. It’s a fun way to show them the structures here and teach them about passive design responses to sun and wind.
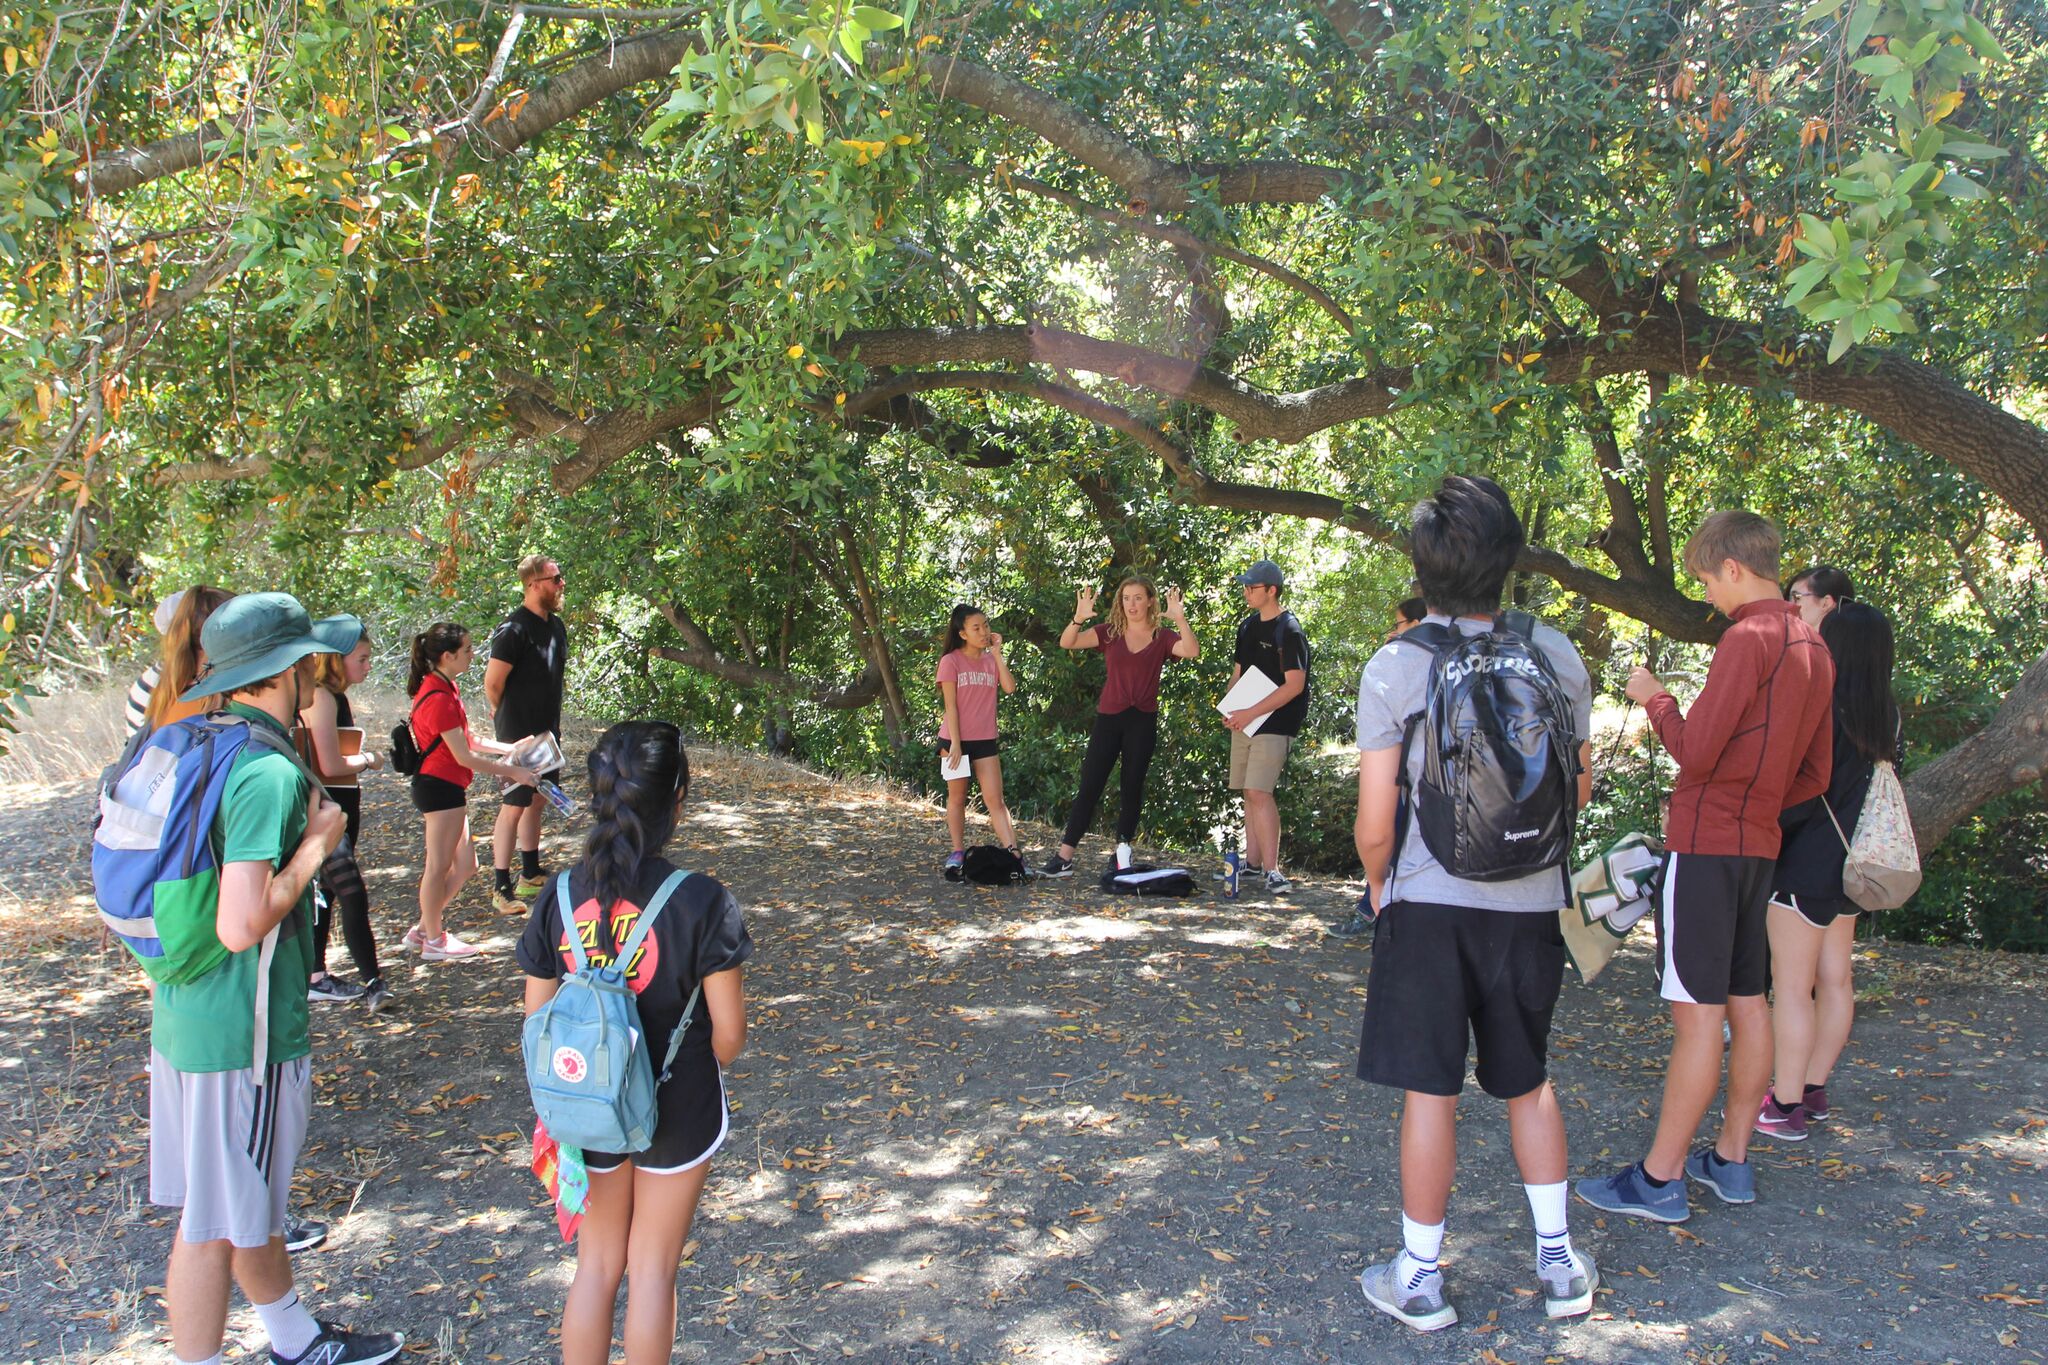
Site design project presentations in Poly Canyon. The students work in small groups to design a house in a few hours, focused on responding to sun, wind, and view.
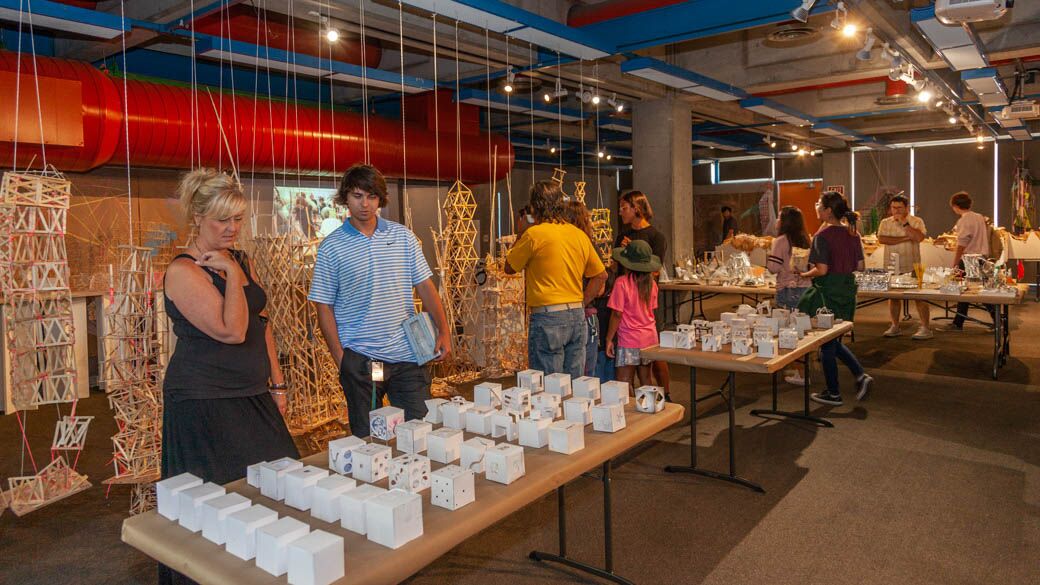
Final showcase, photo by Josef Kasperovich. Every year, I am amazed at how quickly the students begin to sound like architects. These four weeks are so fast-paced and packed with important lessons. Their final projects blow me away every year with their attention to detail and thoughtfulness.
If walls could dream… they’d dream of influencing the next generation.

Nature Elementary School
Spring quarter of my second year, I designed a nature-focused elementary school. We started the quarter by designing one element of a classroom. I decided to pick a cubbie wall. It gives students a place to store their stuff and a place to call their own. My cubbie wall design would be double-sided so that students and teachers could interact with it differently at their different work heights.
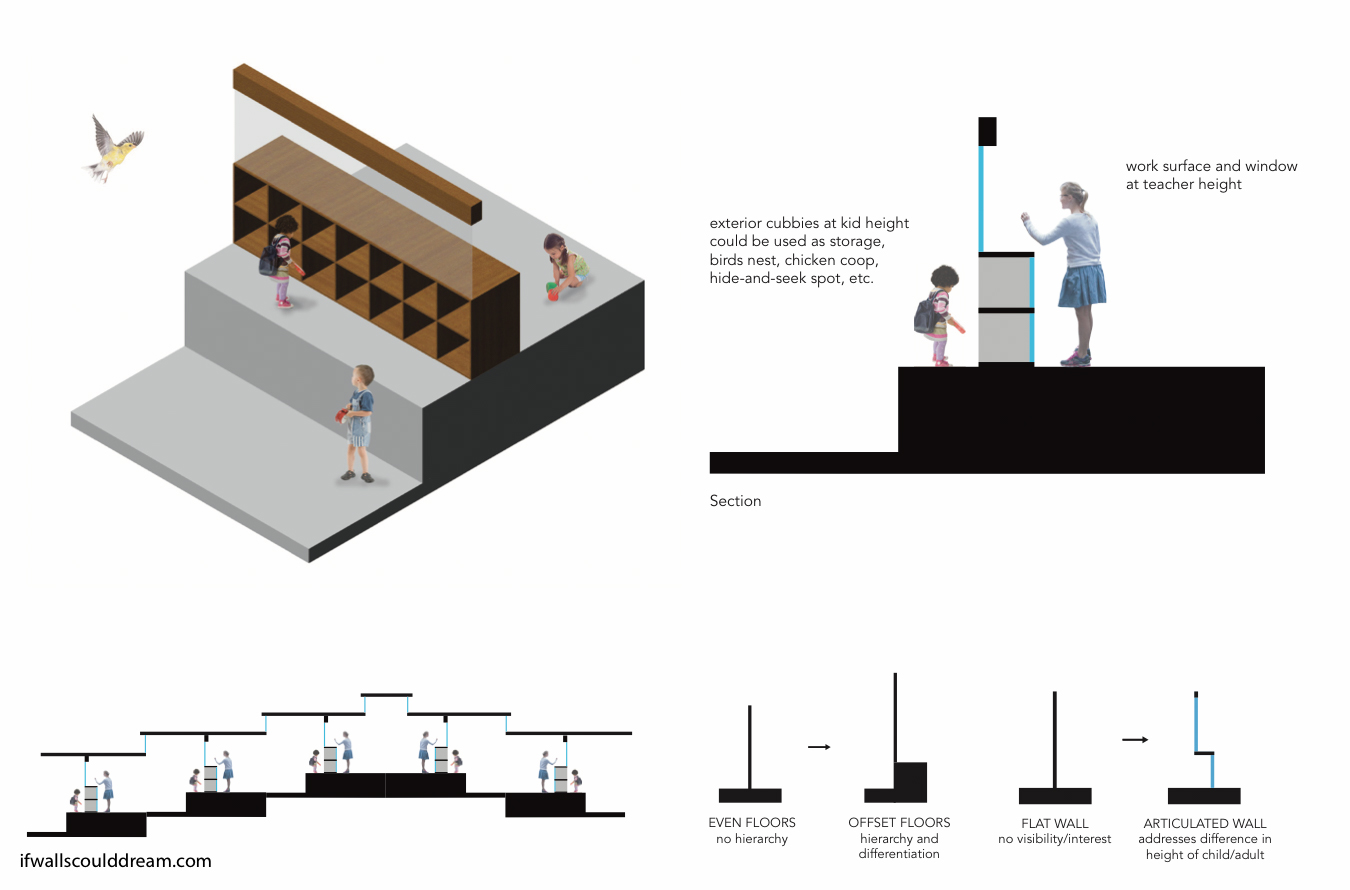
The idea of different interactions at different elevations gave rise to a split-level type classroom with an outdoor space a few steps down from the indoor space.
This classroom idea created a lot of interesting sectional possibilities. However, when it came to stacking the classroom modules into an urban school building, I had to abandon the slanted roofs and go back to the drawingboard.
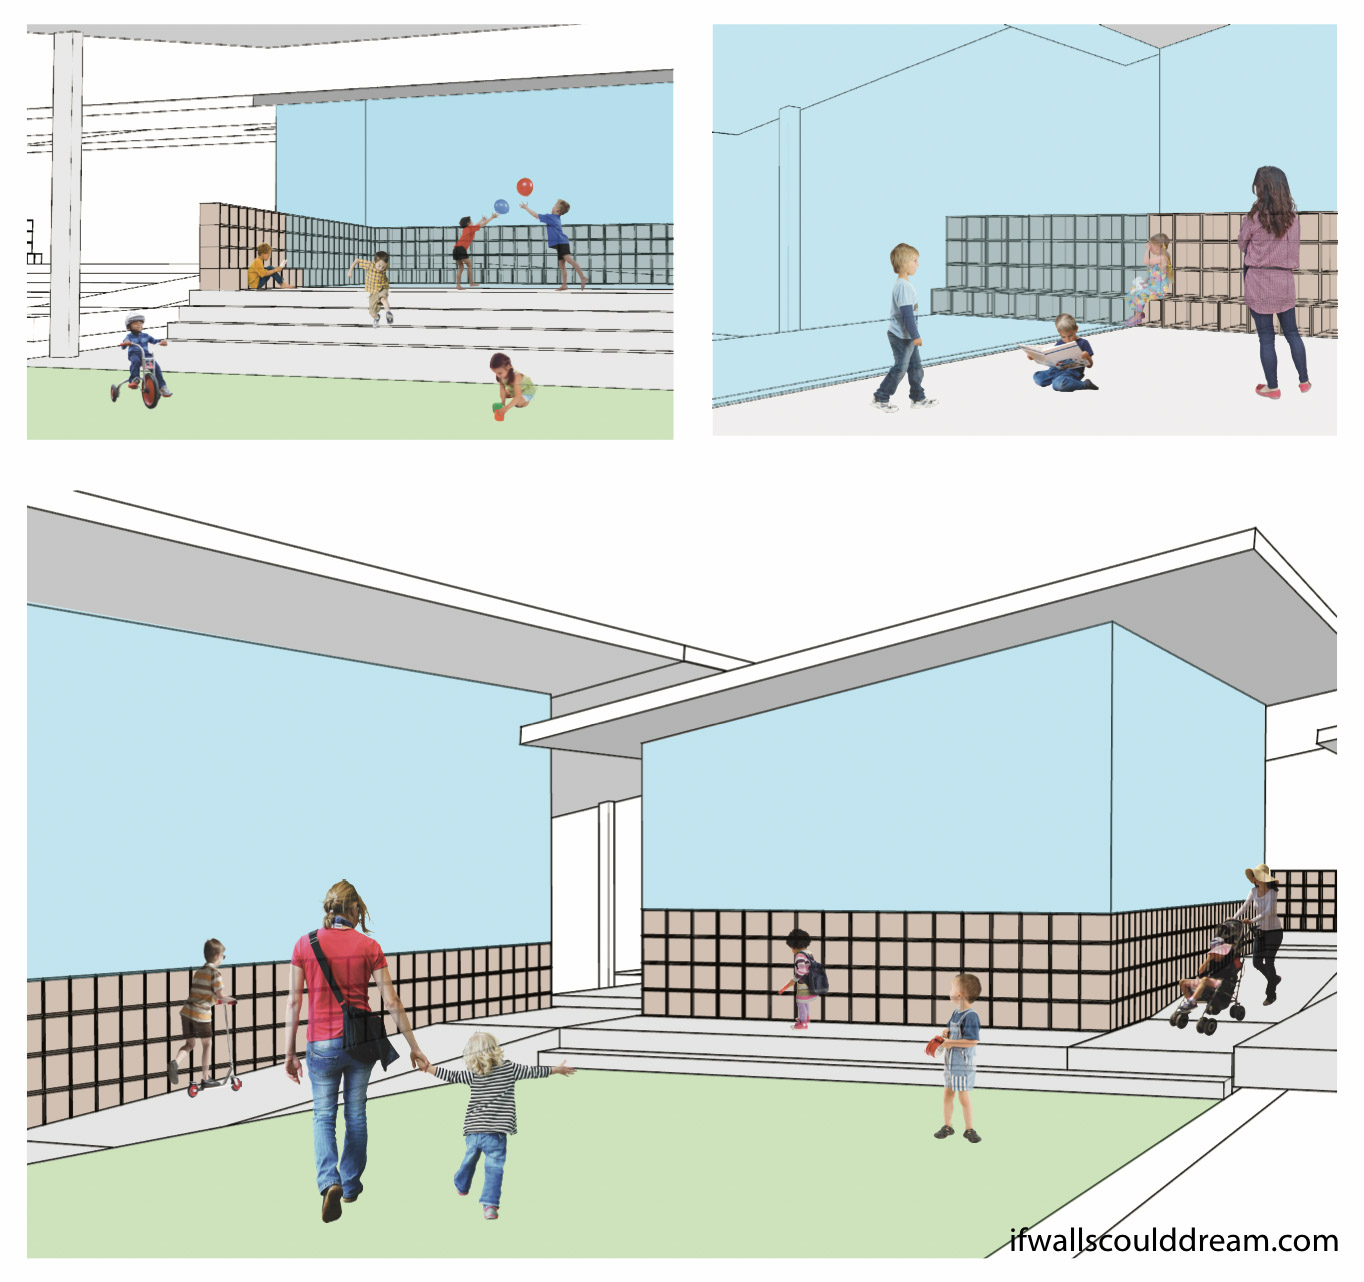
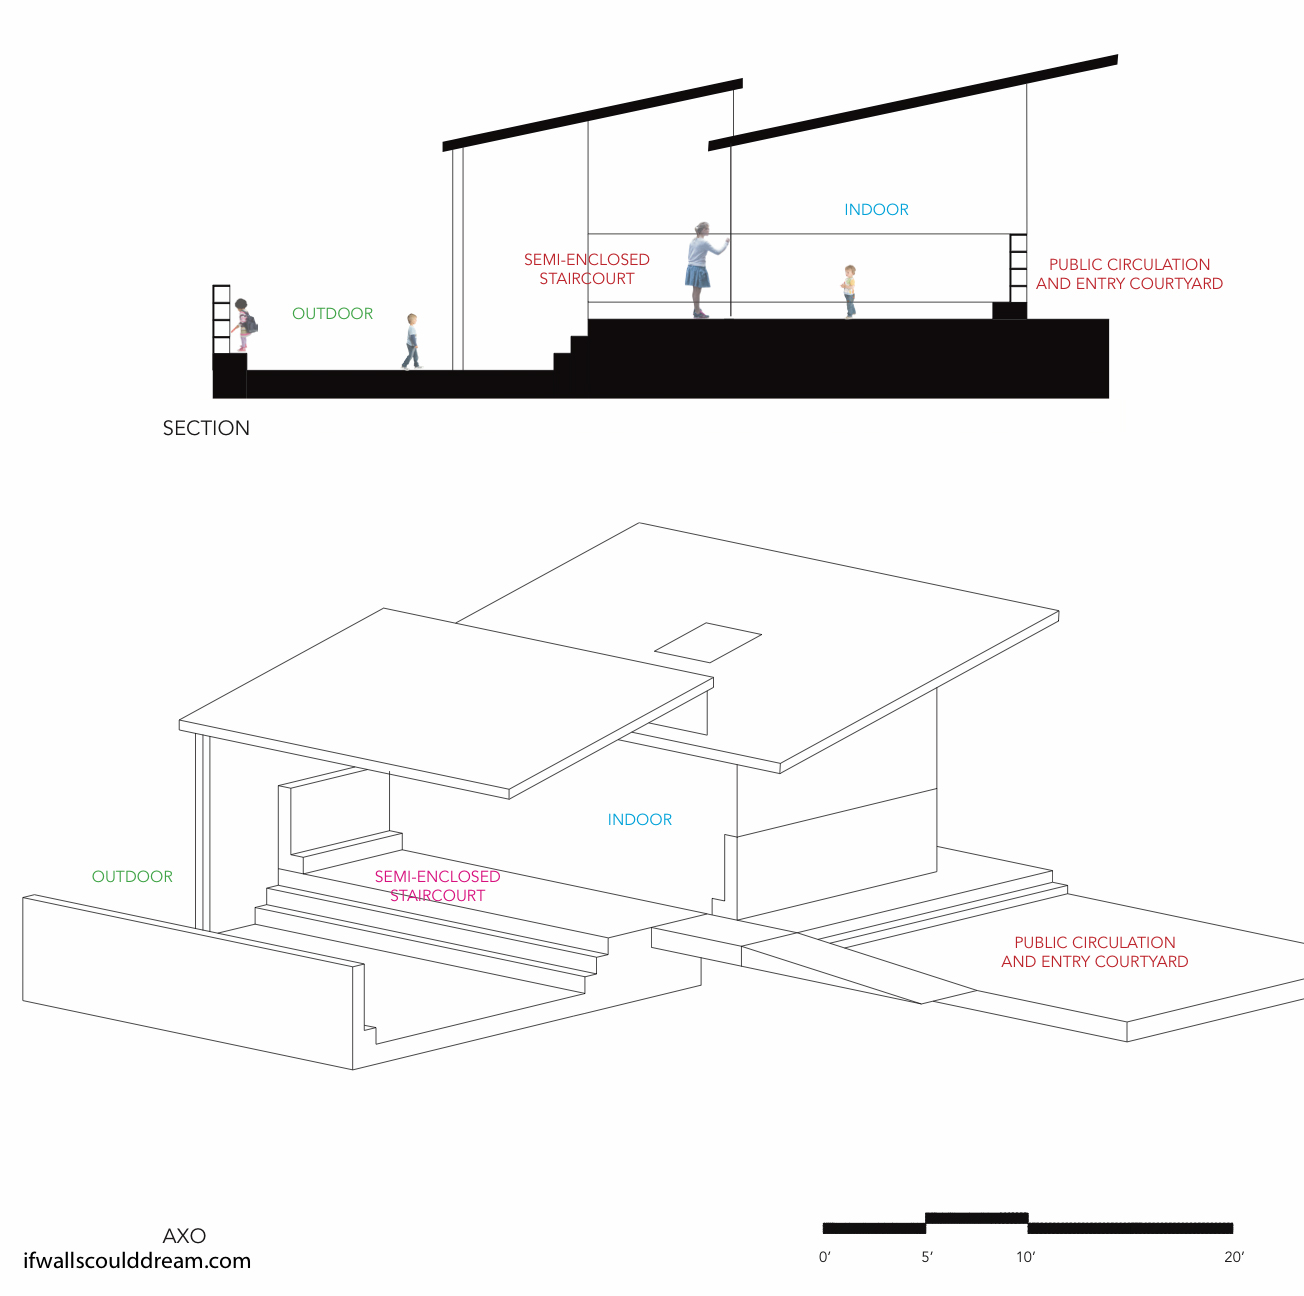
My final classroom design had more separate indoor and outdoor classrooms. I also switched the indoor and outdoor classrooms so now you have to go down a few steps to get to the indoor classroom instead of the other way around. The indoor classroom is fully enclosed with glass and cubbie walls as well as a floor and roof. The outdoor classroom doesn’t have any walls besides the open cubbies, just a floor and a ceiling only over half the room. This provides the children with a variety of different spaces within one classroom.
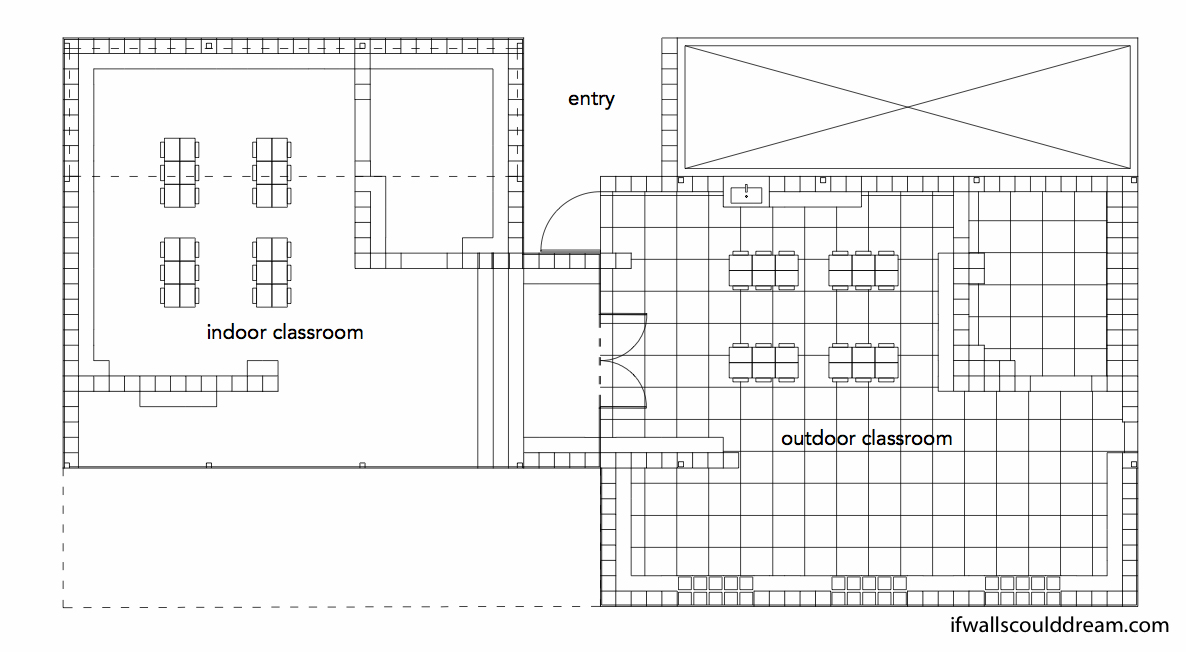
The massing of the building overall is boxy, with alternating indoor and outdoor classrooms. The site is long and narrow and the classrooms take advantage of the southern sunlight.
Large skylights and an open courtyard in the center of the school bring a lot of light and sunshine into the classrooms.
In this section perspective of the entry to the school, you can see the interaction between the indoor and outdoor classrooms. You can also see the cubbie walls carried on from the beginning of the quarter. They provide devision between different spaces within the classroom as well as furniture, seating, windows, and more.
 This section model, taken from the same view as the above drawing, illustrates the relationship between different classrooms.
The school design allows children to connect to nature, both inside and outside of the classroom.

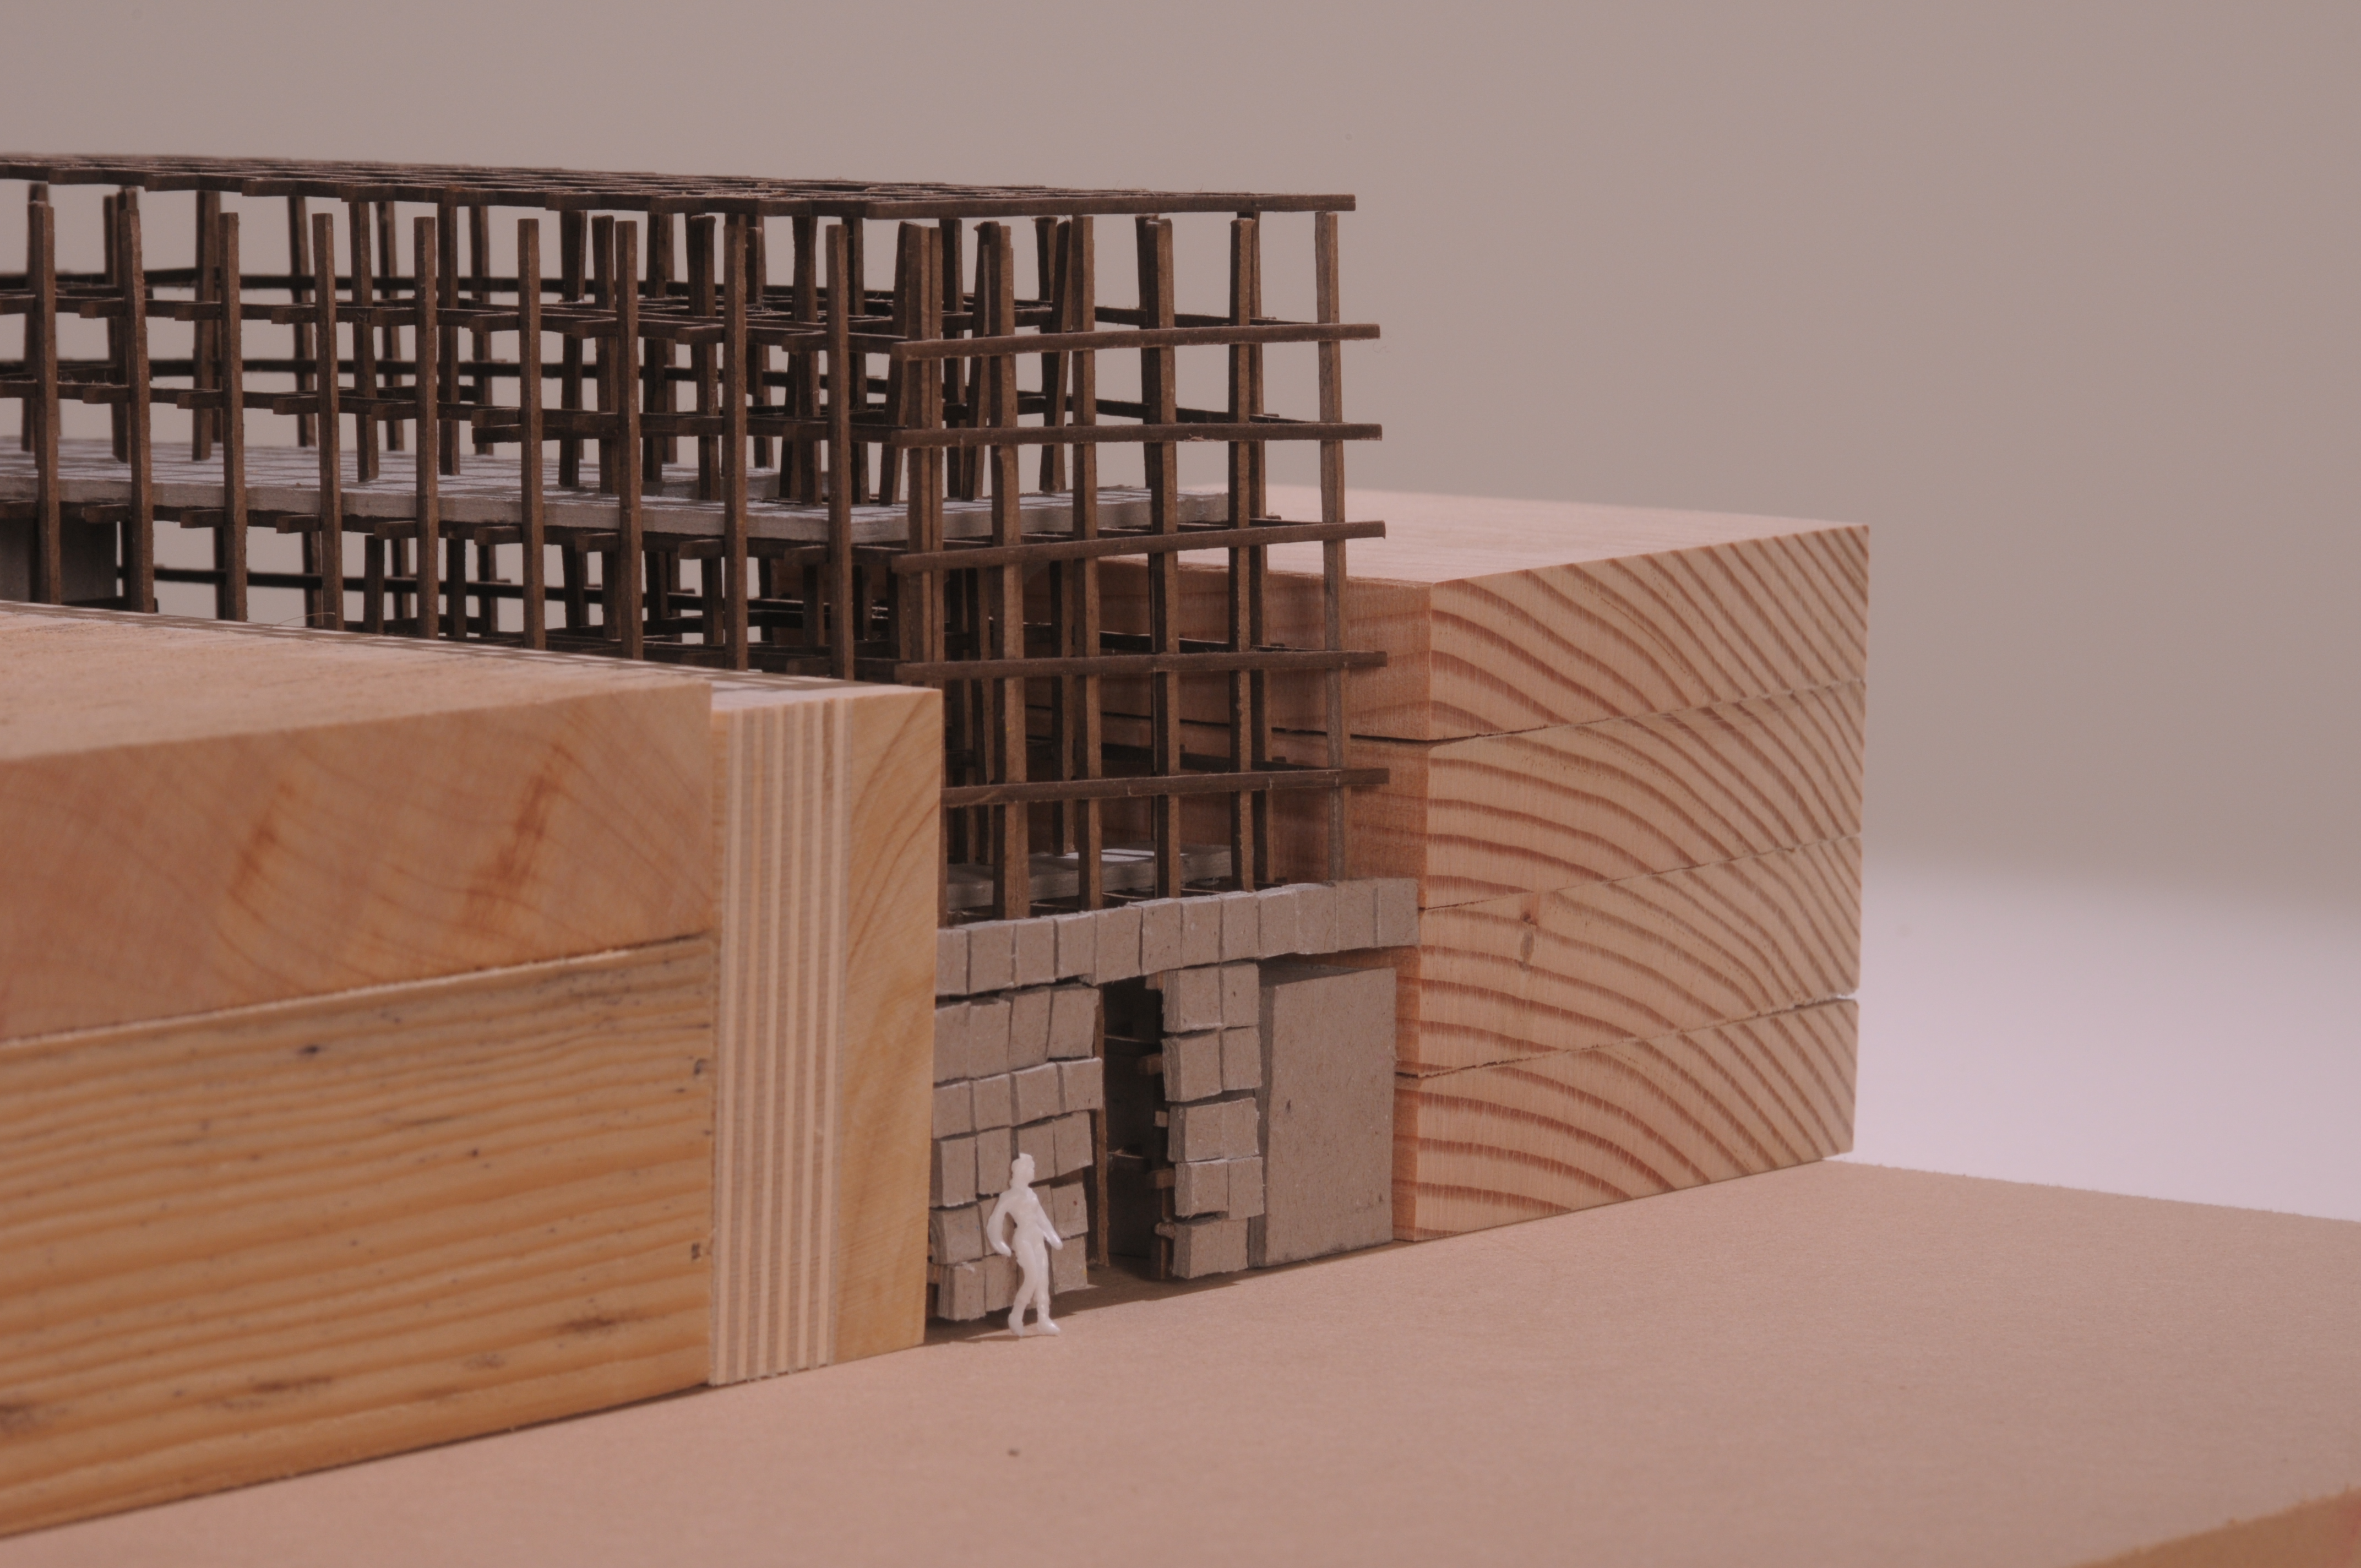
Foodways Bakery
Fall quarter of my second year studying architecture at Cal Poly, I designed a bakery and community center in Guadalupe, CA. The design is inspired by a slice of ciabatta bread and my process included a loooot of model making! It was such a fun quarter and I learned so much.
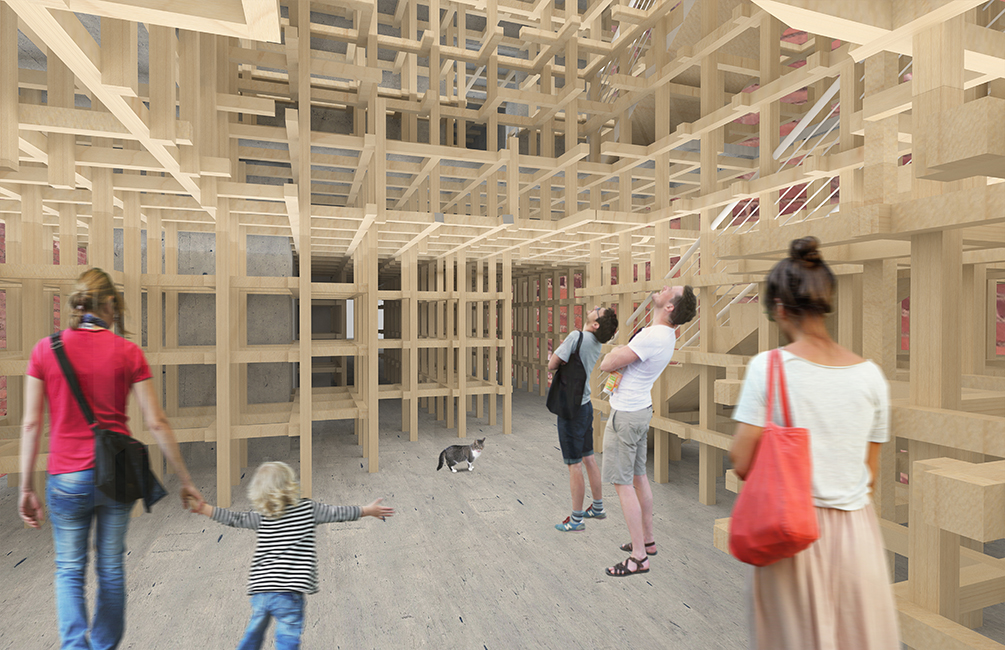 When you enter the building, through the ceramic “crust” facade of the building, you enter the lobby which has a skylight up to the top of the building. The exposed Kengo Kuma-esque wooden structure mimics the texture of the air bubbles in a slice of bread.
The first floor has the lobby, bakery storefront, and a sitting space. In a detached building behind the main building, there is a gallery space and a wheat field behind that in the long, narrow site. The second floor of the main building is the bakery and the third floor is an apartment for the caretaker.
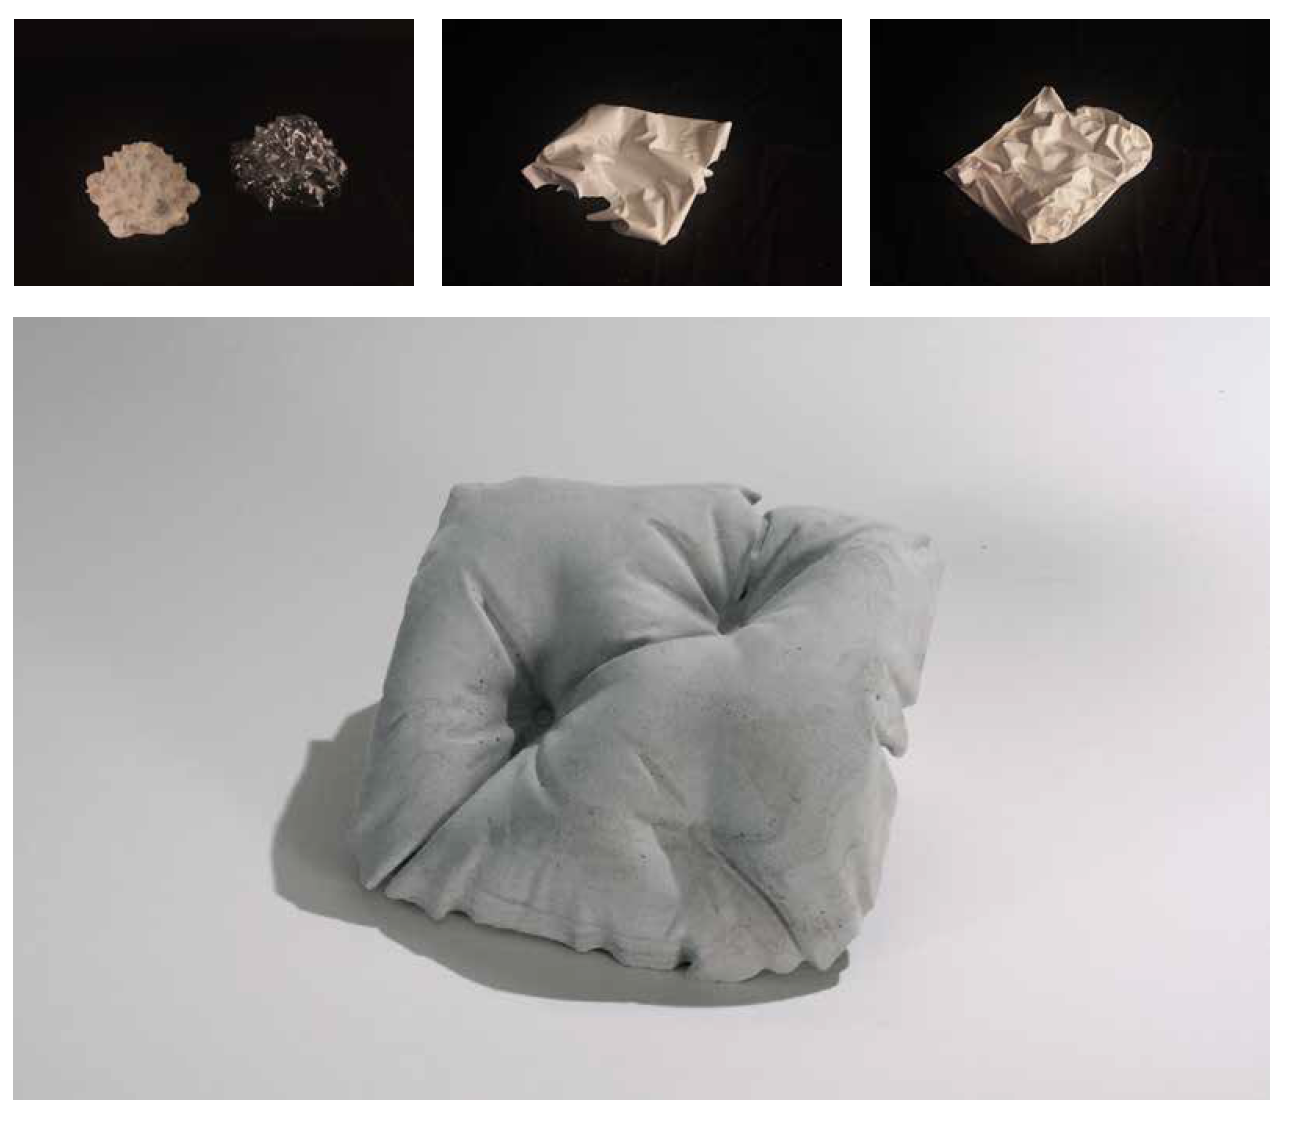
Above are study models of the facade materiality. I started (top left) by vacuum forming a romanesco cauliflower (a unique vegetable with a natural fractal pattern) and then casting it in Rockite. While interesting, it didn’t work as a facade tile. Next, I cast plastic bags in plaster which created very interesting geometries but wasn’t as square as I wanted. Finally, after being inspired by a project at Cal Poly’s annual Vellum furniture show, I created a fabric cast, pillow-like Rockite model. It’s not the perfect solution, I wish it was more square and had gentler curves but it’s what I ended up with.
The details of the wooden grid were important to me in this project. The early study model on the left shows how fabric could be used to enclose organic volumes of space within the rectangular grid. The later study model on the right shows a light shaft between the neighboring building and the proposed upper floors that lets light into the ground floor.
As another geometric investigation, we each mapped a surface on our bodies. I mapped the curve of my hip. I modeled it a variety of ways, with sticks, fabric, and foam, and then modeled it in Rhino (below).
This geometry was used to create the voids in the lobby, sitting area, and gallery spaces. Yes, it is arbitrary to use the geometry of my hip as the form for spaces in a bakery, but it was an interesting challenge and you have to start somewhere.
If walls could dream… they’d dream of fresh baked ciabatta!

Cal Poly SLO Arch 131 Kit
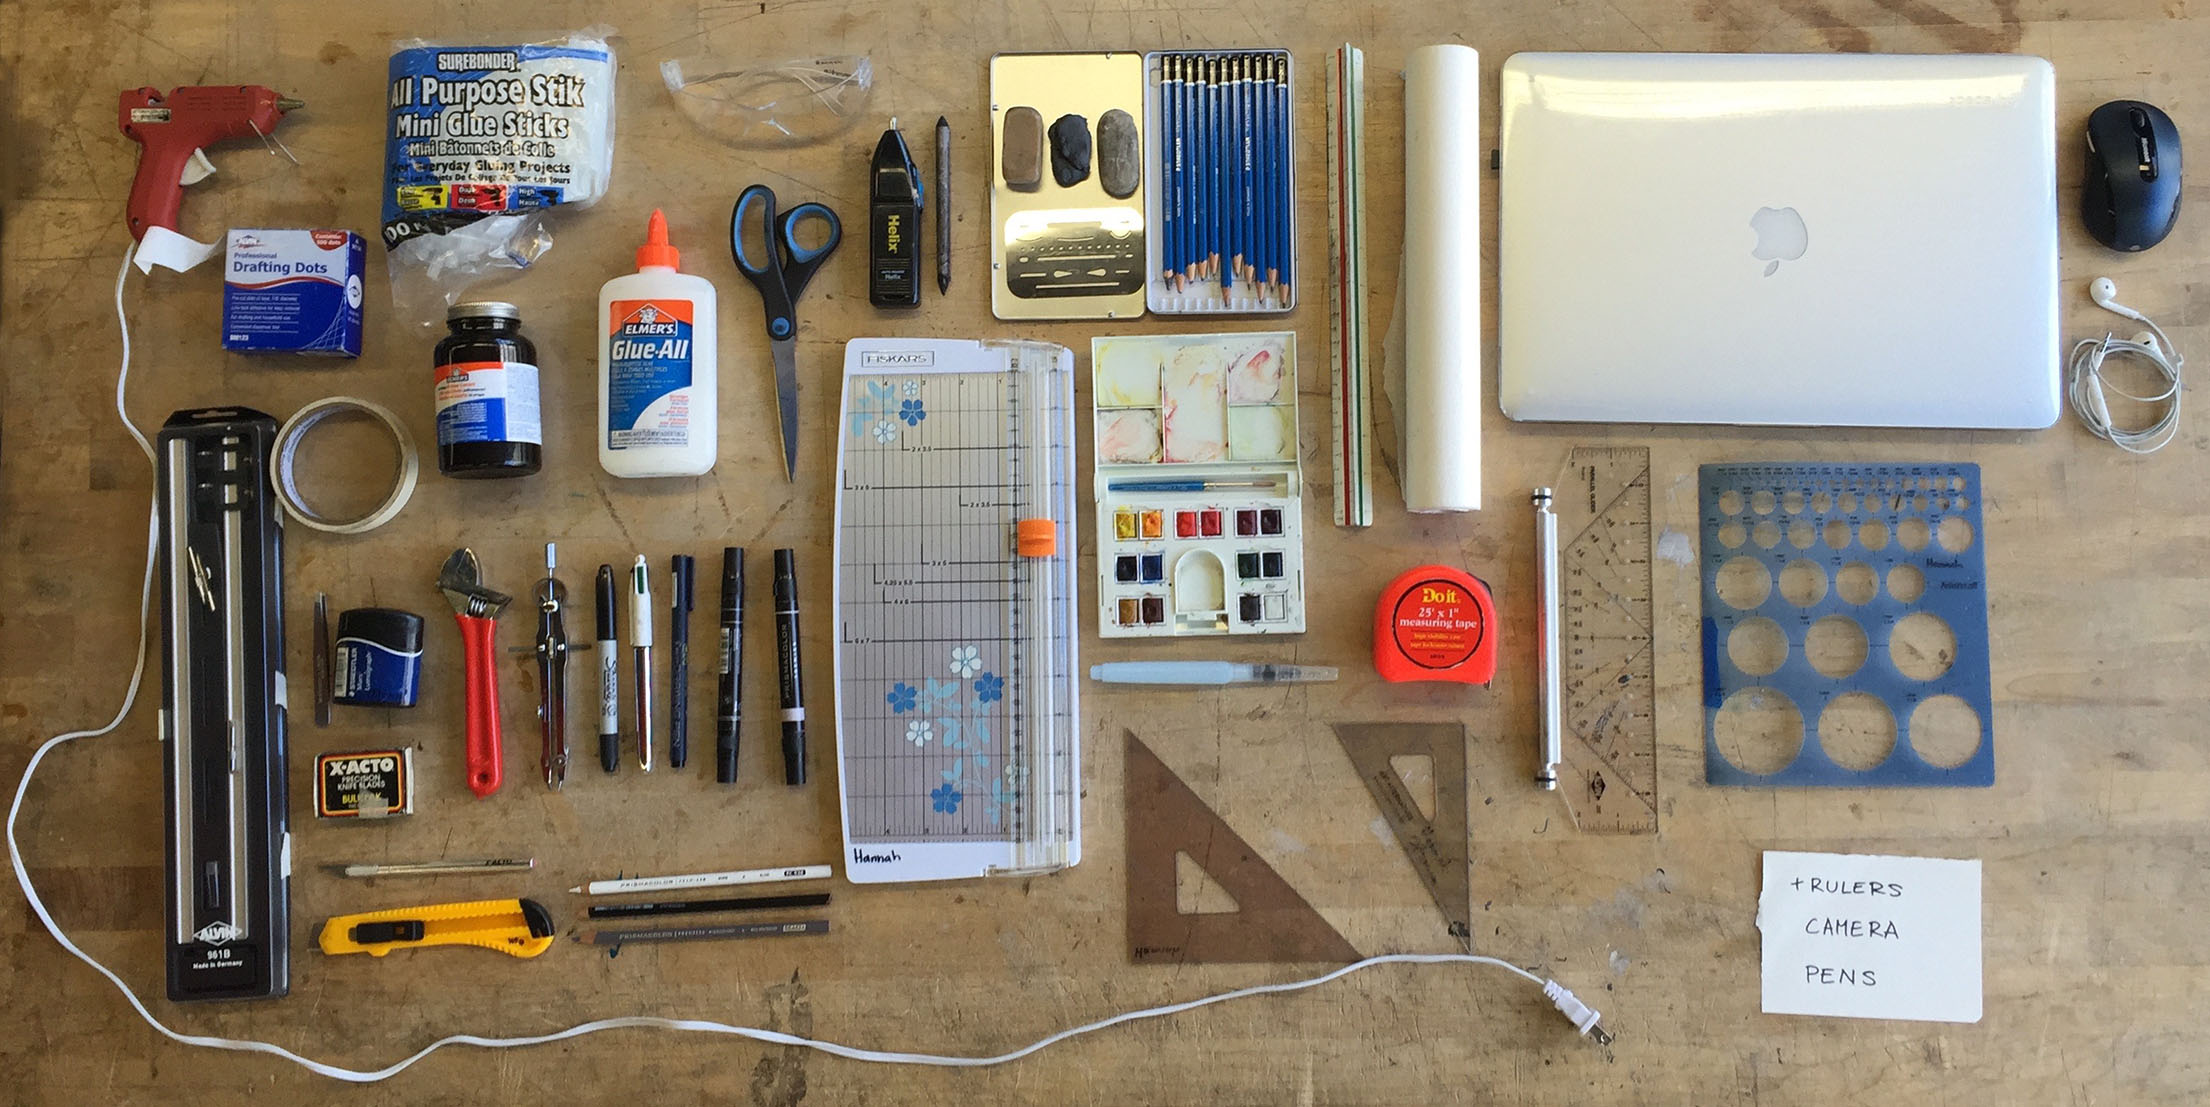
Tools from my freshman studio at Cal Poly. I would recommend all of these except the large Alvin compass on the far left side, it’s a cool tool for drawing giant circles but I didn’t use it that much.
The initial excitement of getting into Cal Poly has worn off and now you are faced with a long (and expensive) list of tools and supplies you need to get before classes start. Not to mention the expense and stress of getting everything for your dorm room, this time in your life is thrilling but also exhausting. It exhausts your energy and your wallet. Goodbye, summer babysitting money! Here’s a few things I wish I would’ve known back when I was a freshman and some tips about that Arch 131 kit. Just a disclaimer before I start, everyone has personal preferences when it comes to architecture supplies and I went through the first year curriculum a few years ago so things might have changed a little bit.
The Arch 131 Kit
The Arch 131 Kit is a list of analog architectural drawing and model making tools and supplies you will use in your studio classes first year and on. It’s essential to have the basics but some things are more critical than others and everyone has their own preferences when it comes to tools. You can buy the entire kit from the bookstore or you can assemble it on your own which is what I did because I already had about half the items. If you already have some things on the list, I would advise getting the rest on your own instead of buying the kit because then you can get what you really want not just what the bookstore gives you.
Tips about assembling the kit on your own:
1. Keep your eyes peeled for free tools – many of the drafting tools are kind of old fashioned (drafting triangles, eraser shields, circle compass, ruler, fancy erasers, etc.) so architects and artists often have drawers full of extras they’d love to donate to a student in need!
2. Don’t freak out about getting the exact thing on the list – most professors don’t care if your pencil sharpener is a $15 stainless steel one or a $1 plastic one, as long as it works!
3. Search for sales and coupons. Craft stores like Michaels often have coupons online that can help you save money! If you live close to San Luis Obispo, check out the bookstore sales and the “fifth year sale” at the end of the school year where graduating students sell random supplies dirt cheap to other students.
Here’s the 2017 Tools and Supplies List with my notes:
Drafting Tools
Alvin 295 Parallel Glider (10” minimum) – super helpful for drawing parallel lines
12” ARCHITECTURAL Triangular Scale – be sure to get an architectural one and not an engineering one! The architectural will have scales such as 1/2, 3/4, 1/16 and an engineering will have scales such as 10, 20, 40.
30°/60° and 45°/90° Drafting Triangle, 12”, with ink edge – super useful for drafting and modeling, also supper common so ask an architect you know if they have an extra!
Erasing Shield – again very useful and common, ask an architect you know if they have an extra!
Metal Pencil Sharpener (Staedtler 510 or equivalent) – a normal pencil sharpener will do
Circle Compass and Bow Set w/ removable pencil and inking heads – useful but a regular compass will work
Drafting Brush – I never used mine
White vinyl eraser – no, a Pink Pearl will not do
Kneaded eraser – no, silly putty will not do
Drafting Tape or Drafting Dots – I’m a fan of tape not dots. also get blue painter’s tape
24” Roll Drafting Vellum, 24”, 10 yard roll (min), 1000H, plain – sounds very specific but yes it is useful
18”x24” Bristol Board, 15+ sheet pad, vellum finish – my favorite paper! Bristol is so versatile, you can use it for charcoal, watercolor, or model making. Get more than 15 sheets so it’ll be cheaper per sheet because you’ll use this a lot
Tracing Paper Roll (12” min, white) – my other favorite paper! So useful for sketching out ideas and making mock-ups, you’ll fly through this stuff so a larger roll is worth the initial cost
Circle Template – useful
36” metal T-Square – I actually never got a T-Square and was fine just borrowing them from friends but it is helpful for keeping long lines square
Zippered Pouch (to carry supplies in) – if you were in art in high school, your portfolio bag works well for this!
Drawing
Pigma Micron Pens (black): 01 & 05 widths – I LOVE these pens, totally worth the investment
Prismacolor Marker: Black – I got a black and a grey and use both
Prismacolor Pencils: White, Black, Warm Gray 50%, Sepia – I didn’t use these much, you’re probably better off with a crayola colored pencils set (or a hand-me-down) and then getting these specific pencils from the bookstore if your professor requires it for a project
Drafting Pencils: 4H, 2H, H, HB, 3B, 6B – super important to have a wide range of leads. This is a pretty common thing so you could ask an architect or artist you know if they have extras
2 Charcoal sticks, soft – yes, you’ll use these
Dry cleaning pad – I had to Google this and still didn’t recognize it so it can’t be that important
12-color Portable Watercolor Set (Winsor & Newton or equivalent) – I loooove watercoloring so I have a variety of watercolor sets but honestly my favorite one is a cheap kids set. It’s more important to have good color variety than a fancy brand name. You want colors that you like and that you think will be useful for mixing. For me, I look for a true red (none of this red-orange nonsense), a leafy green (green is usually for plants so you want a nice deep olivey green and a lighter yellowy green), a sky blue, a nice purple for shadows (not too bright or too dark), a sienna brown, and a black or dark brown.
Round watercolor brush – I treated myself to nice watercolor brushes and it has by far paid off!
Waterbrush Pen (Kuretake or equivalent) – this brush pen is so nice because it keeps the water inside the pen and you squeeze the handle to add more water allowing for precision, less mess, and easier traveling sketching.
36” Drawing Storage Tube – this could be as simple as a shipping tube with one side taped closed
Model Making
Metal Straight Edge, 24” with cork backing and cutting edge – super useful!
Precision Knife #1 (Xacto or Excel) – one of my most used tools!
Xacto or Excel #11 blades (15 pk minimum, 100 pk recommended) – seriously, get the 100pk of blades
Olfa L-2 snap-off knife Olfa L-2 replacement blades – super helpful just make sure you know how to snap off the blades safely!
Scissors – pretty self explanatory
18”x24” Self-Healing Cutting Mat – SO useful! I also got a mini one which is super cute and fun
Hot Glue Gun (any size) & Glue Sticks – I’m sure you have an extra one lying around
Needle-Nose Pliers –
Tacky Glue (Aileen’s Quick-dry) – yes there’s a difference between Tacky and Elmers
Elmer’s Glue – yes you need both. lots of both. and some wood glue. and a little bit of super glue but only a little. maybe I’ll write a blog post on different glues someday
UHU glue stick – I guess it’s useful, you could also use spray adhesive
5 yard roll Scotch aluminum foil tape – not really sure what this is about
25’ (minimum) Tape Measure – I’m sure you can find an extra one in your garage
Shop Safety Glasses – safety first! Don’t forget to put your name on them and try not to scratch up the lenses
Misc. (Things not included in the kit and things I’d add to the kit)
Screw Drivers: Phillips and Flathead – don’t buy one, you can just borrow them from the shop
Sketchbook (sized to carry at all times) – you’ll take this with you everywhere! Some people prefer 5×7″, some 8×10″, do what feels right in your hand
Cordless Drill (recommended, not required) – not necessary because you can borrow it from the shop but useful so keep your eyes out for one on sale
Razor Saw & Miter Box set (recommended, not required) – do it! I don’t know why this isn’t required but it’s the only way to cut thicker basswood pieces
6” combination square (recommended, not required) – if you think you’re going to be doing woodworking then this will come in handy for keeping things square and exact
Tweezers – I’m adding this one! Get some regular drug store tweezers for manipulating small pieces of paper, your fingers will thank you!
Glue syringe – I’m adding this one too! Suuuper helpful for applying glue in exact precision and it’s more ergonomic after a few hours than holding a full bottle of glue.
Chopper – one more I’m adding, it’s useful for cutting small pieces of basswood for models
Sand Paper – I’m adding this one too because it’s comes in handy – get a fine grain
Modeling materials – basswood (NOT BALSA, NEVER BALSA) thin sticks and sheets (1/32″ to 1/4″ sticks are my favorite and 1/16″ sheets), chipboard, newsboard, cardboard – you can often dumpster dive for good scraps of cardboard and even chipboard or wood
Technology
Laptop computer, Mac or PC – this is such a highly debated topic so I’ll just tell you my personal experience. I switched from a desktop PC to a 15″ MacBook Pro when I came to college and I love it. It was around the time of Windows 10 and I much prefer the user interface of the Mac to Windows 10. The size of the laptop has been perfect and I haven’t had any issues yet. That being said, around third year you start getting into Grasshopper and Revit which you can’t run as easily on a Mac so we’ll see if I still love my computer by the end of the year but I think I will. In second year and up, lots of people have larger external monitors for their laptops which helps keep your eyes from getting tired looking at details on a smaller screen. And don’t forget to get a case for your pretty new computer so it doesn’t get scratched up!
Mouse – super useful to save your fingers when drafting
USB flash drive, 4 GB (min) – useful as well, just remember to put your name on it
All-In-One Color Inkjet Printer & Scanner (recommended, but you can print on campus) – I have always printed in the library (or on a friend’s printer) and been just fine
External Hard Drive, 1 TB (4TB is a plus; wireless back-up capability is a plus) – you can just use cloud storage sites, no need for a physical hard drive but it is VERY important to back up your work to avoid losing it all if your computer crashes or breaks or gets stolen.
Digital Camera, ideally DSLR (recommended, see FAQ for info about camera loans) – I already had a DSLR and am a bit of a camera nerd so I brought it and have loved it. If you’re into photography I’d recommend investing in a DSLR because you’ll have fun learning how to use it. That being said, you can rent them (for free!) on campus and we have a full photography studio for taking pictures of your models.
Adobe Creative Cloud (Photoshop, Illustrator, InDesign and Acrobat) – I know it’s expensive but it’s so so useful. When I signed up there was a student discount for the first year so ask about that.
Rhinoceros 5 – Again, it’s expensive up front but you’ll use it so much all five years.
Books
There aren’t any required books for studio but you will likely get assigned PDF readings from your professors and non-assigned “suggested” readings – do them! There is so much to learn and most of us upperclassmen have a whole list of our favorite or most useful design and reference books. Look online or ask upperclassmen for PDFs of these or ask architects you know if they have outdated copies.
Some of my favorites:
For design thinking:
Poetics of Space – Bachelard
Eyes of the Skin – Pallasma
Thinking Architecture – Zumthor
Manual of Section – LTL
For reference:
Architectural Graphic Standards, duh
Building Construction Illustrated
Materials for Design
Happy shopping! And remember to breathe, savor your mom’s cooking, and hug your pets while you can.