
Cal Poly SLO Arch 131 Kit
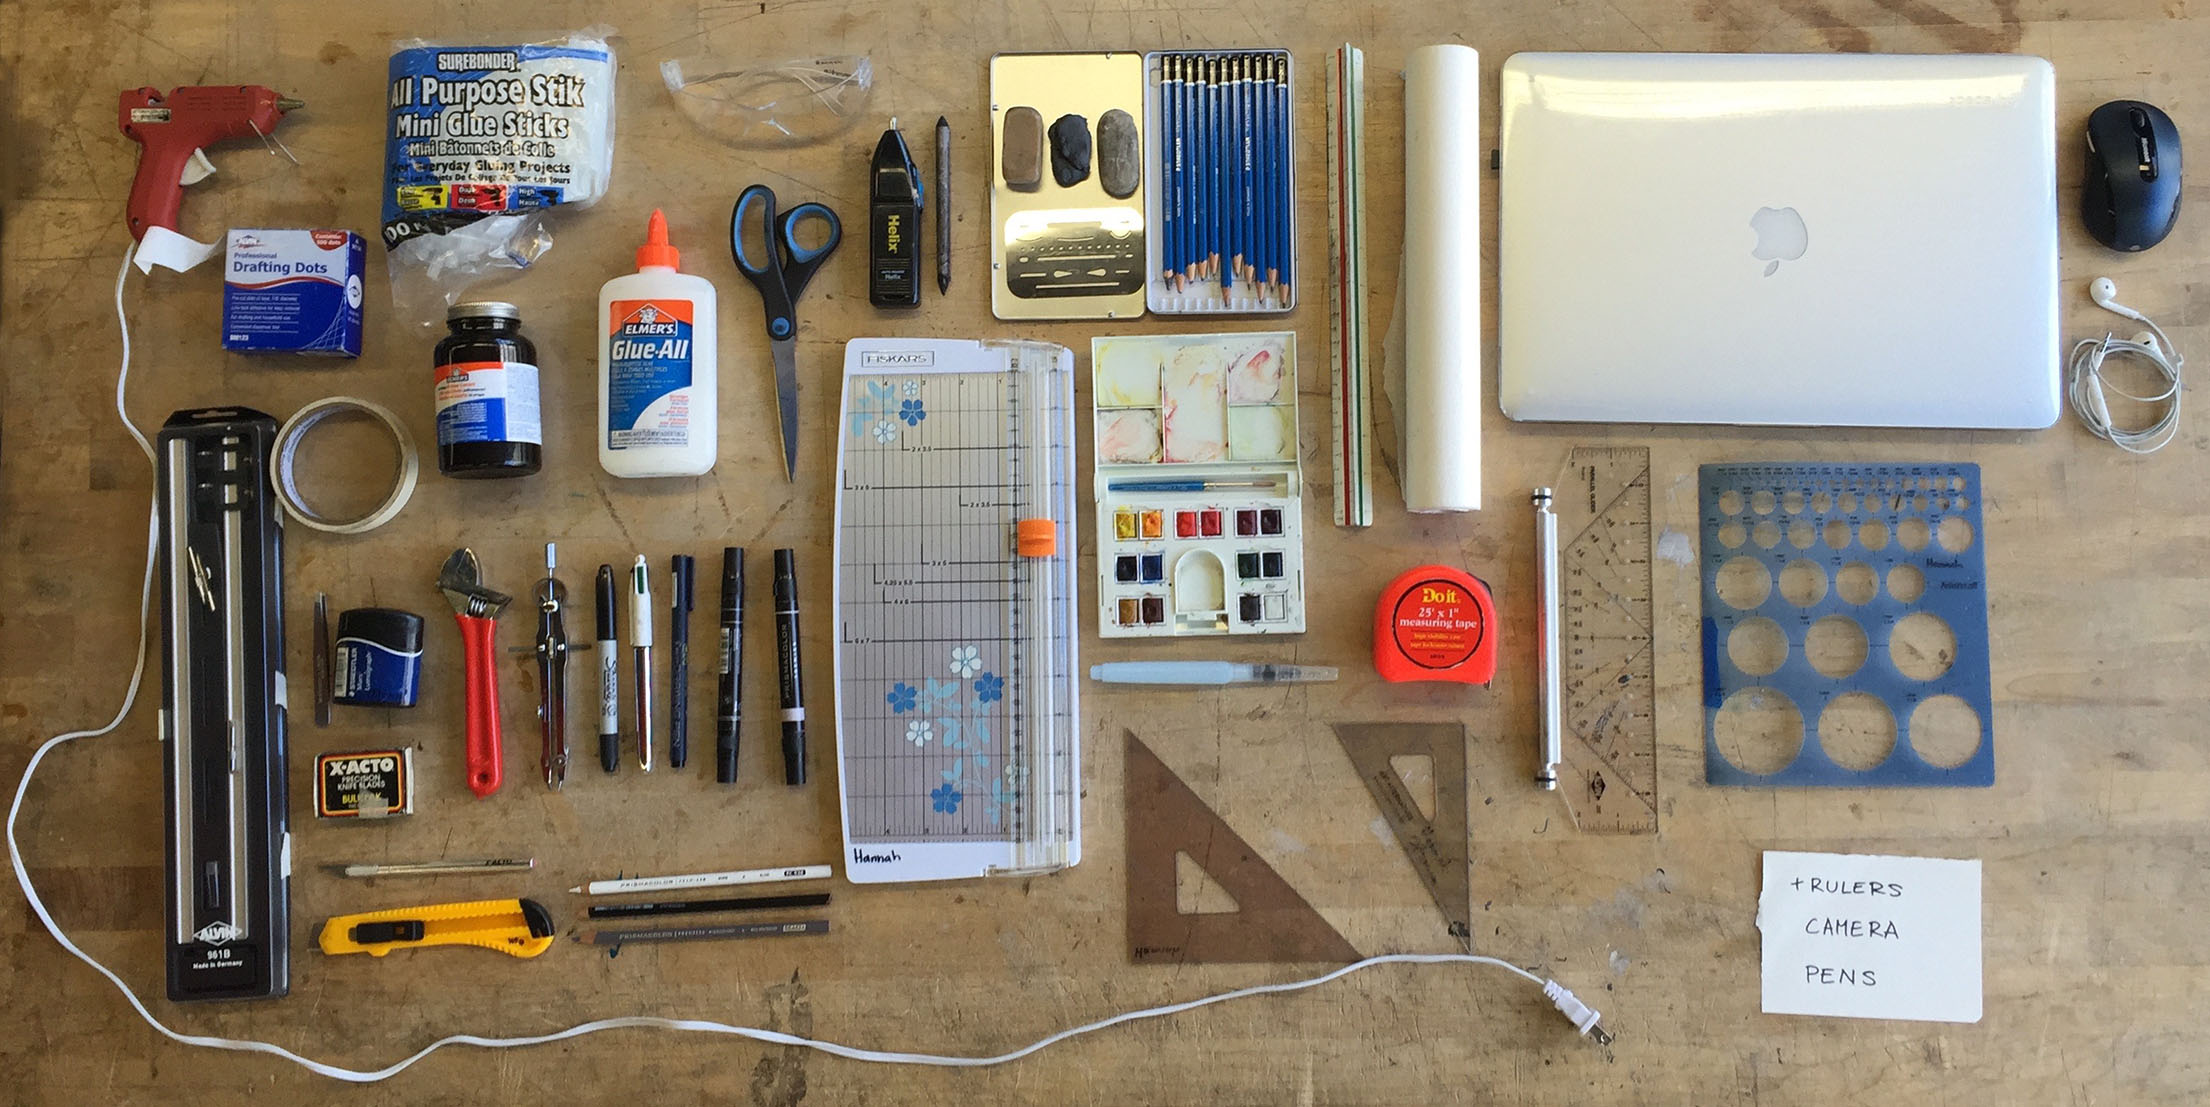
Tools from my freshman studio at Cal Poly. I would recommend all of these except the large Alvin compass on the far left side, it’s a cool tool for drawing giant circles but I didn’t use it that much.
The initial excitement of getting into Cal Poly has worn off and now you are faced with a long (and expensive) list of tools and supplies you need to get before classes start. Not to mention the expense and stress of getting everything for your dorm room, this time in your life is thrilling but also exhausting. It exhausts your energy and your wallet. Goodbye, summer babysitting money! Here’s a few things I wish I would’ve known back when I was a freshman and some tips about that Arch 131 kit. Just a disclaimer before I start, everyone has personal preferences when it comes to architecture supplies and I went through the first year curriculum a few years ago so things might have changed a little bit.
The Arch 131 Kit
The Arch 131 Kit is a list of analog architectural drawing and model making tools and supplies you will use in your studio classes first year and on. It’s essential to have the basics but some things are more critical than others and everyone has their own preferences when it comes to tools. You can buy the entire kit from the bookstore or you can assemble it on your own which is what I did because I already had about half the items. If you already have some things on the list, I would advise getting the rest on your own instead of buying the kit because then you can get what you really want not just what the bookstore gives you.
Tips about assembling the kit on your own:
1. Keep your eyes peeled for free tools – many of the drafting tools are kind of old fashioned (drafting triangles, eraser shields, circle compass, ruler, fancy erasers, etc.) so architects and artists often have drawers full of extras they’d love to donate to a student in need!
2. Don’t freak out about getting the exact thing on the list – most professors don’t care if your pencil sharpener is a $15 stainless steel one or a $1 plastic one, as long as it works!
3. Search for sales and coupons. Craft stores like Michaels often have coupons online that can help you save money! If you live close to San Luis Obispo, check out the bookstore sales and the “fifth year sale” at the end of the school year where graduating students sell random supplies dirt cheap to other students.
Here’s the 2017 Tools and Supplies List with my notes:
Drafting Tools
Alvin 295 Parallel Glider (10” minimum) – super helpful for drawing parallel lines
12” ARCHITECTURAL Triangular Scale – be sure to get an architectural one and not an engineering one! The architectural will have scales such as 1/2, 3/4, 1/16 and an engineering will have scales such as 10, 20, 40.
30°/60° and 45°/90° Drafting Triangle, 12”, with ink edge – super useful for drafting and modeling, also supper common so ask an architect you know if they have an extra!
Erasing Shield – again very useful and common, ask an architect you know if they have an extra!
Metal Pencil Sharpener (Staedtler 510 or equivalent) – a normal pencil sharpener will do
Circle Compass and Bow Set w/ removable pencil and inking heads – useful but a regular compass will work
Drafting Brush – I never used mine
White vinyl eraser – no, a Pink Pearl will not do
Kneaded eraser – no, silly putty will not do
Drafting Tape or Drafting Dots – I’m a fan of tape not dots. also get blue painter’s tape
24” Roll Drafting Vellum, 24”, 10 yard roll (min), 1000H, plain – sounds very specific but yes it is useful
18”x24” Bristol Board, 15+ sheet pad, vellum finish – my favorite paper! Bristol is so versatile, you can use it for charcoal, watercolor, or model making. Get more than 15 sheets so it’ll be cheaper per sheet because you’ll use this a lot
Tracing Paper Roll (12” min, white) – my other favorite paper! So useful for sketching out ideas and making mock-ups, you’ll fly through this stuff so a larger roll is worth the initial cost
Circle Template – useful
36” metal T-Square – I actually never got a T-Square and was fine just borrowing them from friends but it is helpful for keeping long lines square
Zippered Pouch (to carry supplies in) – if you were in art in high school, your portfolio bag works well for this!
Drawing
Pigma Micron Pens (black): 01 & 05 widths – I LOVE these pens, totally worth the investment
Prismacolor Marker: Black – I got a black and a grey and use both
Prismacolor Pencils: White, Black, Warm Gray 50%, Sepia – I didn’t use these much, you’re probably better off with a crayola colored pencils set (or a hand-me-down) and then getting these specific pencils from the bookstore if your professor requires it for a project
Drafting Pencils: 4H, 2H, H, HB, 3B, 6B – super important to have a wide range of leads. This is a pretty common thing so you could ask an architect or artist you know if they have extras
2 Charcoal sticks, soft – yes, you’ll use these
Dry cleaning pad – I had to Google this and still didn’t recognize it so it can’t be that important
12-color Portable Watercolor Set (Winsor & Newton or equivalent) – I loooove watercoloring so I have a variety of watercolor sets but honestly my favorite one is a cheap kids set. It’s more important to have good color variety than a fancy brand name. You want colors that you like and that you think will be useful for mixing. For me, I look for a true red (none of this red-orange nonsense), a leafy green (green is usually for plants so you want a nice deep olivey green and a lighter yellowy green), a sky blue, a nice purple for shadows (not too bright or too dark), a sienna brown, and a black or dark brown.
Round watercolor brush – I treated myself to nice watercolor brushes and it has by far paid off!
Waterbrush Pen (Kuretake or equivalent) – this brush pen is so nice because it keeps the water inside the pen and you squeeze the handle to add more water allowing for precision, less mess, and easier traveling sketching.
36” Drawing Storage Tube – this could be as simple as a shipping tube with one side taped closed
Model Making
Metal Straight Edge, 24” with cork backing and cutting edge – super useful!
Precision Knife #1 (Xacto or Excel) – one of my most used tools!
Xacto or Excel #11 blades (15 pk minimum, 100 pk recommended) – seriously, get the 100pk of blades
Olfa L-2 snap-off knife Olfa L-2 replacement blades – super helpful just make sure you know how to snap off the blades safely!
Scissors – pretty self explanatory
18”x24” Self-Healing Cutting Mat – SO useful! I also got a mini one which is super cute and fun
Hot Glue Gun (any size) & Glue Sticks – I’m sure you have an extra one lying around
Needle-Nose Pliers –
Tacky Glue (Aileen’s Quick-dry) – yes there’s a difference between Tacky and Elmers
Elmer’s Glue – yes you need both. lots of both. and some wood glue. and a little bit of super glue but only a little. maybe I’ll write a blog post on different glues someday
UHU glue stick – I guess it’s useful, you could also use spray adhesive
5 yard roll Scotch aluminum foil tape – not really sure what this is about
25’ (minimum) Tape Measure – I’m sure you can find an extra one in your garage
Shop Safety Glasses – safety first! Don’t forget to put your name on them and try not to scratch up the lenses
Misc. (Things not included in the kit and things I’d add to the kit)
Screw Drivers: Phillips and Flathead – don’t buy one, you can just borrow them from the shop
Sketchbook (sized to carry at all times) – you’ll take this with you everywhere! Some people prefer 5×7″, some 8×10″, do what feels right in your hand
Cordless Drill (recommended, not required) – not necessary because you can borrow it from the shop but useful so keep your eyes out for one on sale
Razor Saw & Miter Box set (recommended, not required) – do it! I don’t know why this isn’t required but it’s the only way to cut thicker basswood pieces
6” combination square (recommended, not required) – if you think you’re going to be doing woodworking then this will come in handy for keeping things square and exact
Tweezers – I’m adding this one! Get some regular drug store tweezers for manipulating small pieces of paper, your fingers will thank you!
Glue syringe – I’m adding this one too! Suuuper helpful for applying glue in exact precision and it’s more ergonomic after a few hours than holding a full bottle of glue.
Chopper – one more I’m adding, it’s useful for cutting small pieces of basswood for models
Sand Paper – I’m adding this one too because it’s comes in handy – get a fine grain
Modeling materials – basswood (NOT BALSA, NEVER BALSA) thin sticks and sheets (1/32″ to 1/4″ sticks are my favorite and 1/16″ sheets), chipboard, newsboard, cardboard – you can often dumpster dive for good scraps of cardboard and even chipboard or wood
Technology
Laptop computer, Mac or PC – this is such a highly debated topic so I’ll just tell you my personal experience. I switched from a desktop PC to a 15″ MacBook Pro when I came to college and I love it. It was around the time of Windows 10 and I much prefer the user interface of the Mac to Windows 10. The size of the laptop has been perfect and I haven’t had any issues yet. That being said, around third year you start getting into Grasshopper and Revit which you can’t run as easily on a Mac so we’ll see if I still love my computer by the end of the year but I think I will. In second year and up, lots of people have larger external monitors for their laptops which helps keep your eyes from getting tired looking at details on a smaller screen. And don’t forget to get a case for your pretty new computer so it doesn’t get scratched up!
Mouse – super useful to save your fingers when drafting
USB flash drive, 4 GB (min) – useful as well, just remember to put your name on it
All-In-One Color Inkjet Printer & Scanner (recommended, but you can print on campus) – I have always printed in the library (or on a friend’s printer) and been just fine
External Hard Drive, 1 TB (4TB is a plus; wireless back-up capability is a plus) – you can just use cloud storage sites, no need for a physical hard drive but it is VERY important to back up your work to avoid losing it all if your computer crashes or breaks or gets stolen.
Digital Camera, ideally DSLR (recommended, see FAQ for info about camera loans) – I already had a DSLR and am a bit of a camera nerd so I brought it and have loved it. If you’re into photography I’d recommend investing in a DSLR because you’ll have fun learning how to use it. That being said, you can rent them (for free!) on campus and we have a full photography studio for taking pictures of your models.
Adobe Creative Cloud (Photoshop, Illustrator, InDesign and Acrobat) – I know it’s expensive but it’s so so useful. When I signed up there was a student discount for the first year so ask about that.
Rhinoceros 5 – Again, it’s expensive up front but you’ll use it so much all five years.
Books
There aren’t any required books for studio but you will likely get assigned PDF readings from your professors and non-assigned “suggested” readings – do them! There is so much to learn and most of us upperclassmen have a whole list of our favorite or most useful design and reference books. Look online or ask upperclassmen for PDFs of these or ask architects you know if they have outdated copies.
Some of my favorites:
For design thinking:
Poetics of Space – Bachelard
Eyes of the Skin – Pallasma
Thinking Architecture – Zumthor
Manual of Section – LTL
For reference:
Architectural Graphic Standards, duh
Building Construction Illustrated
Materials for Design
Happy shopping! And remember to breathe, savor your mom’s cooking, and hug your pets while you can.
Internships
I am two weeks into my second internship at an architecture office. My first internship was during the end of the school year and I learned so much about creating construction documents and the everyday work of an architect. I really enjoyed my time there and could’ve stayed forever but I wanted to see a different side of architecture. So this summer, I’m doing another internship at a different firm that that looks more at the social side of architecture. I’ve loved working for both of these firms and I can already tell that I will be happy working professionally as an architect after college.
 |
| My second home for the summer |
If walls could dream… they’d dream of being constructed in architecture offices!
Visiting Cornell University: My Top 4 Things To Do
This past weekend, I visited Cornell University in Ithaca, New York. I had a wonderful time exploring the beautiful campus and learning more about their architecture program.
Here are a few tips for your own tour:
1. Visit the Johnson Museum of Art

The museum has a patio, a light-up roof, and a viewing tower.
Whether you’re more of an art-observer or an architecture-oogler…

Architectural detail of a two story floor-to-ceiling window.
you’ll love the view from the top! (And did I mention it’s free?)

Beautiful panoramic views of campus, Ithaca, and the lake.
2. Explore Ithaca!
Ithaca is a rural town in the finger lakes region of New York. Cornell University is located on a hill to the northeast of town. Campus itself is divided into central campus (where all of the academic buildings are), north campus (north of the river, where freshman housing is), and west campus (down the hill on the western edge of campus, where upperclassmen housing is).
Below are two of my favorite “downtown” type places in Ithaca.

Collegetown is directly south of campus and has many great places to eat. I’d totally recommend Collegetown Bagels. Their chocolate chai blew my mind!

Collegetown
The Commons, under construction during my visit, has many more great places to eat. My favorite restaurant there was Waffle Frolic. Yes, just as the name implies, it is indeed an entire restaurant dedicated to the most delicious and inventive waffles ever.

Ithaca Commons
3. See Some Natural Beauty
To work off all the extra bagel and waffle-related calories you’ll be consuming while in Ithaca, take a walk to some waterfalls. If a “walk” in the cold New York weather sounds daunting, don’t worry. Triphammer falls can be seen from your car as well as from a footbridge literally on top of it. To get the true Cascadilla experience requires climbing stairs down into the gorge, but it’s SO worth it!
There are so many beautiful waterfalls in Ithaca, but these two are right on campus (see map above).

The top part of Triphammer Falls.

Cascadilla Falls

Cascadilla Falls
4. Get in the Classroom
Last but not least, it is important to really investigate what it means to be a student at this university. For me, that meant attending an AAP (College of Architecture, Art, and Planning) Information Session and visiting studio. The information session gave me an opportunity to ask architecture-specific questions to an admissions person and get to know the requirements and expectations of studying architecture at Cornell. Visiting studio was one of the highlights of my visit at Cornell because, as an architecture student, I will be spending the majority of my time in studio. First of all, I loved how Milstein Hall being one giant room encourages so much collaboration and community between architecture students. Second, I got to sit in on a critique and really see how intellectually Cornell approaches design.
If walls could dream… they’d dream about art, food, and waterfalls.
Map of Architecture Colleges
As all “visual people” would know, the NAAB (National Architecture Accreditation Board) list of architecture colleges is not very helpful in understanding where these schools actually are, so I created this interactive Google Maps map of all of the accredited BArch programs in the US. Now we all can easily visualize the locations of the schools as well as start to learn about the climate and the town around them to help simplify our college search.
Happy National Architecture Week!
It’s National Architecture Week, the perfect time to take a moment to appreciate the architects and architecture around us! The built environment often blends so naturally with our experience of it that we barely even know it’s there, but “the details are not the details, they make the design” as Charles Eames once said. So this week I’m going to put extra effort into looking for the magnificent little details of design.
My TED Talk: Personal, Timeless, Everywhere
The wait’s over! The video of my TED talk is finally up!
 |
| Photos by Cassie Triplett and Isaac Cook |
I spoke at TEDxYouth@GrassValley a few weeks ago on the topic of architecture and how it influences our lives.
I used the ideas of it being personal, timeless, and everywhere to guide my talk. I also shared some principles of design that help us understand architecture, and then introduced the idea of great design disappearing and just letting life happen.
So what are you waiting for?!? Go watch the video!!
Architecture is…
I’ve been blogging about architecture for almost four years now, and asked a lot of walls why they’re dreaming, but I haven’t really stopped to ask myself why architecture is so important to us as a society. I think it boils down to three main points; that architecture is personal, timeless, and everywhere.
Architecture creates unique and memorable experiences for us all. We all live in a house, in architecture. And it has a huge effect on our lives. It serves as the background, the setting, where life takes place. Architecture is unique to every one of us, but it’s universal to everyone. It creates community.
Architecture connects us to our past and will propel us into our future. Styles may change over time. By understanding these styles, we get to know life in that time period a little more. Frank Gehry once said that “Architecture should speak of its time and place, but yearn for timelessness.”
Architecture is in every place and every detail. No matter where you go in the world, in any climate and any culture, you’ll find architecture. But the success of architecture lies in its details. It’s the details (the materials, the lines, the shapes, the use of light, etc.) that make or break the experience of a building.
And to me, architecture is everything. It’s all about problem solving and critical thinking, yet it’s also creative and tangible and inspiring. It’s the perfect mix of math and engineering with art and design. It has the power to change the world. I feel so lucky that I’ve found this passion for architecture and I love to tell people about it! In fact, this Saturday I’ll be speaking about architecture and some of the principles I’ve shared above at TEDxYouth@GrassValley. Wish me luck! And I’ll keep you updated on how it goes and post the video of my talk as soon as it’s published!
How To Become an Architect
So you want to be an architect?
Well there are a few steps you have to fulfill before you can practice architecture.
First you must meet the EDUCATION requirement.
This means you have to earn a degree from a NAAB (National Architectural Accrediting Board) accredited program, for example the Bachelors of Architecture (B.Arch) or Masters of Architecture (M.Arch)
Second you must meet the EXPERIENCE requirement
This includes completing the Intern Development Program (IDP) by working as an intern for an architectural firm
Third you must meet the EXAMINATION requirement
This is when you take the Architect Registration Examination (ARE) which tests your knowledge and skills so you can practice architecture independently
Now you can be LICENCED by a local jurisdiction and CERTIFIED by the NCARB (National Council of Architectural Registration Boards)
Any questions? Leave me a comment below!
*this is just an overview of the steps to becoming an architect in the US, be sure to research the details of each program before committing yourself to this major
Philadelphia University

Philadelphia University is a leader in the fields of architecture, design, engineering, business, textiles, and health and sciences. They offer an accredited 5 year Bachelor of Architecture. It’s a “industry-centered, liberal arts-infused education, blending academic scholarship with hands-on, professional learning.”
The average class size is 18 with a student-to-faculty ratio of 14:1 and just under 3,000 undergraduate students. It’s a competitive college to get into, and fairly pricey at $30,356 in tuition and fees, but their undergraduates’ career placement rate in major-related jobs is consistently above 90%. The university itself sits on 100 acres in the East Falls section of Philadelphia.
Still want more? Visit http://www.philau.edu/arch/index.html
University of Idaho
Another architecture program I found interesting was at University of Idaho. It offers a Bachelor of Science in Architecture as well as an accredited Master of Architecture. It’s a great blend of creativity and arts with science and engineering. Alumni get jobs as architects, draftsmen, carpenters, urban planners, set designers, and more. The program is recognized for it’s research and expertise in sustainable design, green design, health and wellness issues, as well as social justice.

Now what’s the college like?
Recognized by the Princeton Review as one of the best public universities in America, it’s a public research university located in the beautiful and rural town of Moscow, Idaho. It’s on a semester calendar. Its colors are silver and gold. It has just over 12,000 students. Its out-of-state tuition is $16,384, ranked third by Newsweek’s “Best Colleges For You 2012” for affordable public research universities. Its acceptence rate is 61%. It has a variety of sports teams, clubs, and facilities.
Want more info? Check out their website:
http://www.uidaho.edu/caa/architecture/bsarch