100 Fold Summer Design-Build
I had the amazing opportunity to spend the summer in Lakeside, Montana learning from an incredible group of architects and working with a diverse team of architecture students to design and build a playground structure for a local middle school.
Mentorship and Teamwork
100 Fold Studio has such a big heart for mentorship and they empower and inspire the next generation of humanitarian architects through their example. Just spending a few months with them, I noticed right away that they do architecture differently. It’s not about ego. It’s about listening.
With a group of 24 architecture students from all across the US and abroad all trying to design this one playground, I though this project was going to be a train wreck! Thankfully, it was the exact opposite! With 100 Fold’s model of cooperation over competition as an example and with a common goal of making our project the best we could for the kids who were going to use it, the design process went smoothly.
Our Design
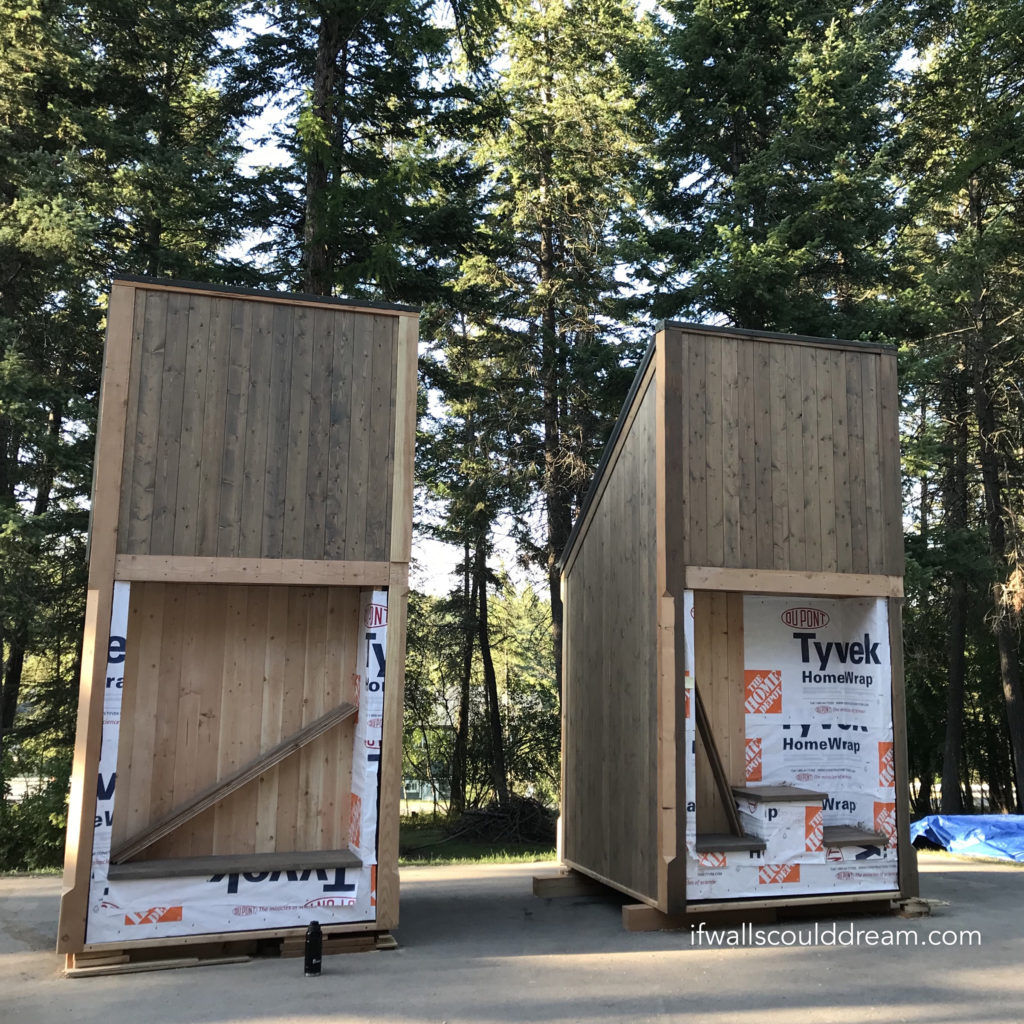
The prompt was to build a structure that would be the catalyst and heart of a new playground for the local middle school, and that would store their outdoor games. When we met with the school principal, she emphasized that she wants the school to focus on the whole child, so we designed four sheds with the themes “intellectual, social, emotional, and physical” to represent different aspects of a child. Each shed has a bench area on the front with something that represents its theme. For example, social shed has a long bench and the intellectual shed has a table with a chess board. In the middle of the four sheds is a fun new game the kids love called Nine Square in the Air. Lastly, the structures frame the beautiful mountain views on rural the Montana campus and remind the students of the beautiful place they live in.
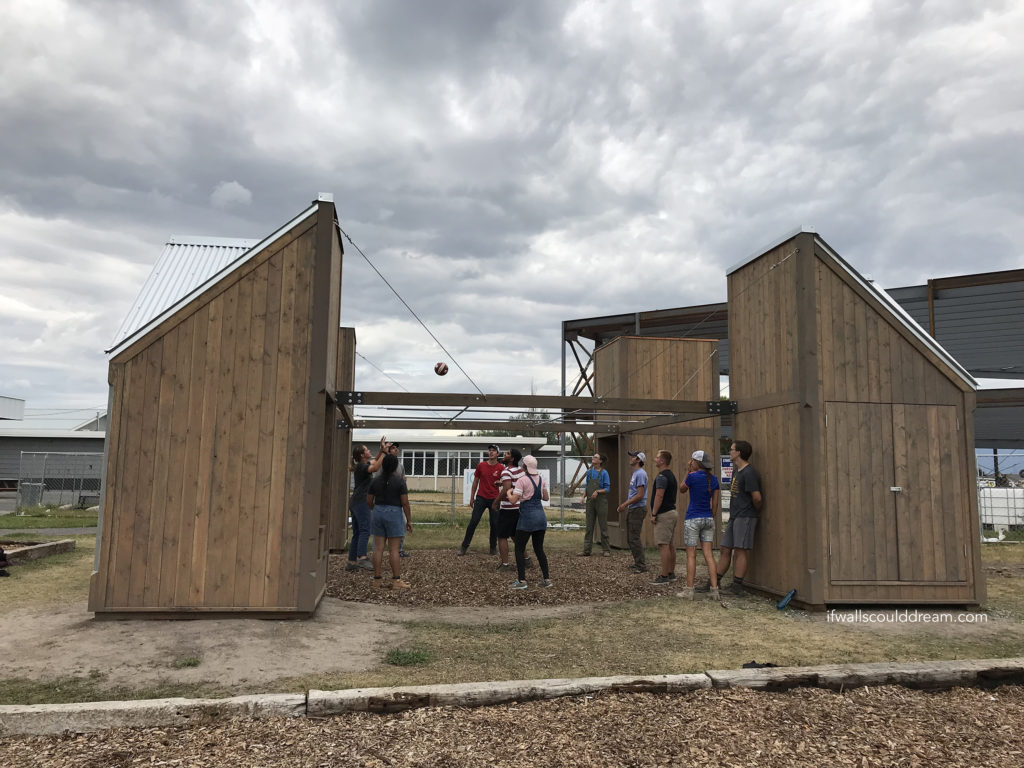
Build Week
After working together to design the project, we got to build it together too! Again, I though that 24 people (plus the staff who helped us!) building a structure was going to be a disaster but it actually worked out really well. We all learned new things but also learned how to shine in our strengths. We came together as a team and made lasting memories. We also learned that it’s REALLY HARD TO BUILD THINGS IN REAL LIFE! Everything takes longer than you’d imagine and it looks like you’re going so fast at first, but the finishing touches take so much patience! But we also learned that it’s SO WORTH THE WAIT. It was priceless to get to play in the finished structure and now to see photos of the kids enjoying it!
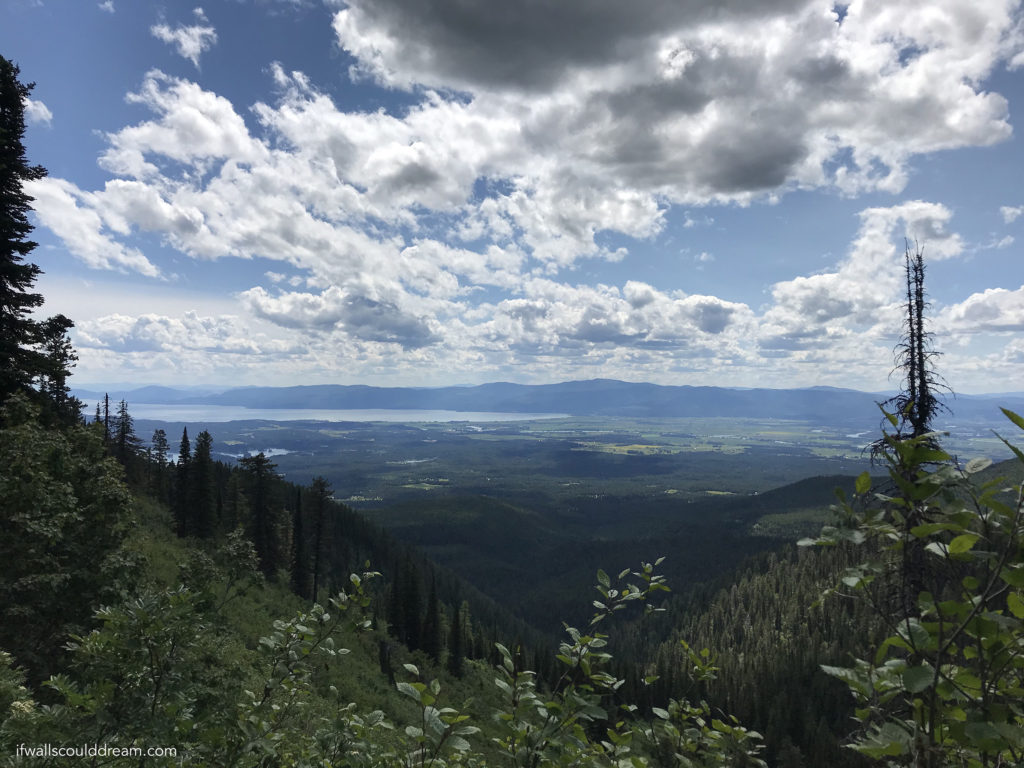
Beautiful Montana
It was such an amazing summer of growth, not only in my architectural and leadership skills, but personally. It was a great time of reflection in nature and a time to think about WHO I want to be as an architect.
I can’t recommend 100 Fold Studio enough. It’ll be a landmark in my path as an architect. A distinct wayfinding point in my career. A solid foundation.
Podcast: Swan Levine House
The third episode of the If Walls Could Dream podcast is here! Today, we are touring a hospital that became a bnb and art studio in the small town of Grass Valley, CA. This unique and charming bnb was lovingly restored to tell the history of its past.
Special thanks to Howard Levine for sharing his story.
Podcast: Copenhagen City Hall Part 2
The second episode of the If Walls Could Dream podcast is here! Today, Kristoffer, our favorite city hall tour guide, tells us how he discovered the hidden meaning behind the stairwell. You aren’t gonna want to miss this one!
Special thanks to Kristoffer Sahlholdt for sharing his story.
Podcast: Copenhagen City Hall Part 1
If Walls Could Dream is launching a podcast! It’s all about the stories hidden within the walls of everyday buildings. I believe every building has a story to tell, but it’s up to us to listen. I have loved writing about buildings here for the past nine years, and I think I’ve learned a lot about how to “read” buildings, but I wanted to be able to invite you all into the stories better and I hope this podcast will do just that. Join me as we go around the globe, chasing stories of everyday buildings with extraordinary dreams.
Special thanks to Kristoffer Sahlholdt for sharing his story.

Overlapping Transparency
This quarter, I got to design a mixed use homeless housing project in Los Angeles. This project is based on the housing first model of the Skid Row Housing Trust (SRHT) in Los Angeles. We got to tour SRHT projects and get a feel for the Skid Row and Arts District neighborhoods of LA.
The housing first model seeks to end homelessness by giving people houses. It’s that easy. No strings attached to employment or substance abuse, you give them a house and that gives them the solid foundation to rebuild their life.
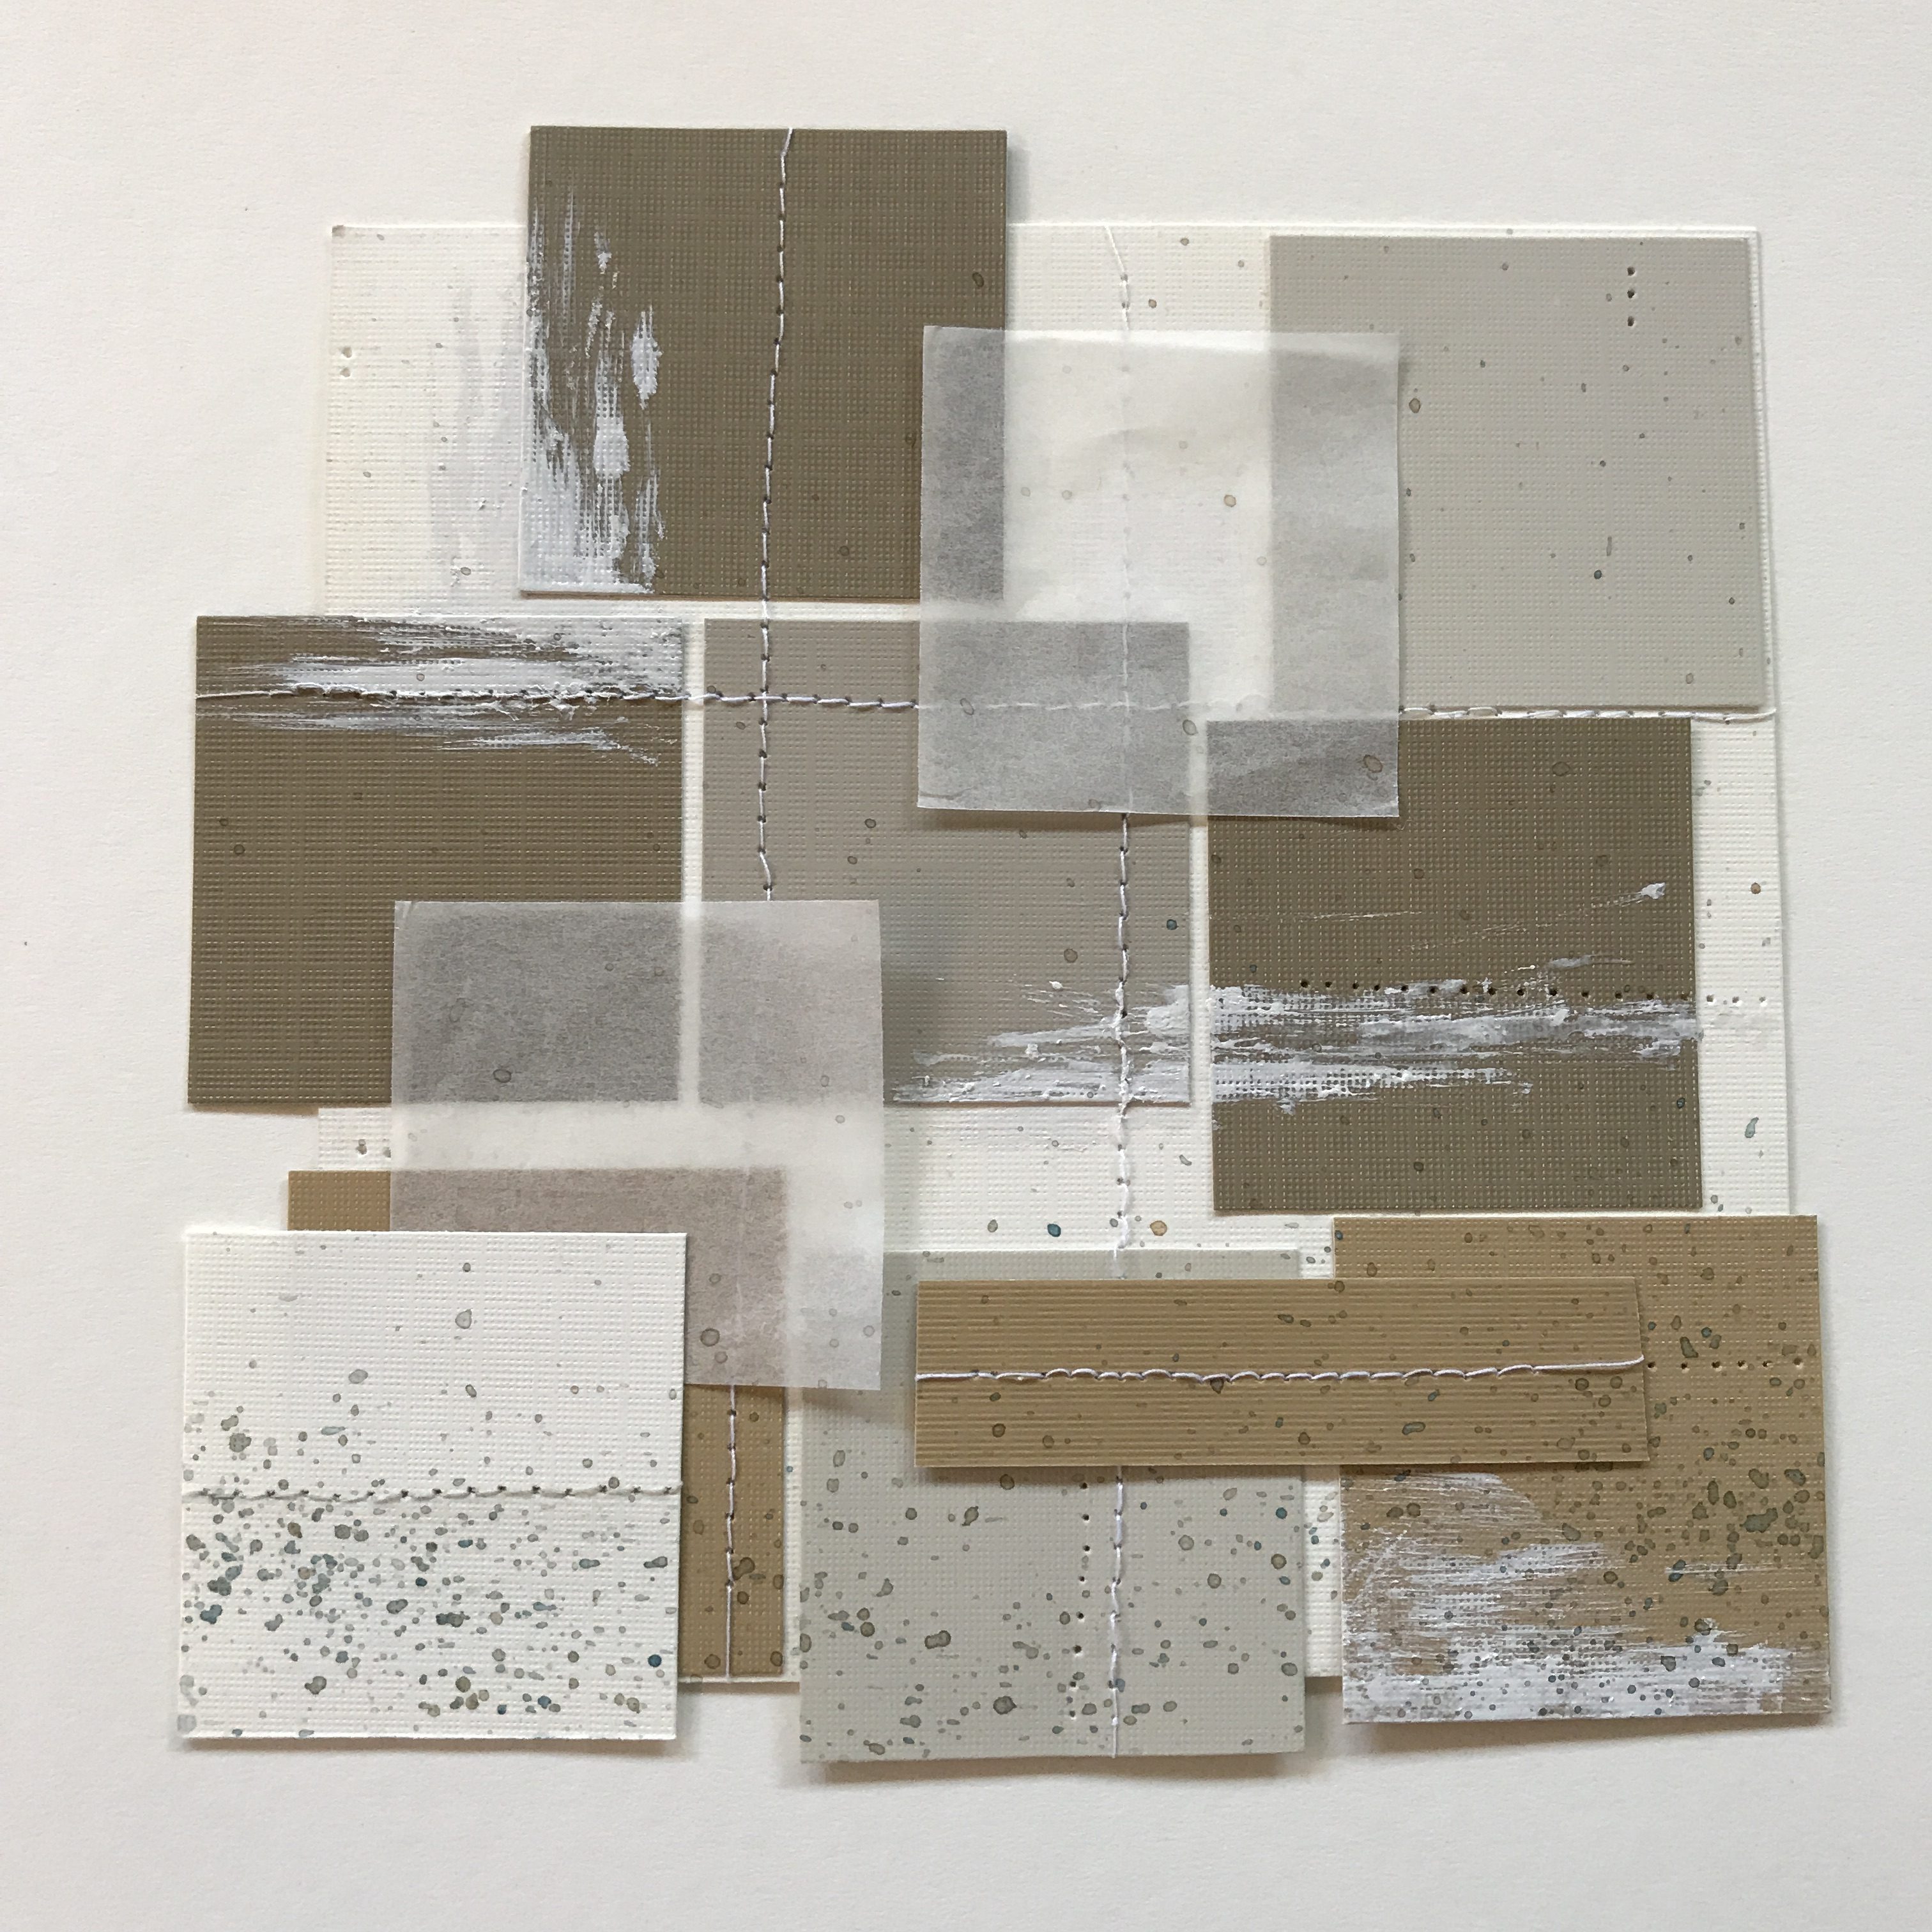
We started the quarter out by making collages and I created this piece based on the idea of stitching together various different programs to see how they can overlap and work together to create something new and better than being on their own.
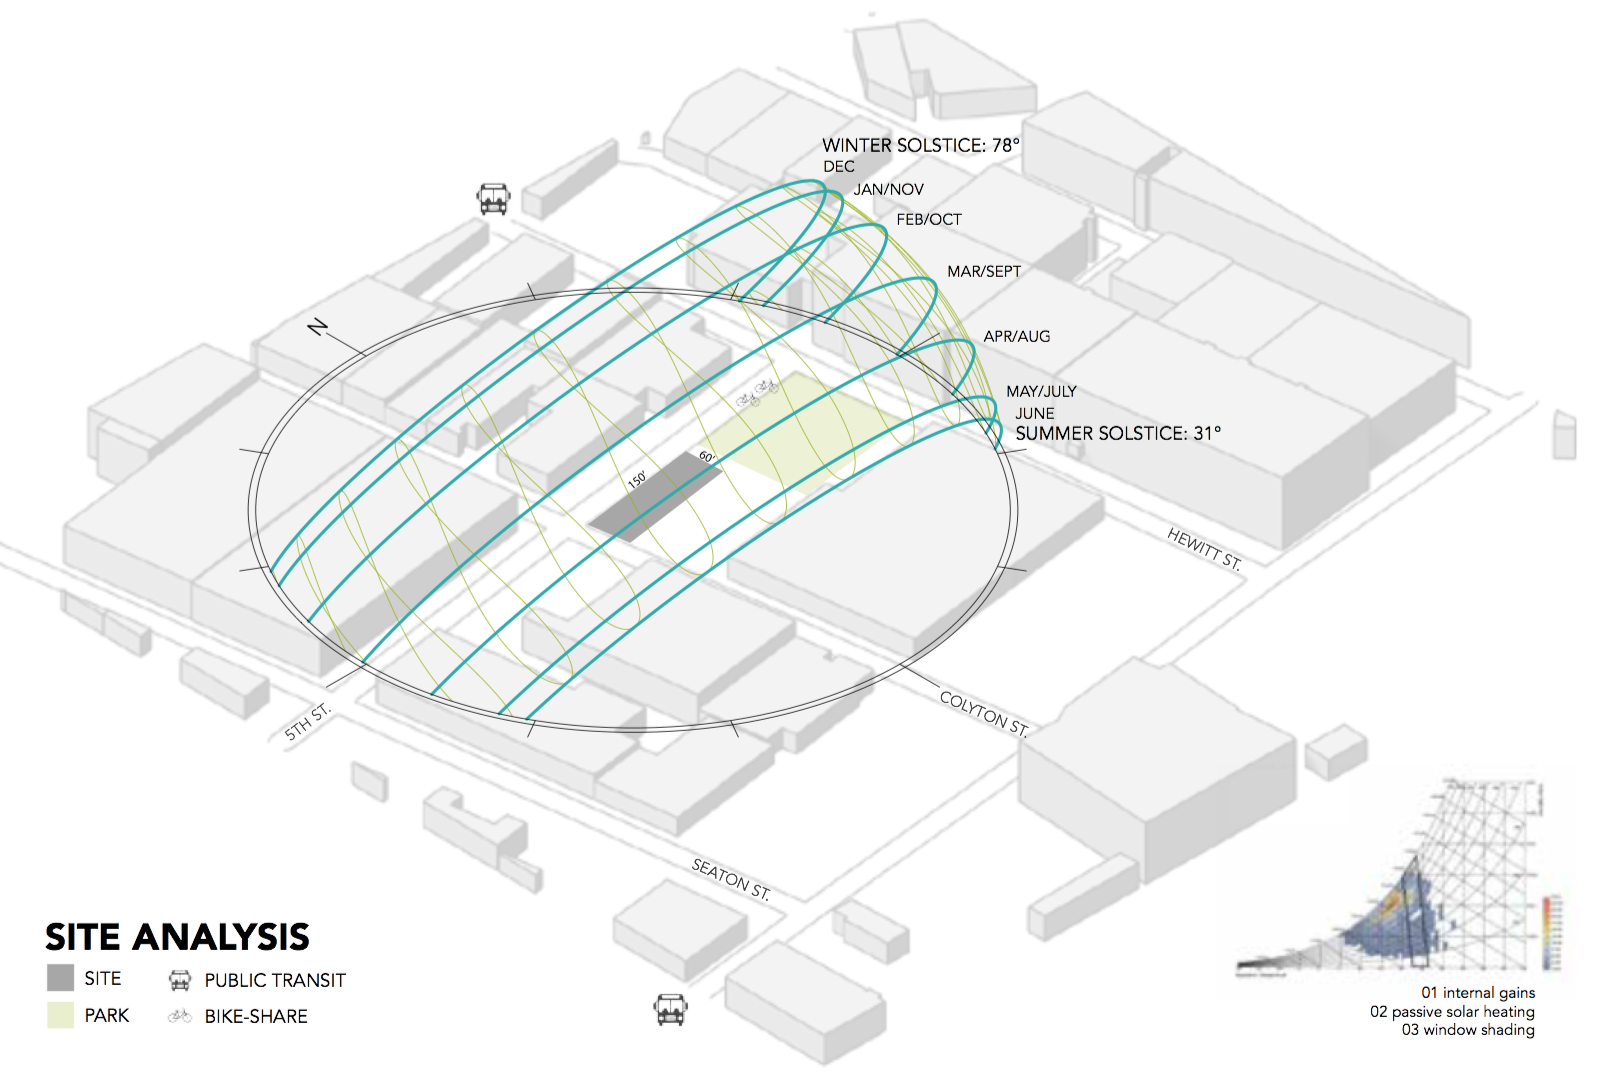
Our site, in the Arts District of Los Angeles, has access to public transportation, great southern sun exposure, and a park next door. When we visited, there were lots of great artist spaces, coffee shops, and restaurants in this area.
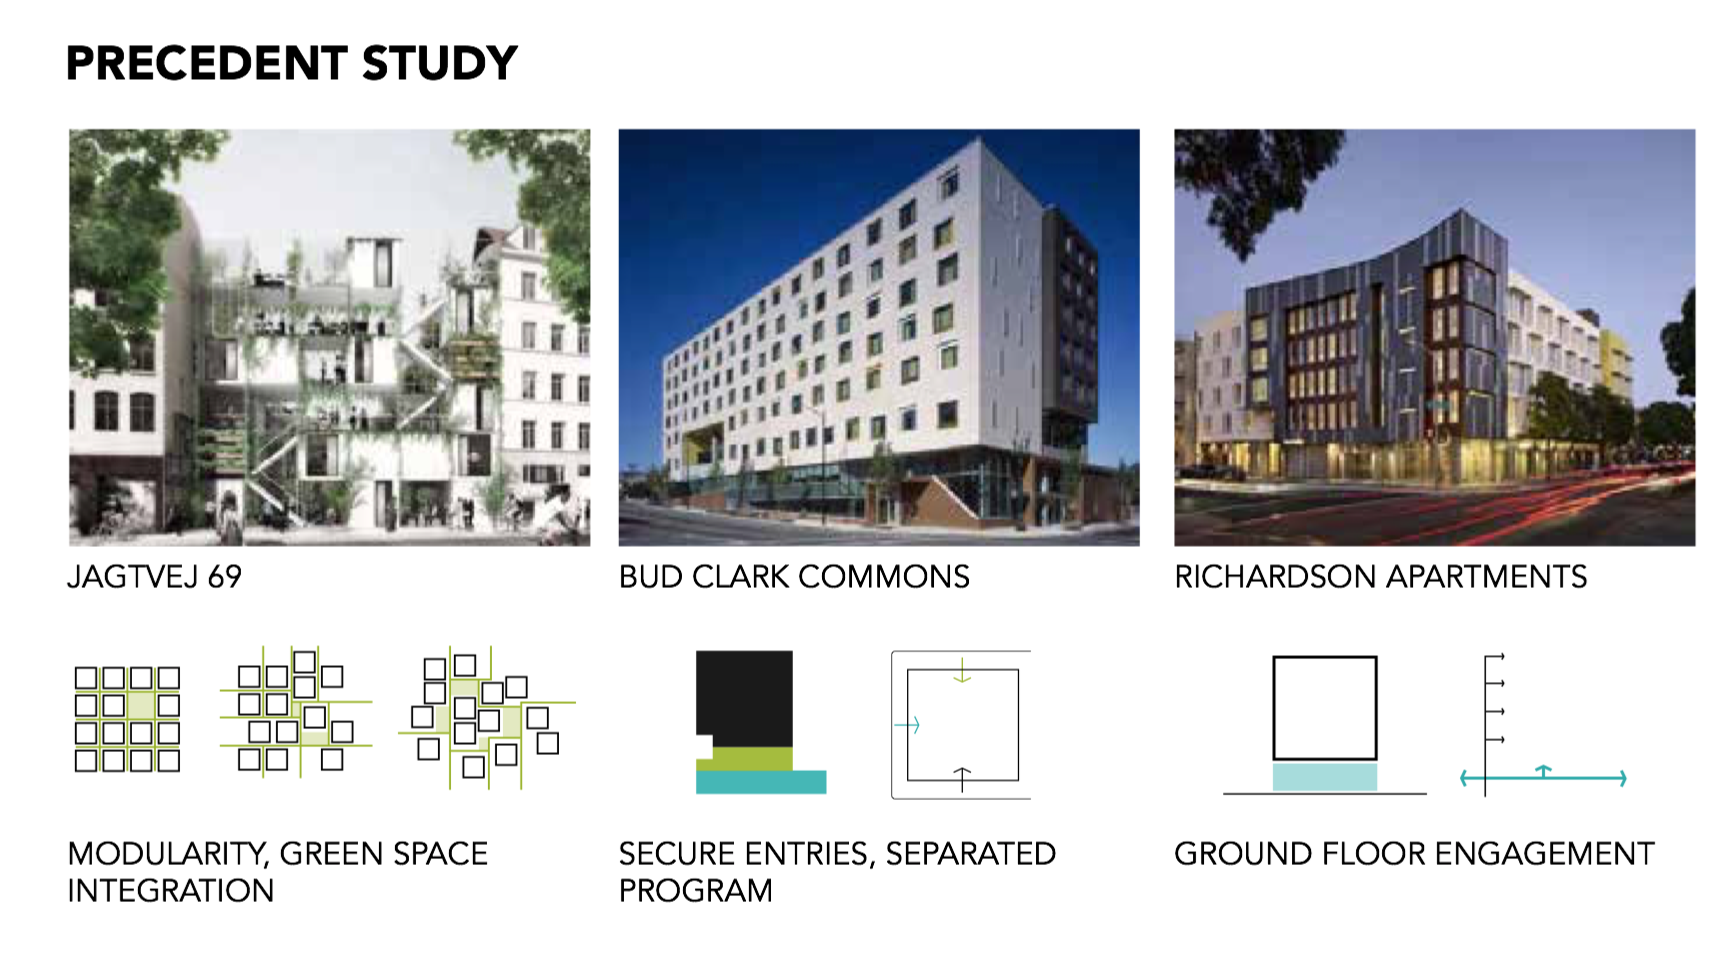
We studied precedents of mixed use homeless housing to see how other architects integrated green space, provided security, and public engagement.
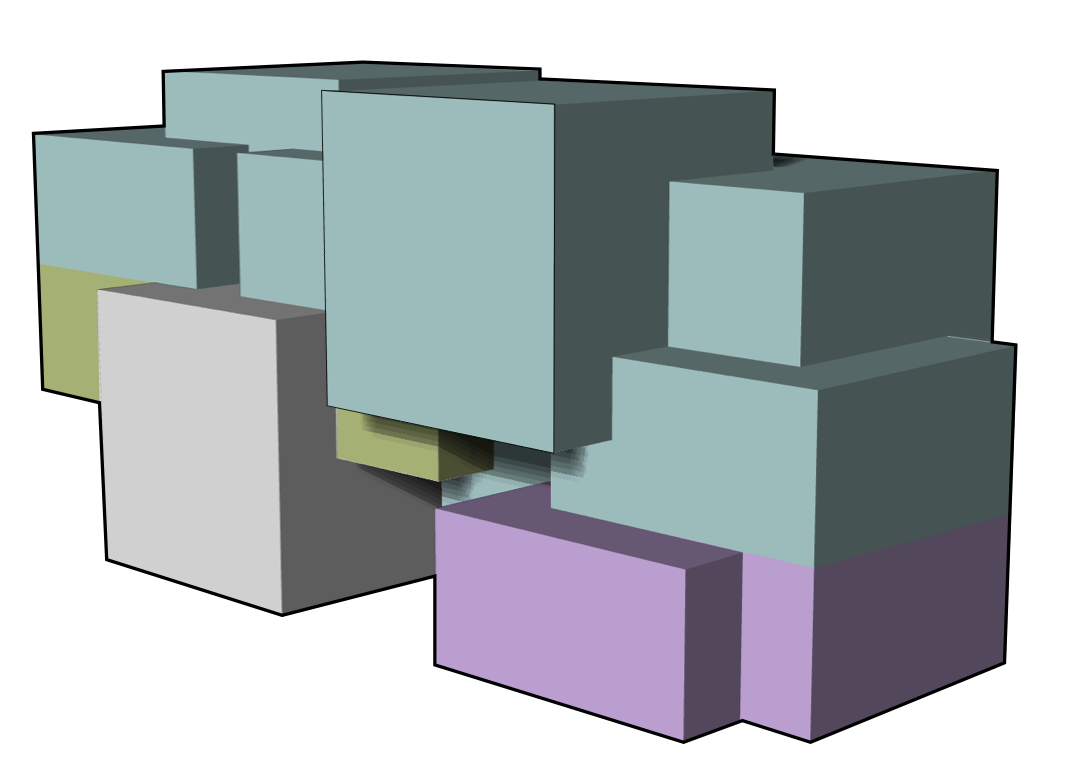
I created the massing for my building using overlapping cubes. In the diagram below, the grey is the restaurant, purple is the ceramics studio, green is the health clinic, and blue is the apartments. I like how this massing creates covered areas on the ground floor and patios on the upper floors.
In addition to a massing scheme, the idea of overlapping plays out in the program. This building is all about what happens when you combine different programs in one building. How can you build symbiotic relationships between seemingly different groups of people and functions within a building?
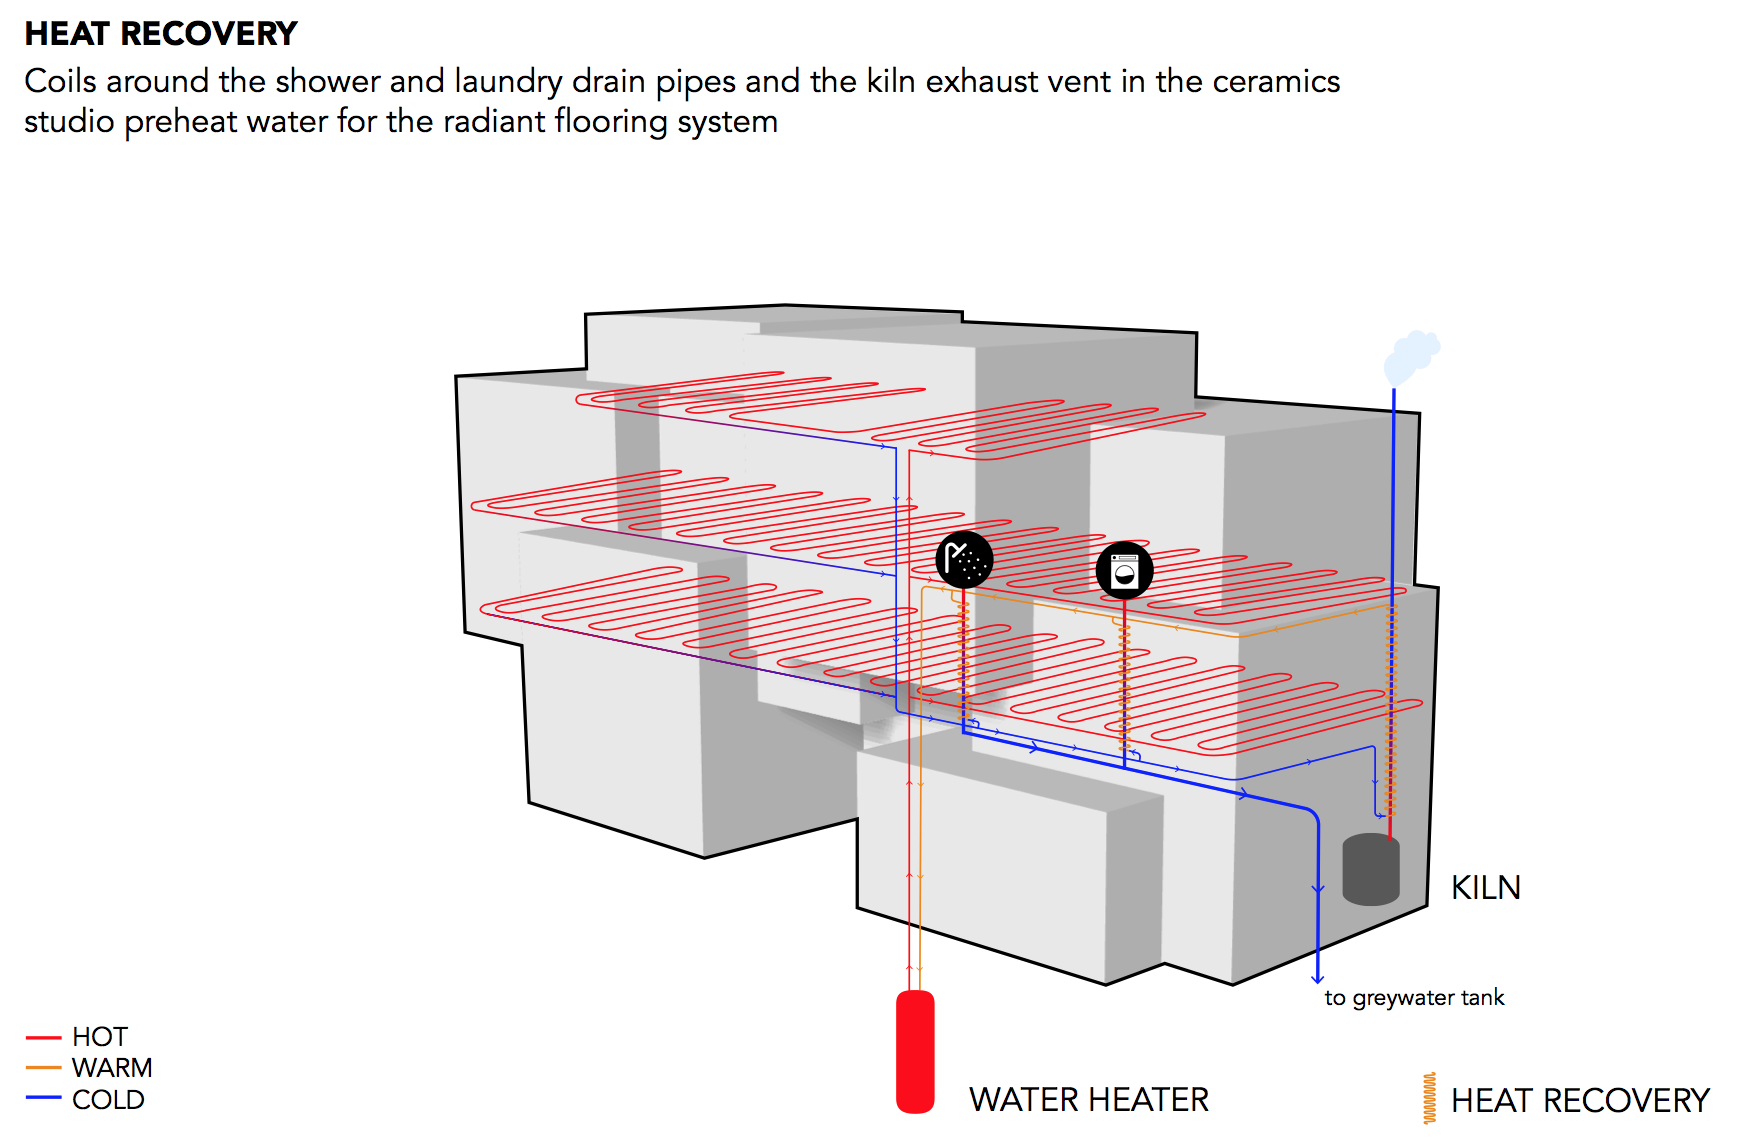
The building design includes heat recovery, using waste heat from the ceramics kiln to provide radiant floor heating in the apartments.
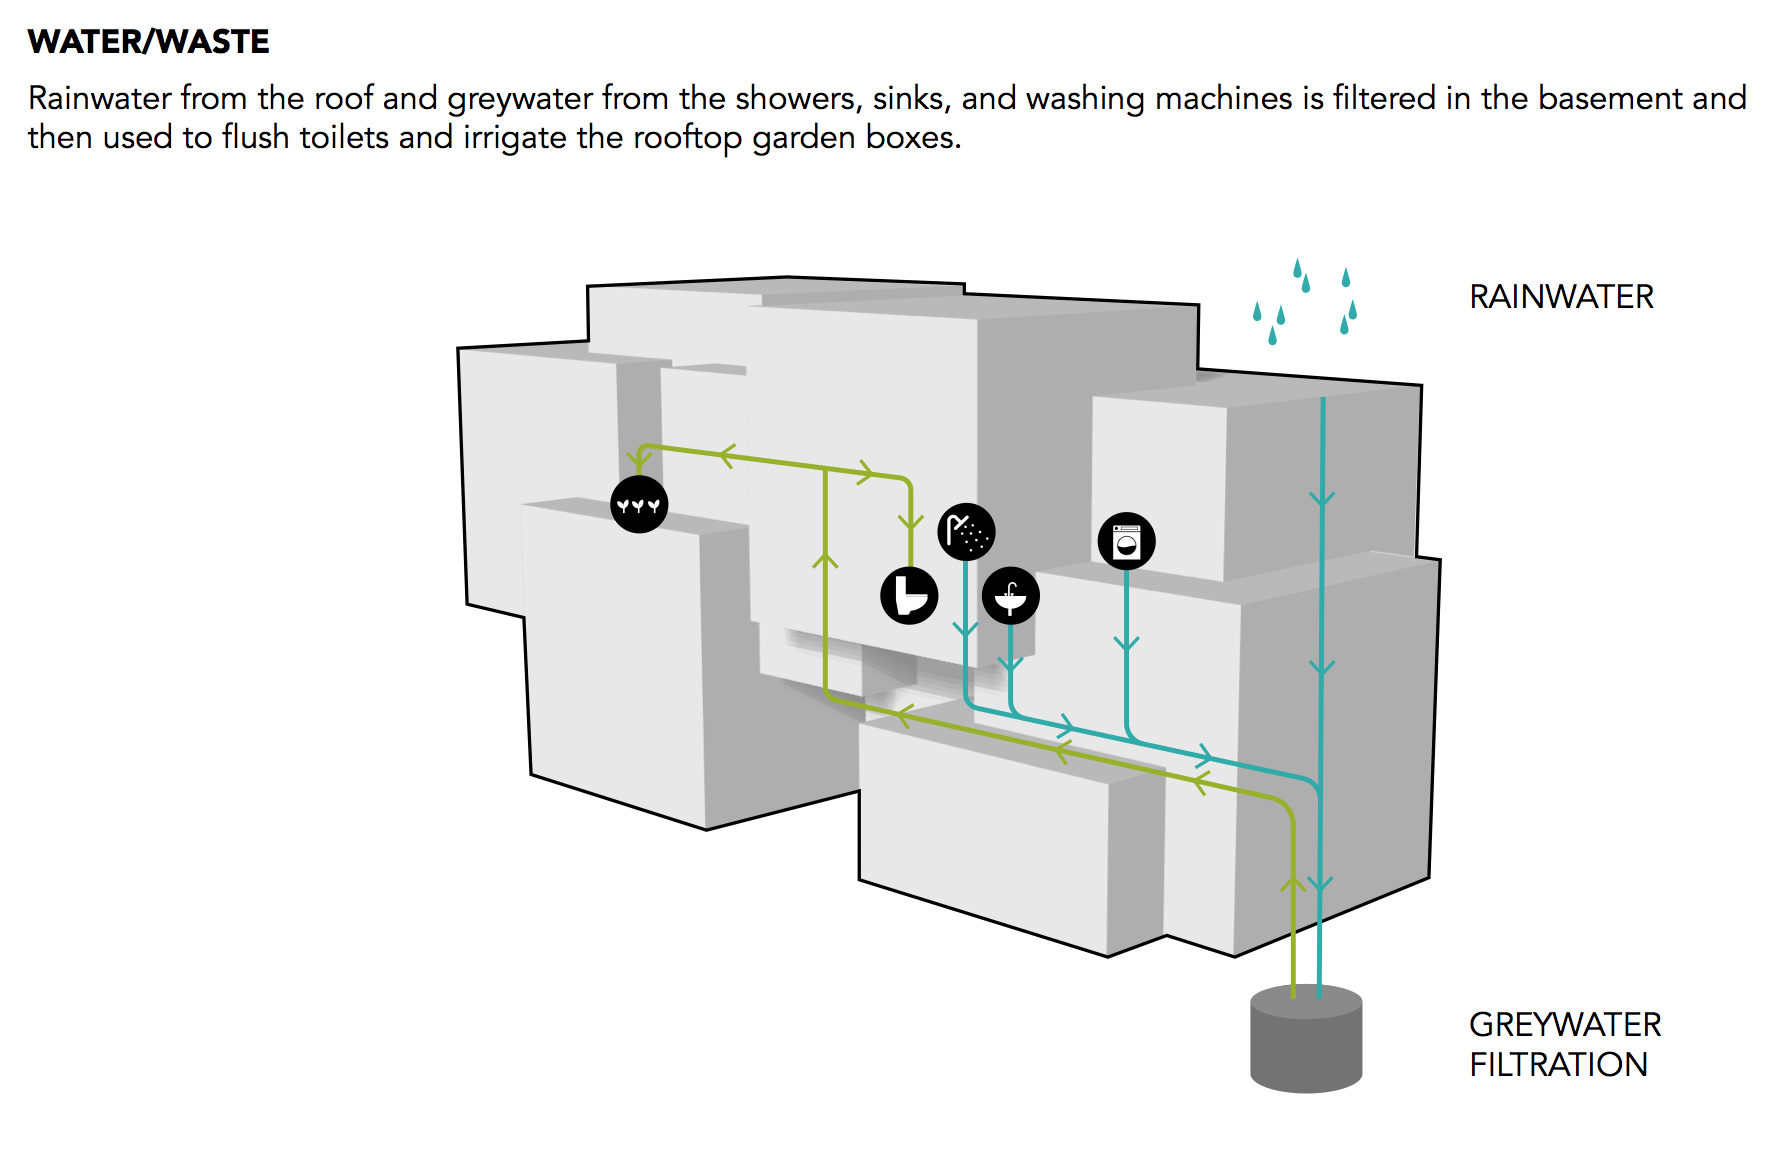
The building also has a water recycling system. Rainwater from the roof and grey water from the showers, sinks, and washing machines, are filtered and reused to flush toilets and irrigate planters.
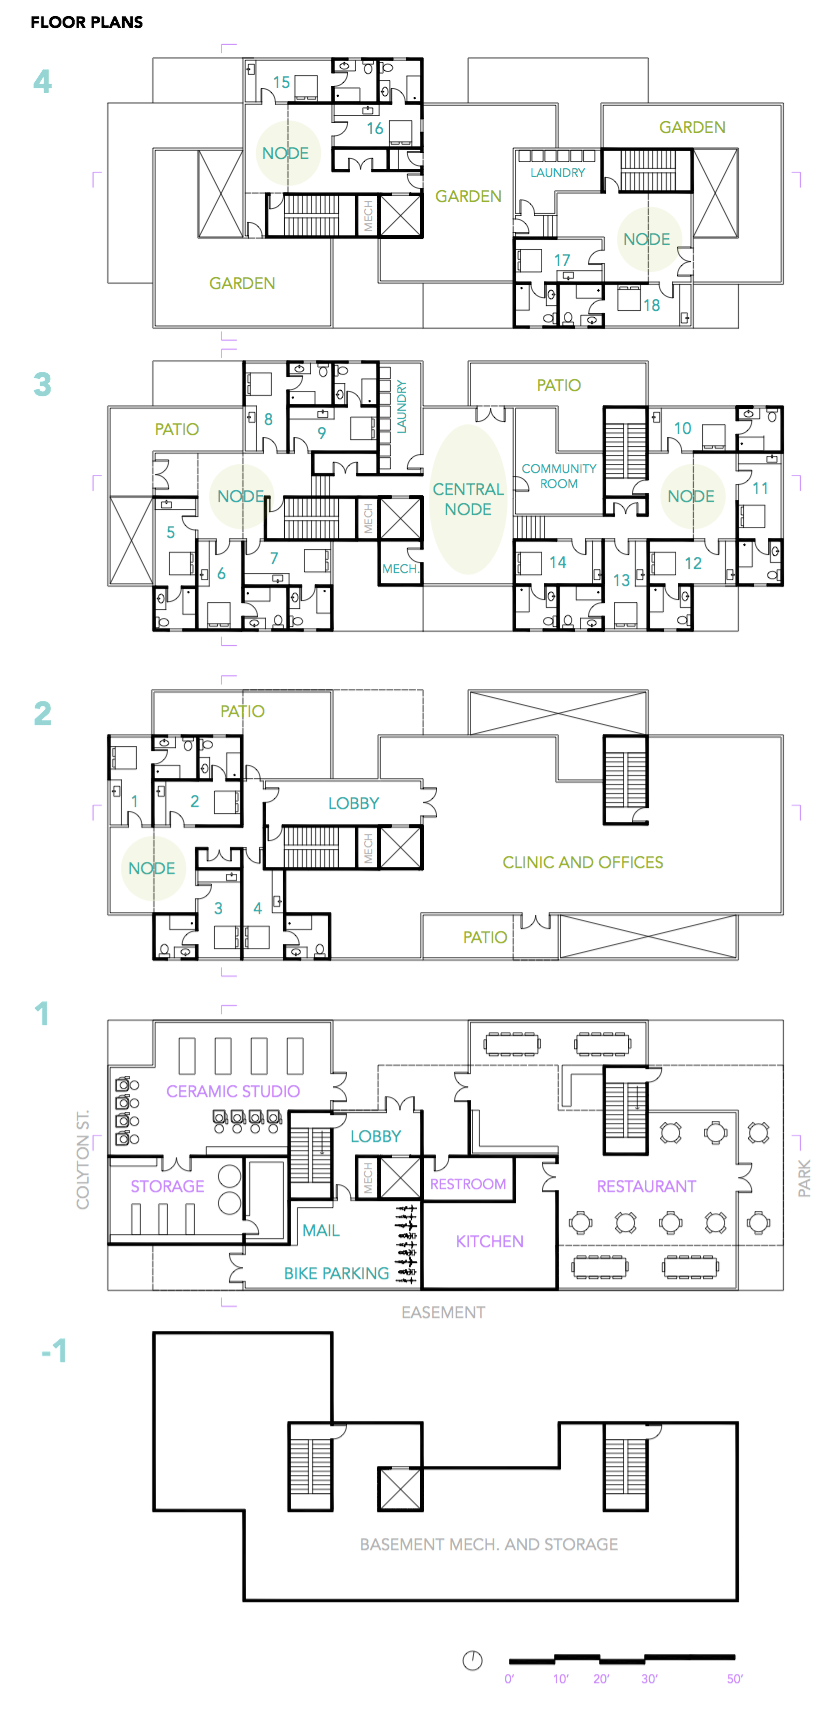
The floor plan for the building, below, shows the different programs in the building. The apartments on the upper floors each open on to a common “node” space that can be used like a shared living room. It encourages residents to get to know their neighbors, have dinner parties, and build community.
The ceramics studio on the first floor helps to connect the Art District community with the formerly homeless residents through art therapy and community events. My vision for this space is that they would have classes where community members could learn alongside residents. They could have an annual fundraising dinner and auction off pieces made by the residents.
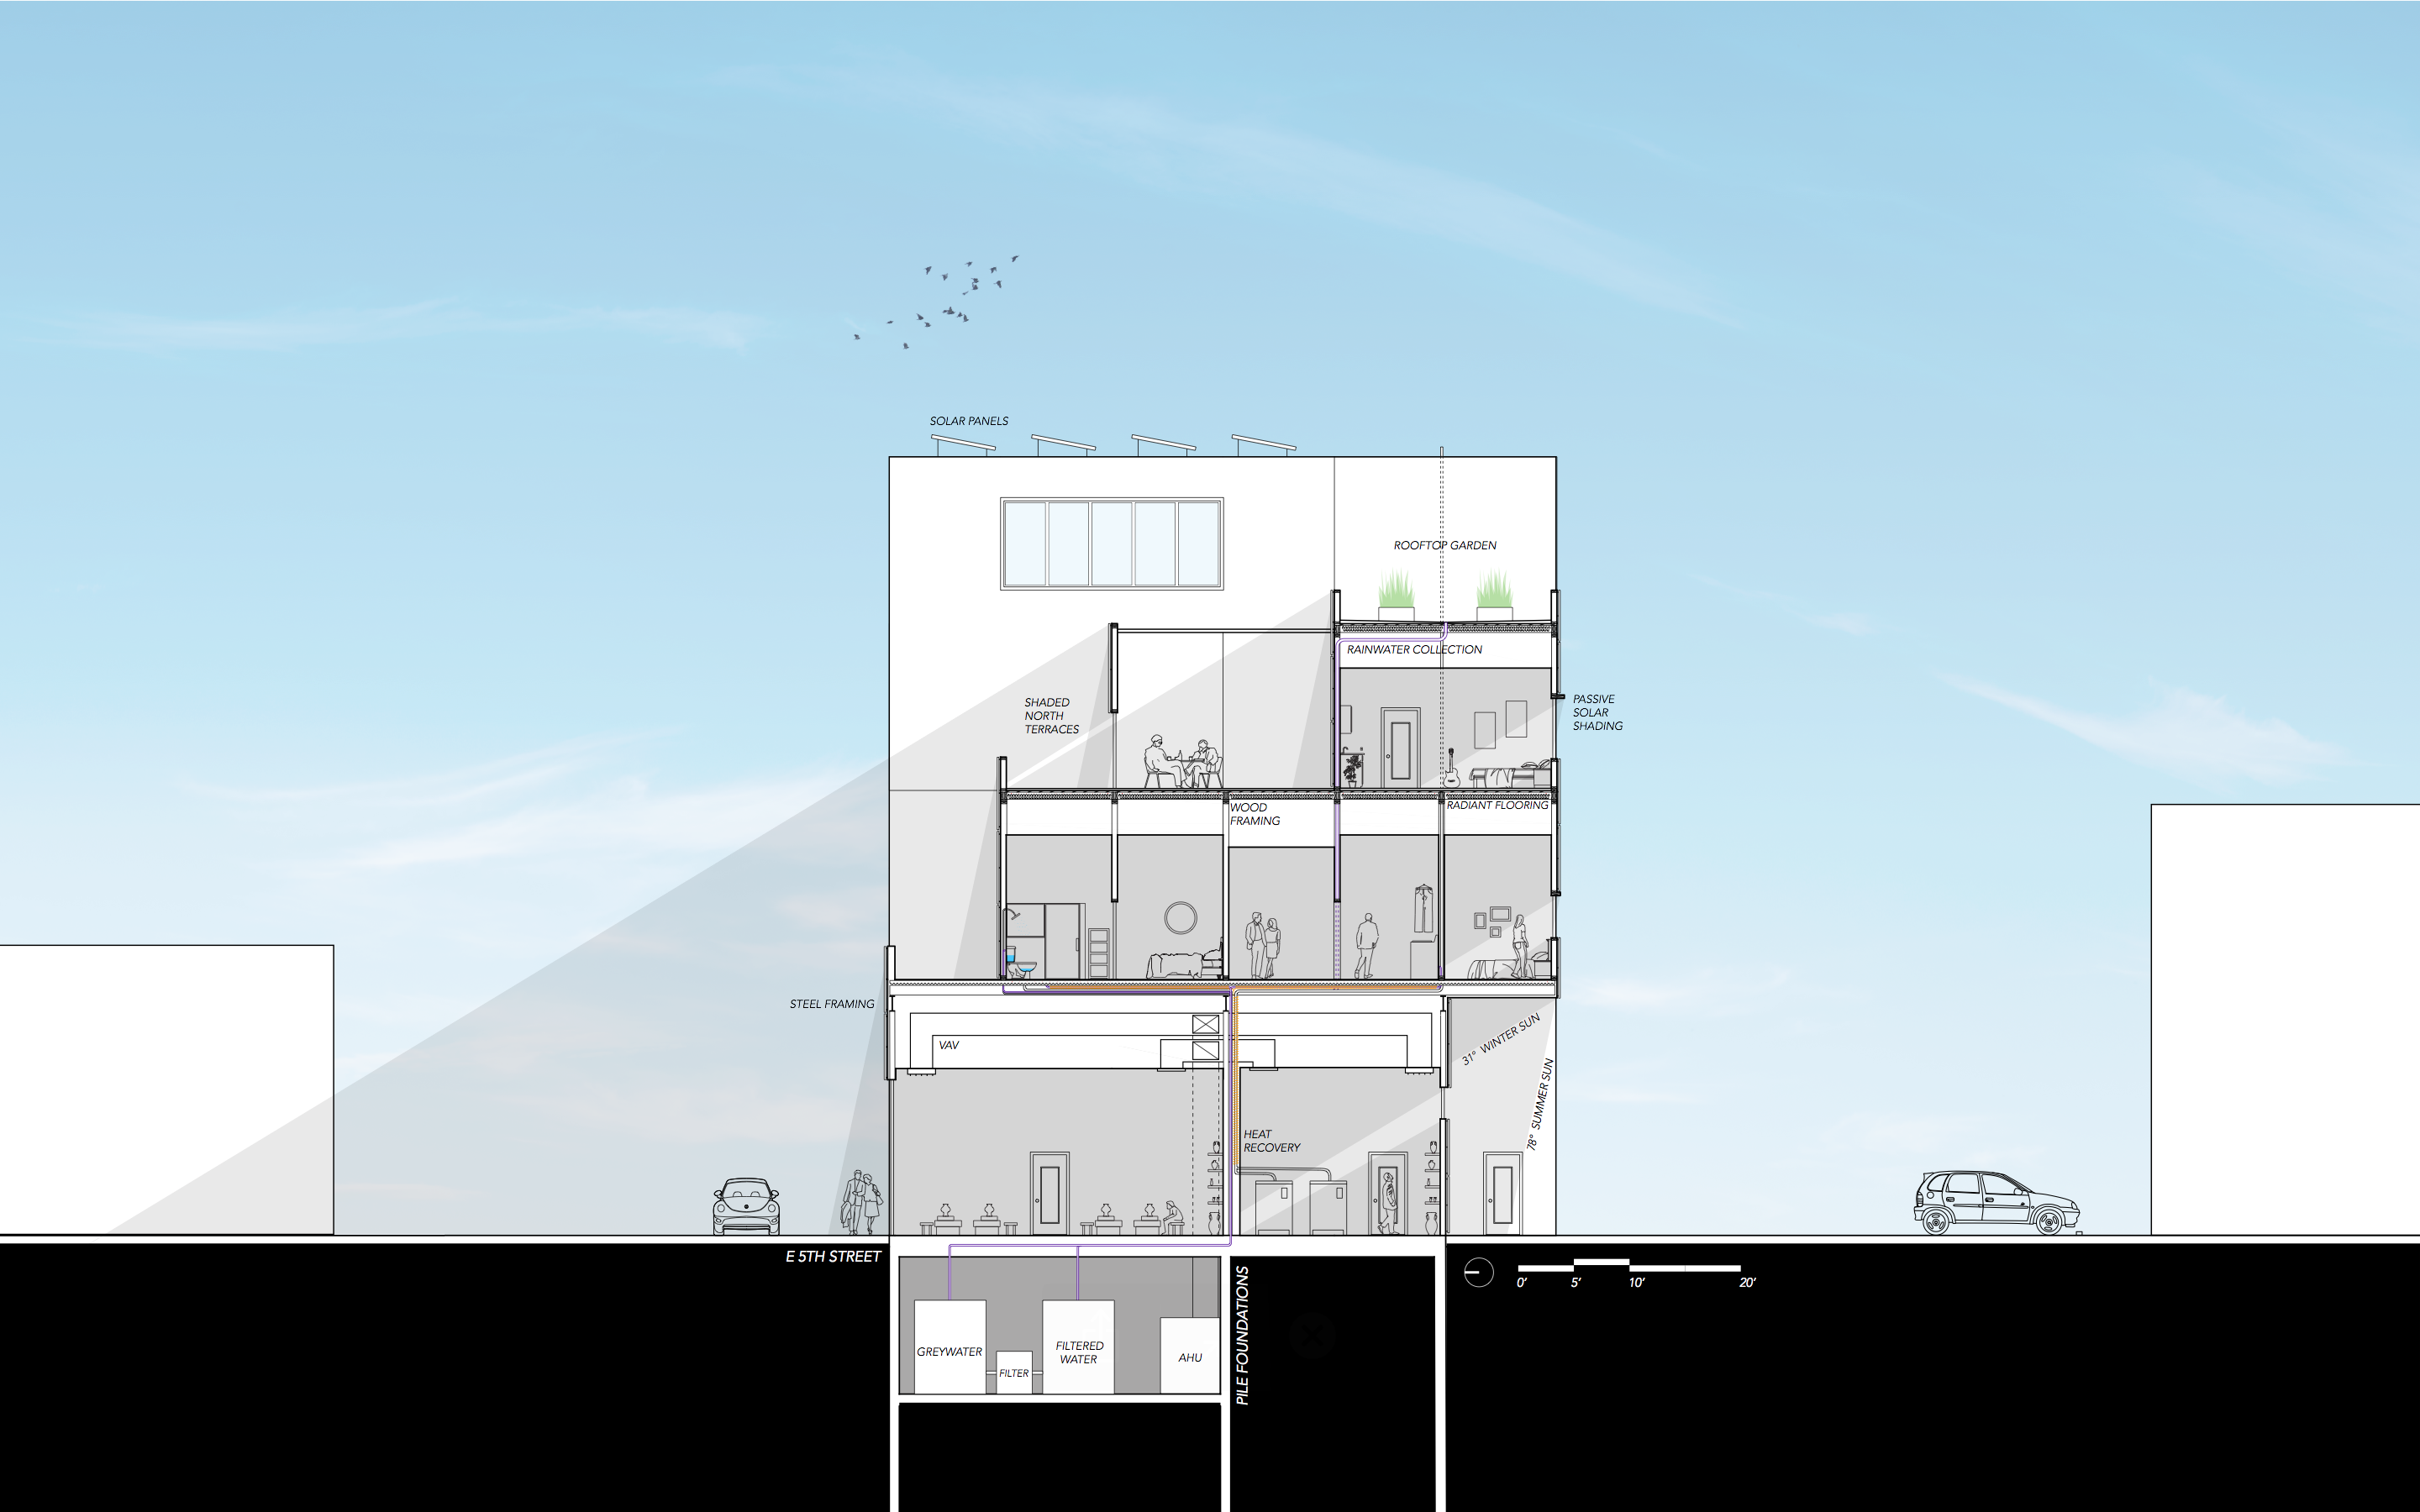
The building section, below, shows the integration of the mechanical systems as well as the passive shading and solar panels on the roof.
If walls could dream… they’d dream of giving homeless people homes.

Grasshopper Tutorial 2: Climate Analysis
In addition to being a great iterative design tool, Grasshopper for Rhino can produce beautiful climate analysis diagrams. This tutorial will walk you through creating a wind rose, psychometric chart, and a 3D sun path using Ladybug in Grasshopper. (Why all the animal names? I really really don’t know…) Grasshopper climate analysis is an easy way to add a level of professionalism and customization to your architecture projects.
If you are unfamiliar with Grasshopper, check out my basics tutorial here first.
Step 1: Install Ladybug
Ladybug is a plug-in for Grasshopper that you can download here at Food4Rhino and follow the video on their website to install it.
Step 2: Download an .epw Weather File
You’ll need a .epw weather file for the location that you want to analyze. I like using EnergyPlus to get my weather data.
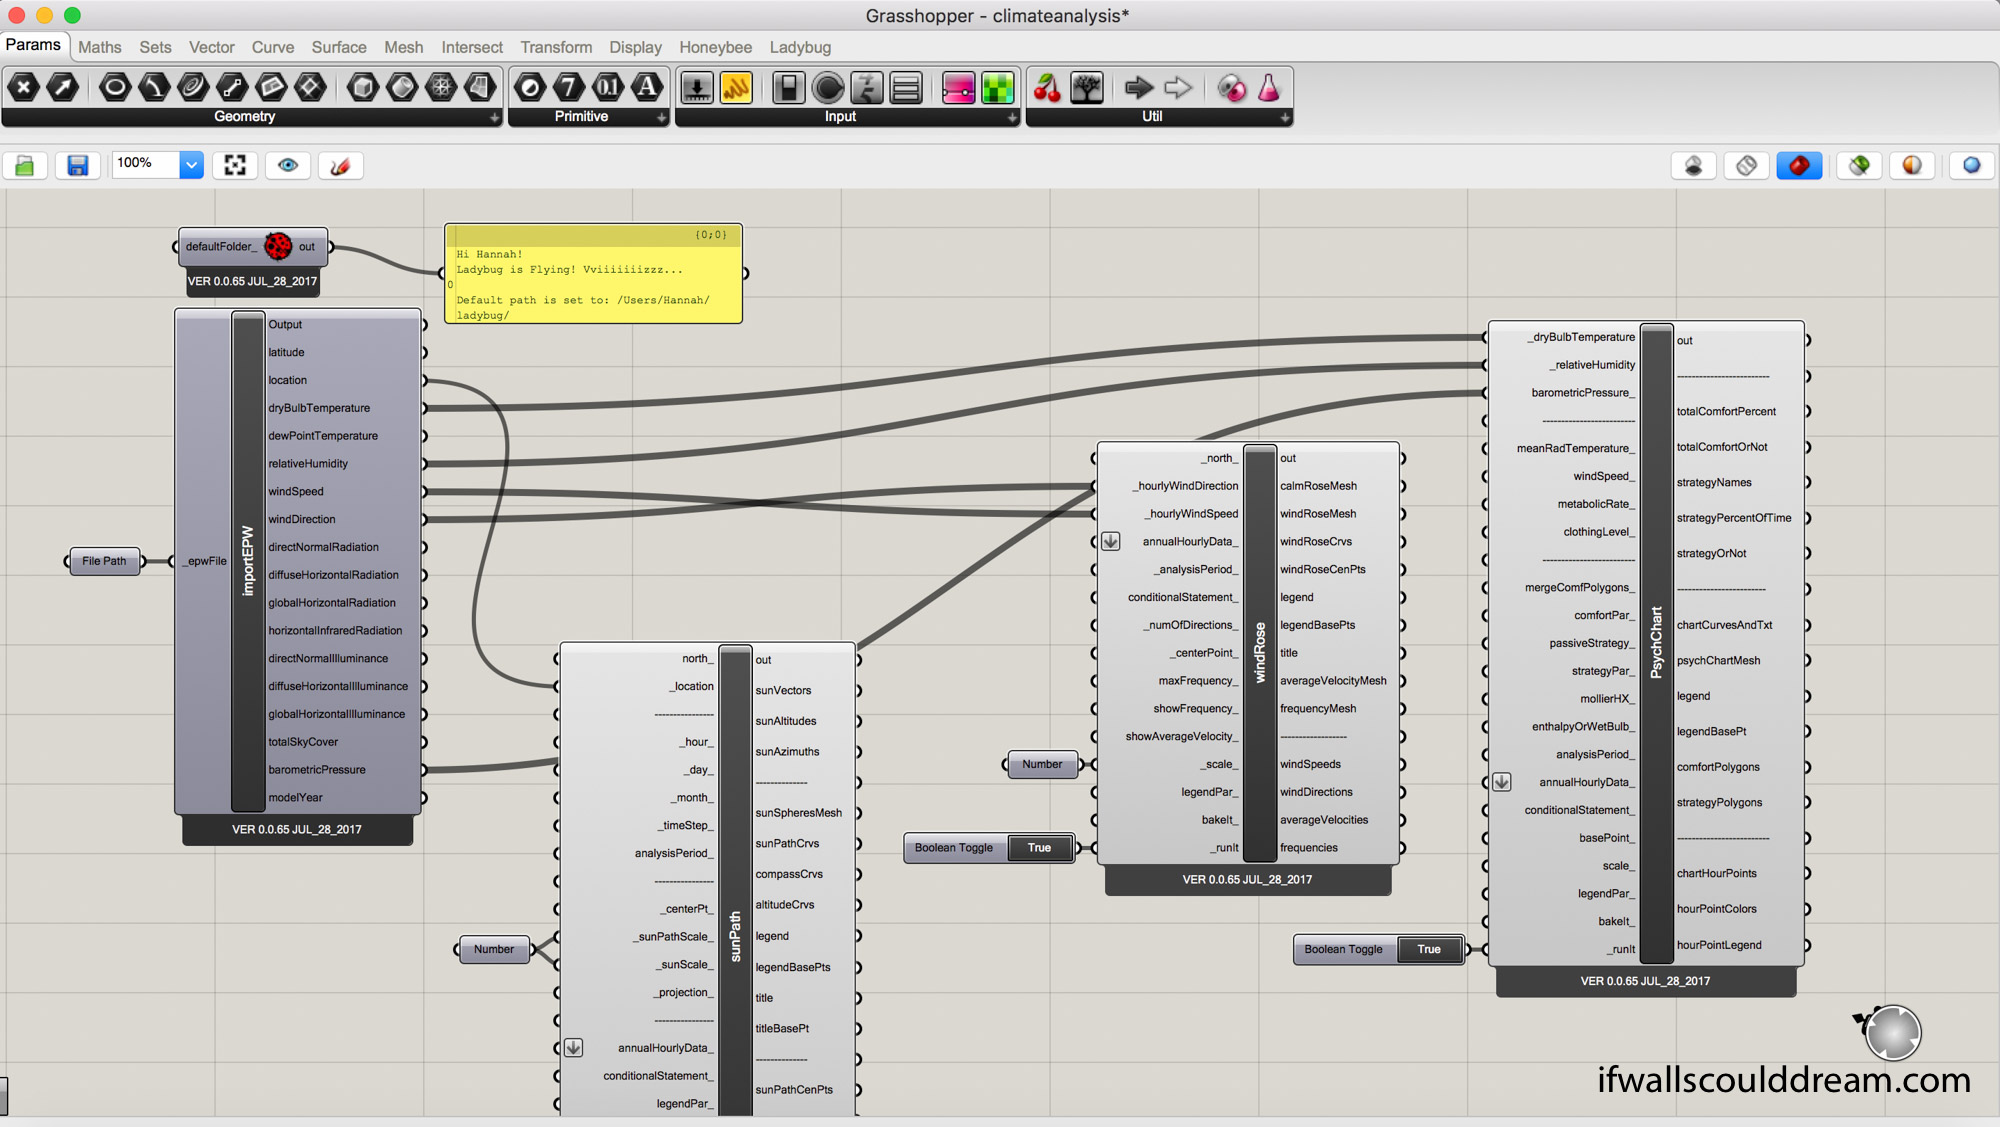
Step 3: Launch Ladybug
Open Grasshopper and start by double clicking in the canvas and typing “ladybug_ladybug”. If you connect a panel to it, it will give you a cute little “Ladybug is Flying! Vviiiiizzzz…” message so you know Ladybug is up and ready to go! DONT FORGET THIS because if you don’t have the “ladybug_ladybug” component, NONE of your ladybug components will work!!

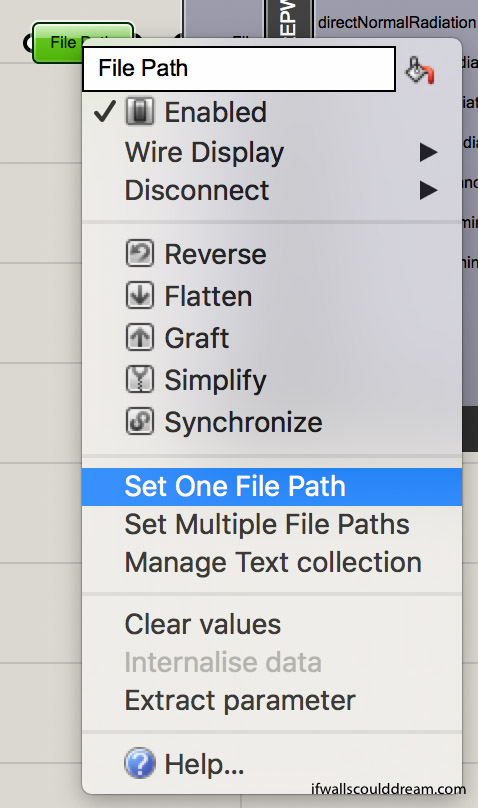
Step 4: Set File Path
Next, add a “file path” component on the left side of your canvas. To link your .epw file, right click on the “file path” and select “set one file path” and then select the .epw file you just downloaded.
Step 5: Sun Path
Add a “ladybug_import EPW” component connected to the “file path” and then add a “ladybug_sunpath” component. All you have to connect is the “location” from “importEPW” to “sunPath”. If you want to reduce the scale of the “sunPath” you can add a “number” component and set a number less than 1.
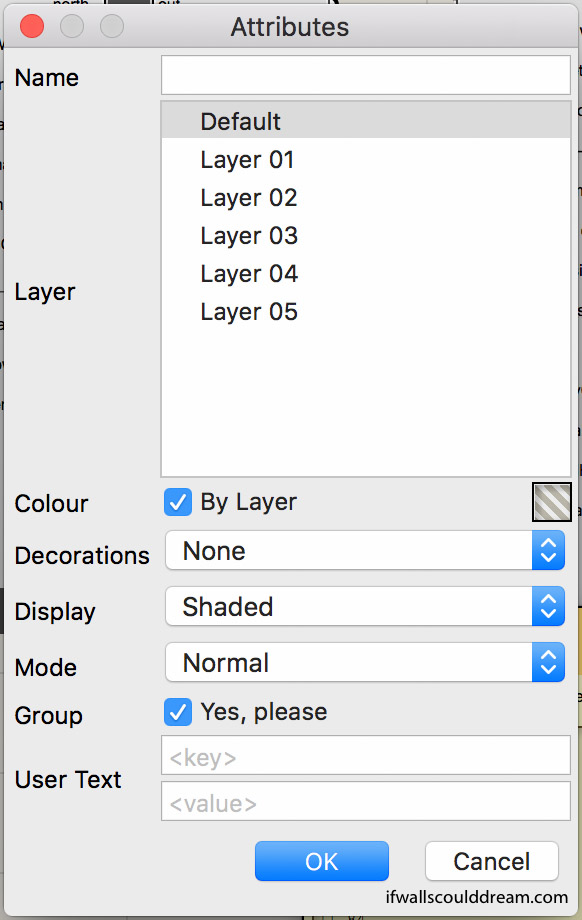
When you bake your ladybug components, I have found it useful to group them and make sure that the display is set to shaded.
Here is what the Sun Path looks like when it’s finished:
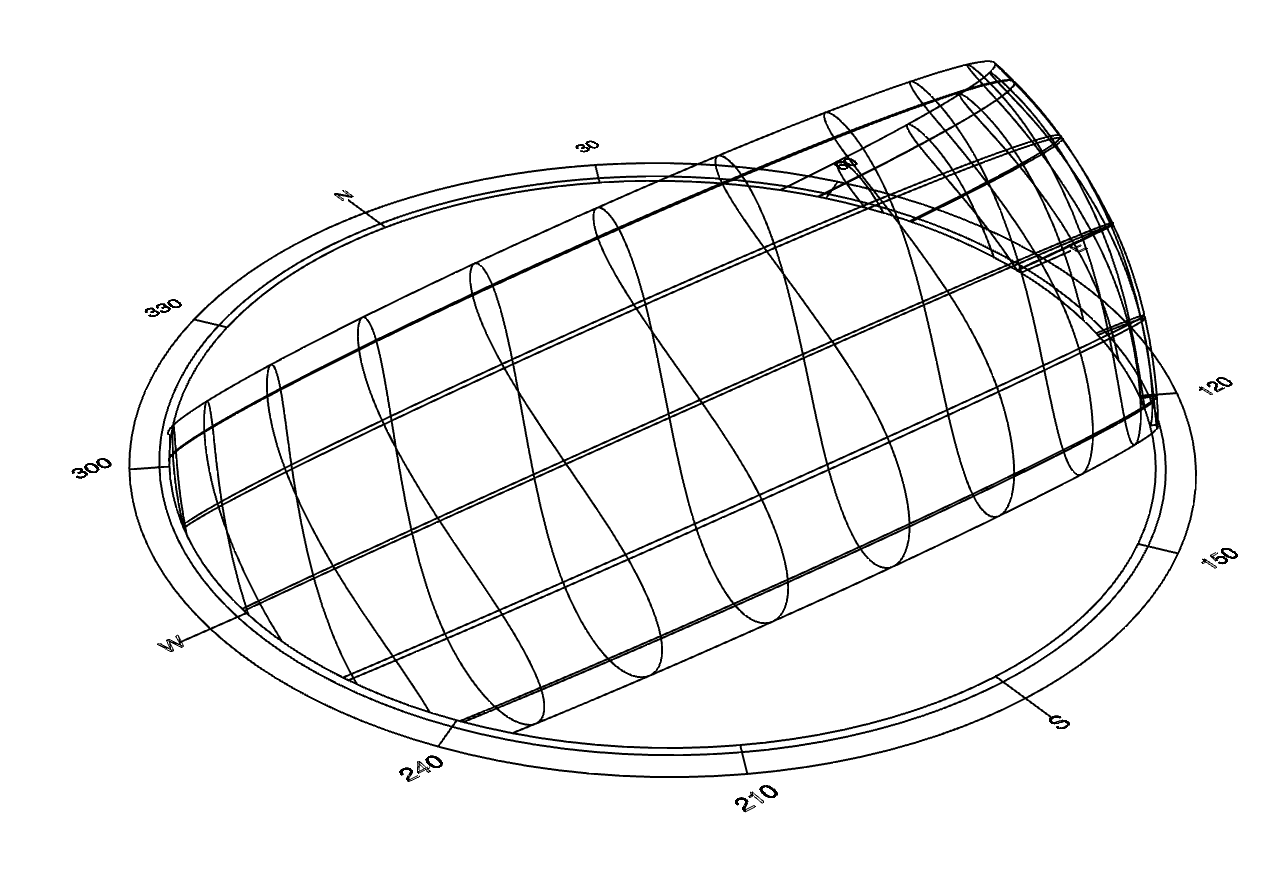
You can add your own geometry or a render below it and put it on a site plan like this:
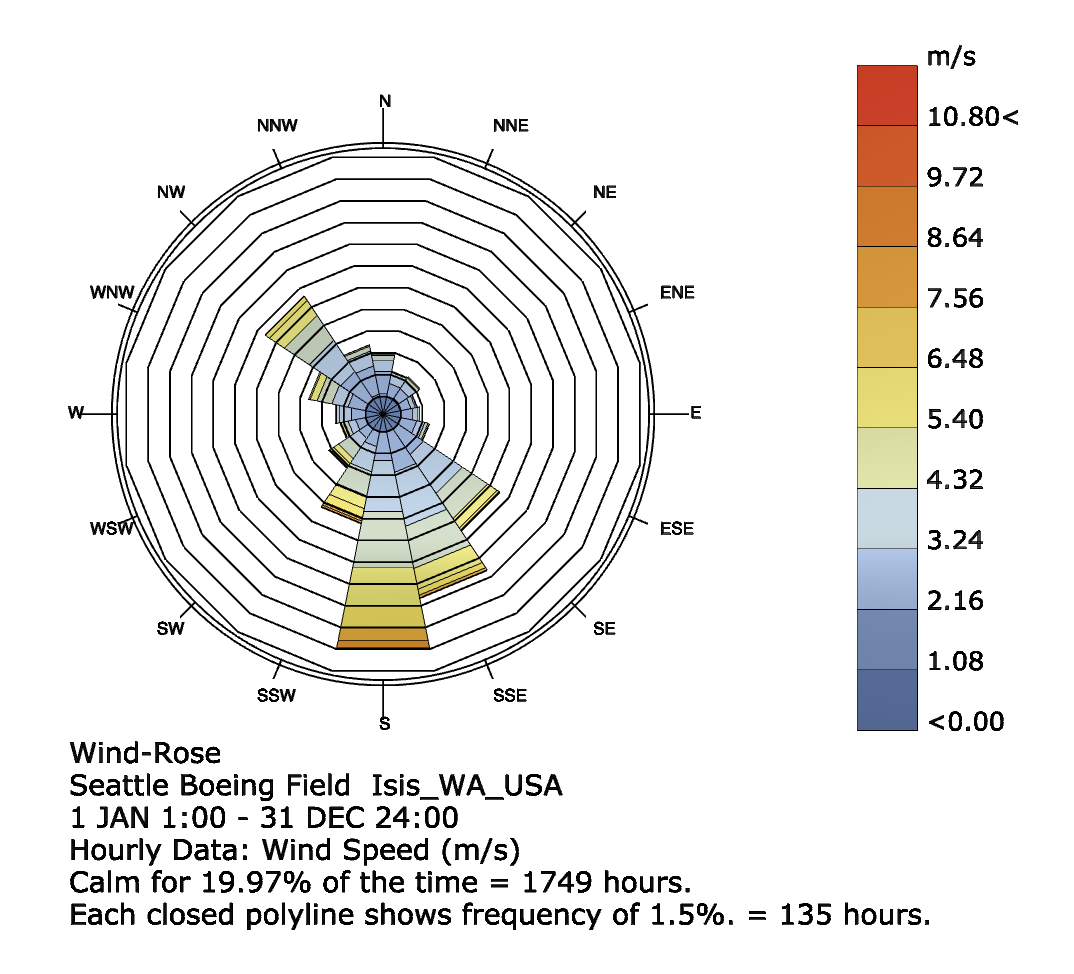
Step 6: Wind Rose
Add a “ladybug_windrose” component. Connect windSpeed and windDirection from “importEPW” to “windRose”. If you want to reduce the scale, you can add a “number” component and set a number less than 1. Add a boolean toggle to _runit and turn it to true.
This is what it will look like once you bake it:
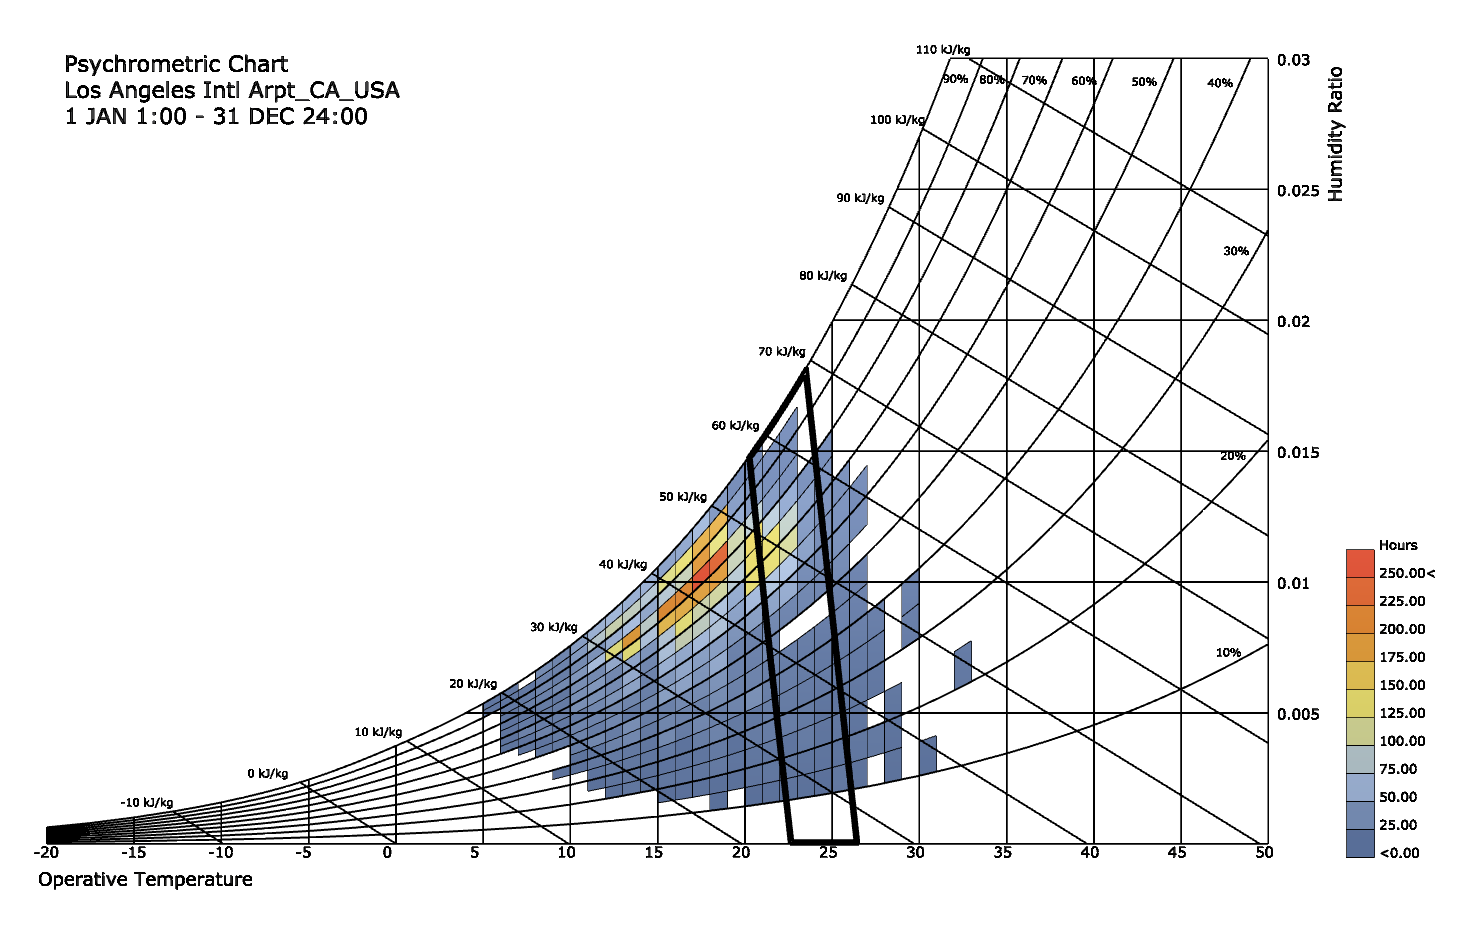
Step 7: Psychometric Chart
Add a “ladybug_psychChart” component. Connect dryBulbTemperature, relativeHumidity, and barometricPressure from “importEPW” to “PsychChart”. Add a boolean toggle to _runit and turn it to true.
This is what it will look like once you bake it:
If walls could dream… they’d dream of ladybugs and grasshoppers.

Oakland Library
The fall quarter of my third year, I decided to take a studio that focuses on massing and designing in section. Our program was to design a library in Oakland, California. After the Less Shape, More Geometry warm-up project, we took a similar approach to the massing of our library project, using simple shapes to create more complex, geometric, site-responsive building masses.
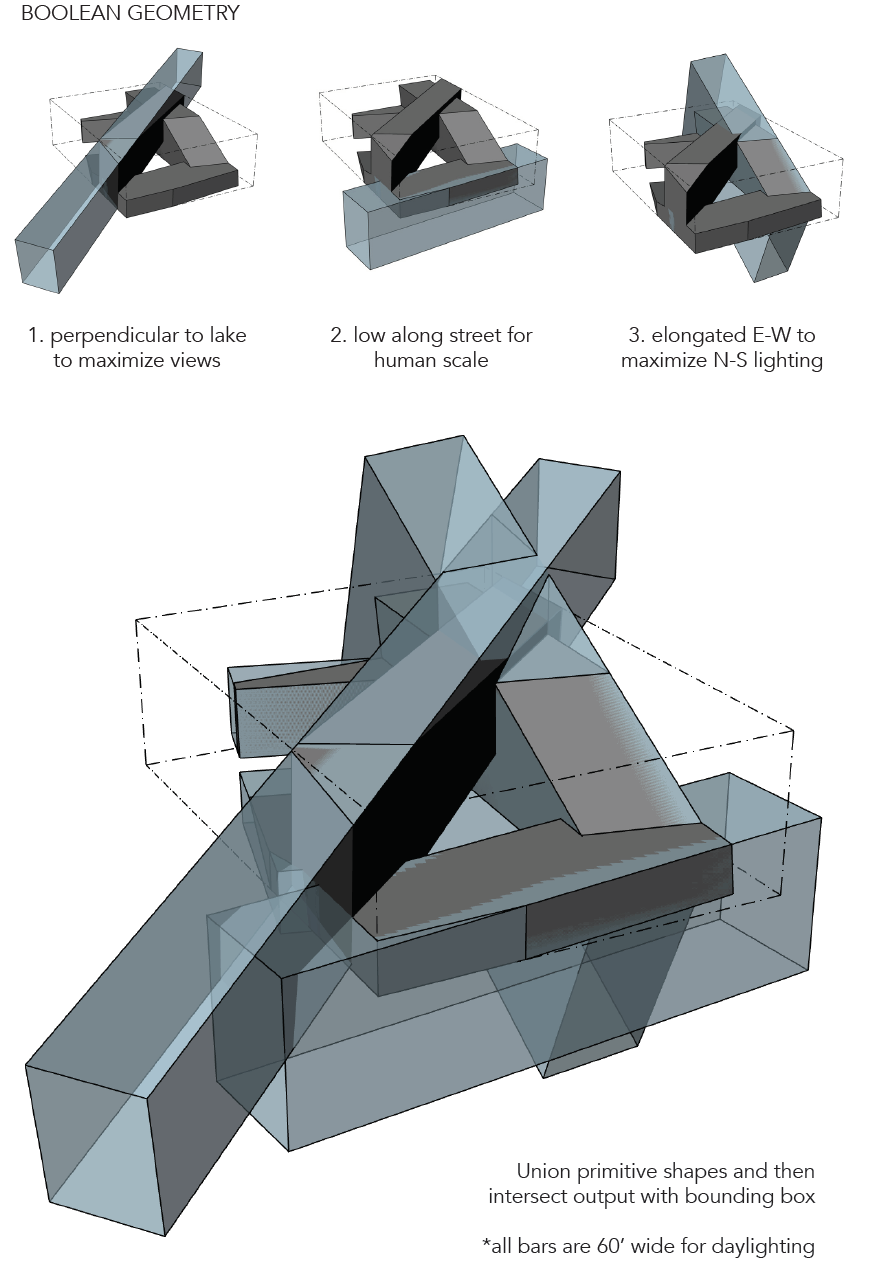
I chose this form because it responds to the views of Lake Merritt on the site as well as incorporating the “bridge” idea from my Less Shape, More Geometry project.
The form seems to settle in to the site, higher on the corners where there are taller buildings and lower on the front corner where there is a small, historic building and a park across the street with Lake Merritt just past the park.
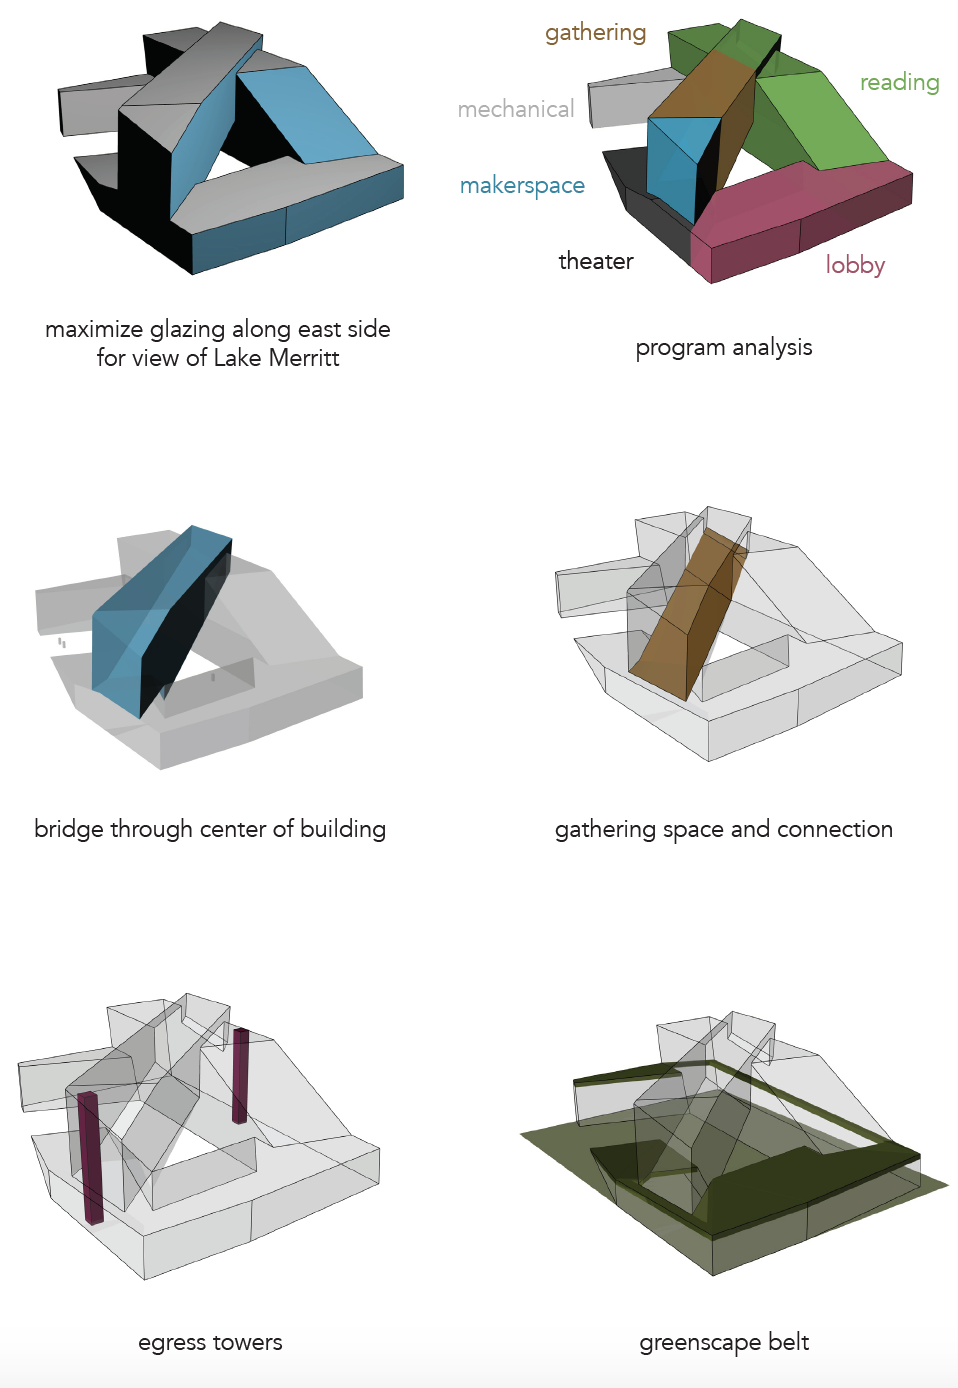
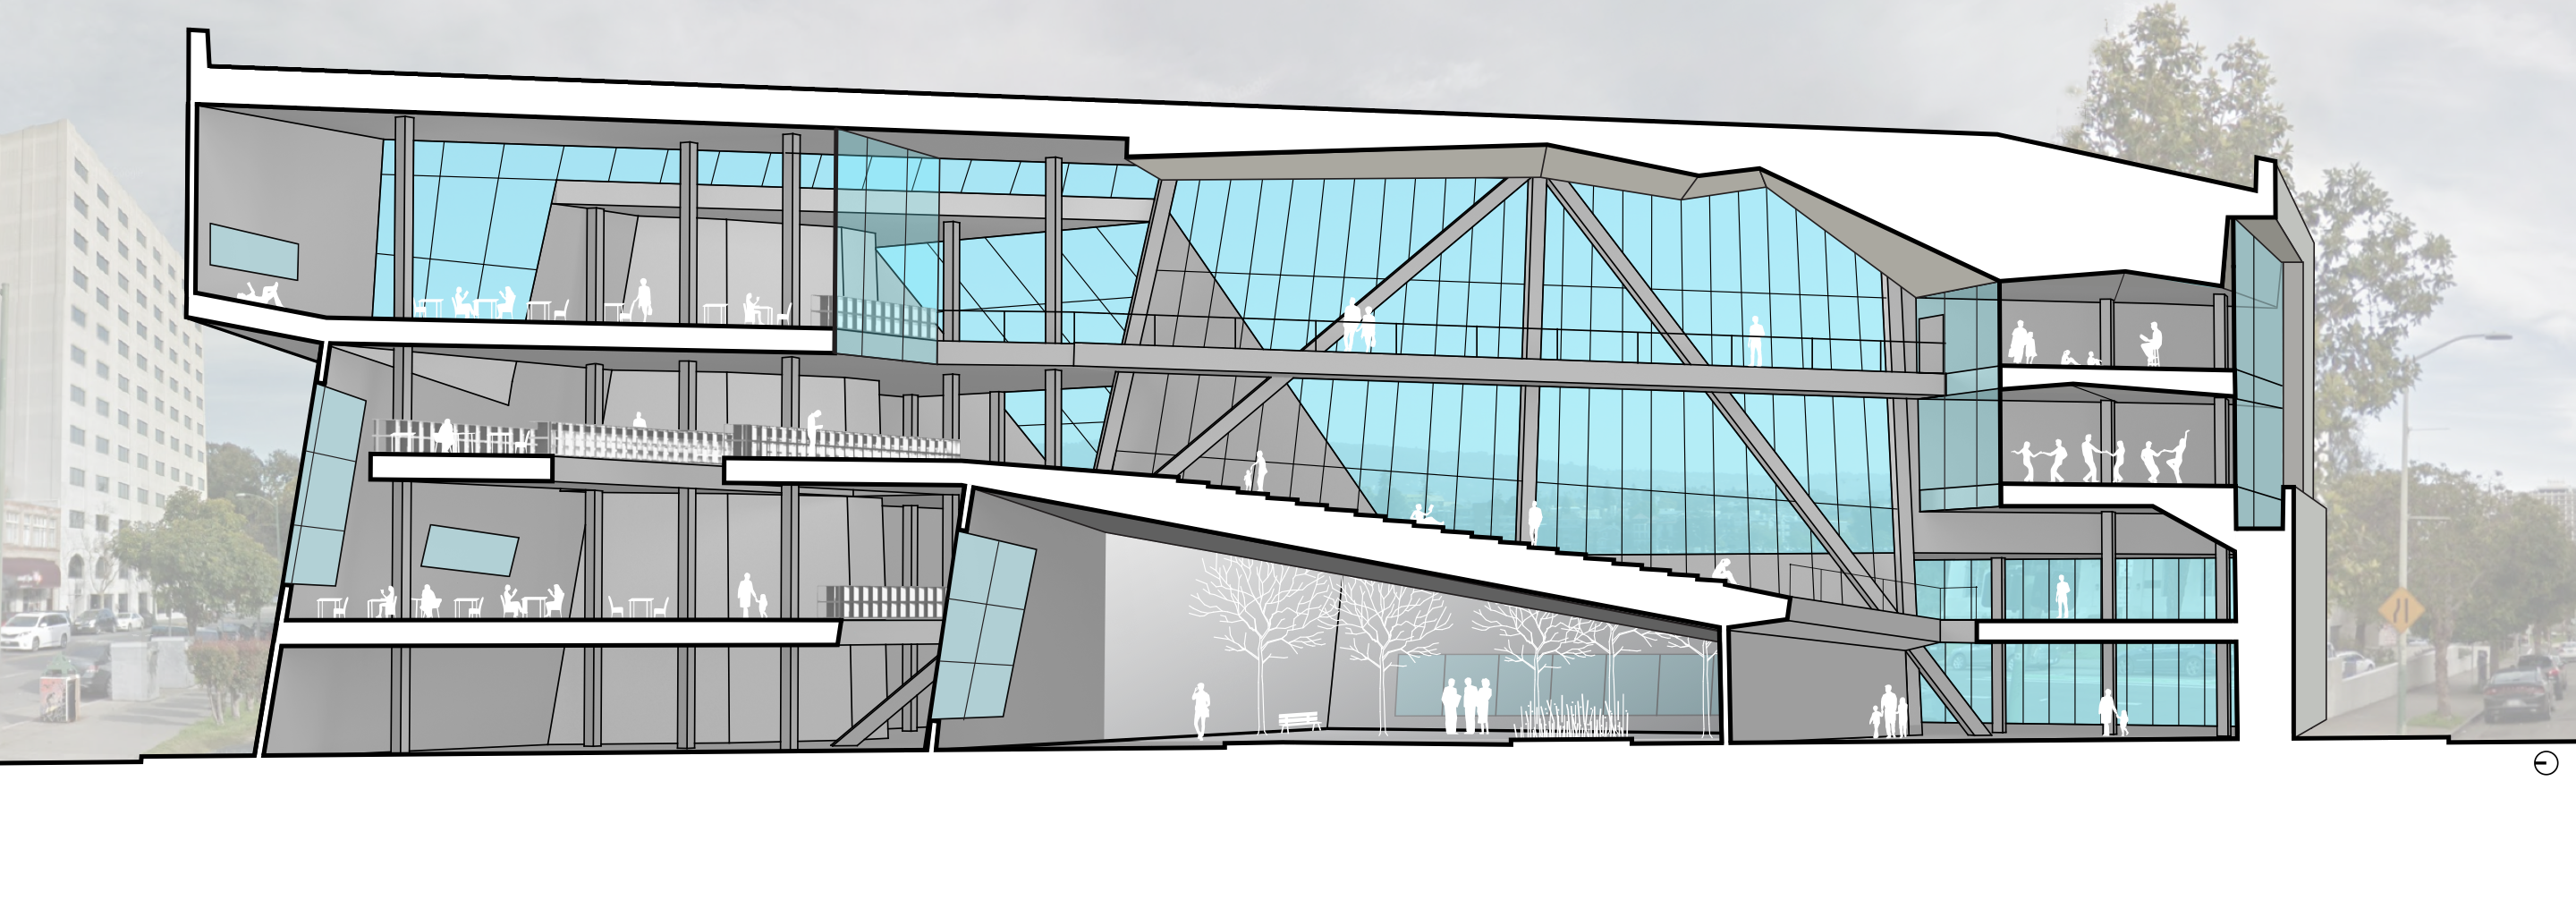
Another important quality of the library is the lighting and mood of different rooms. The section drawing below shows a variety of reading rooms with different lighting qualities.
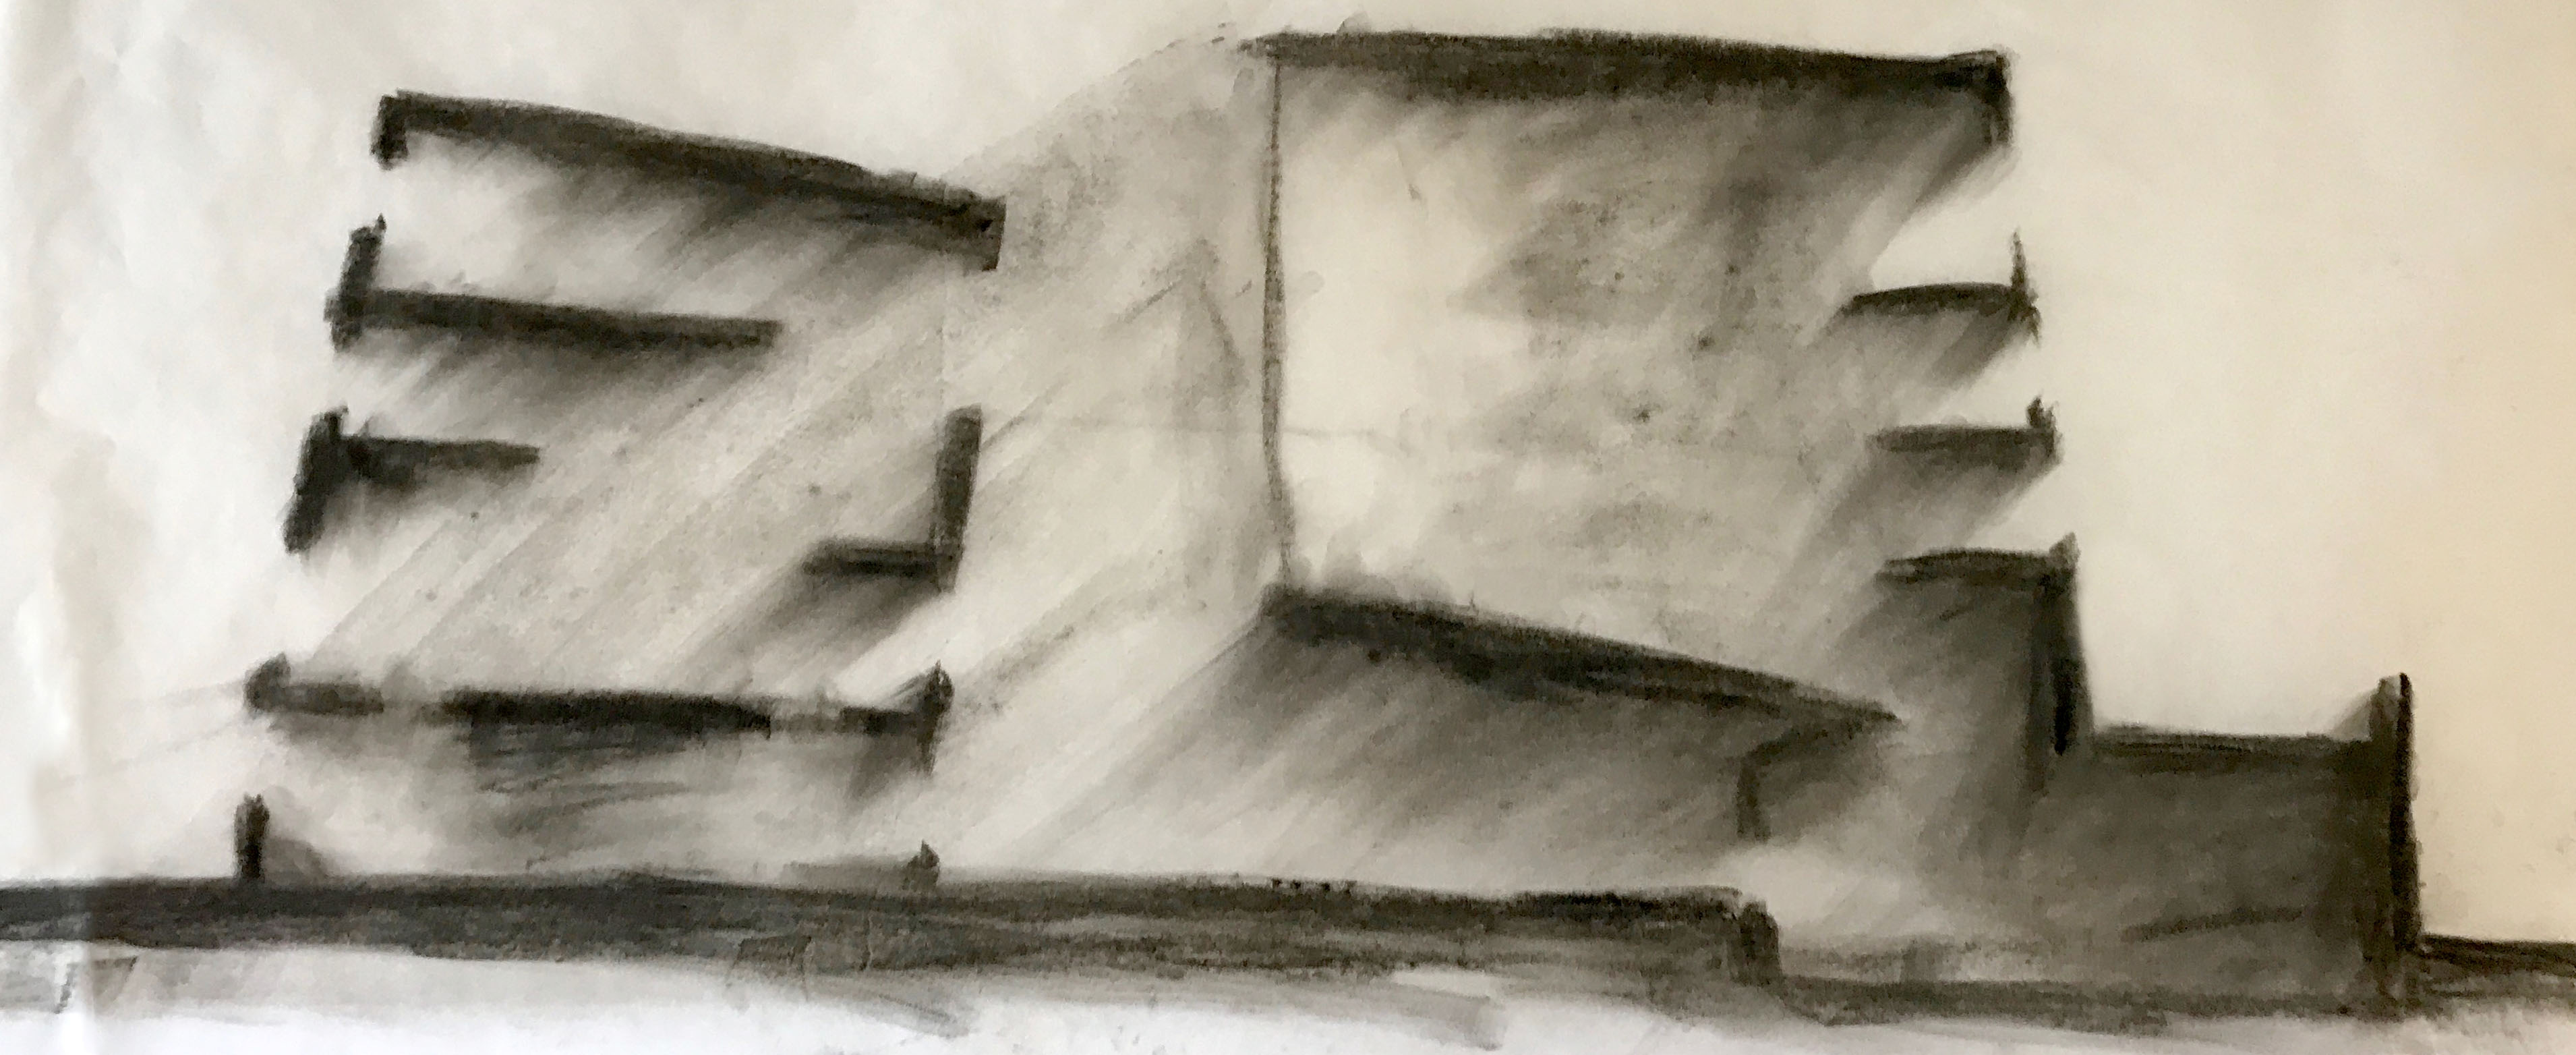
The finished version of the section drawing, below, shows the bridge space in the center of the building, an open space for community events or casual interactions. The bridge connects the book stacks on the left side of the building with the community arts spaces on the right side of the building. All of the spaces have expansive views of Lake Merritt and plenty of glass.
If walls could dream… they’d dream of site-responsive building massing.

Grasshopper Tutorial: Basic Boolean Operations
Grasshopper is an algorithmic design tool in the 3D modeling software Rhino. (Why all the animal names? I really don’t know…) Here is a tutorial about how to get started modeling in Grasshopper.
Step One: Open Grasshopper
Type “grasshopper” into the command line in Rhino, a new window like this should pop up:
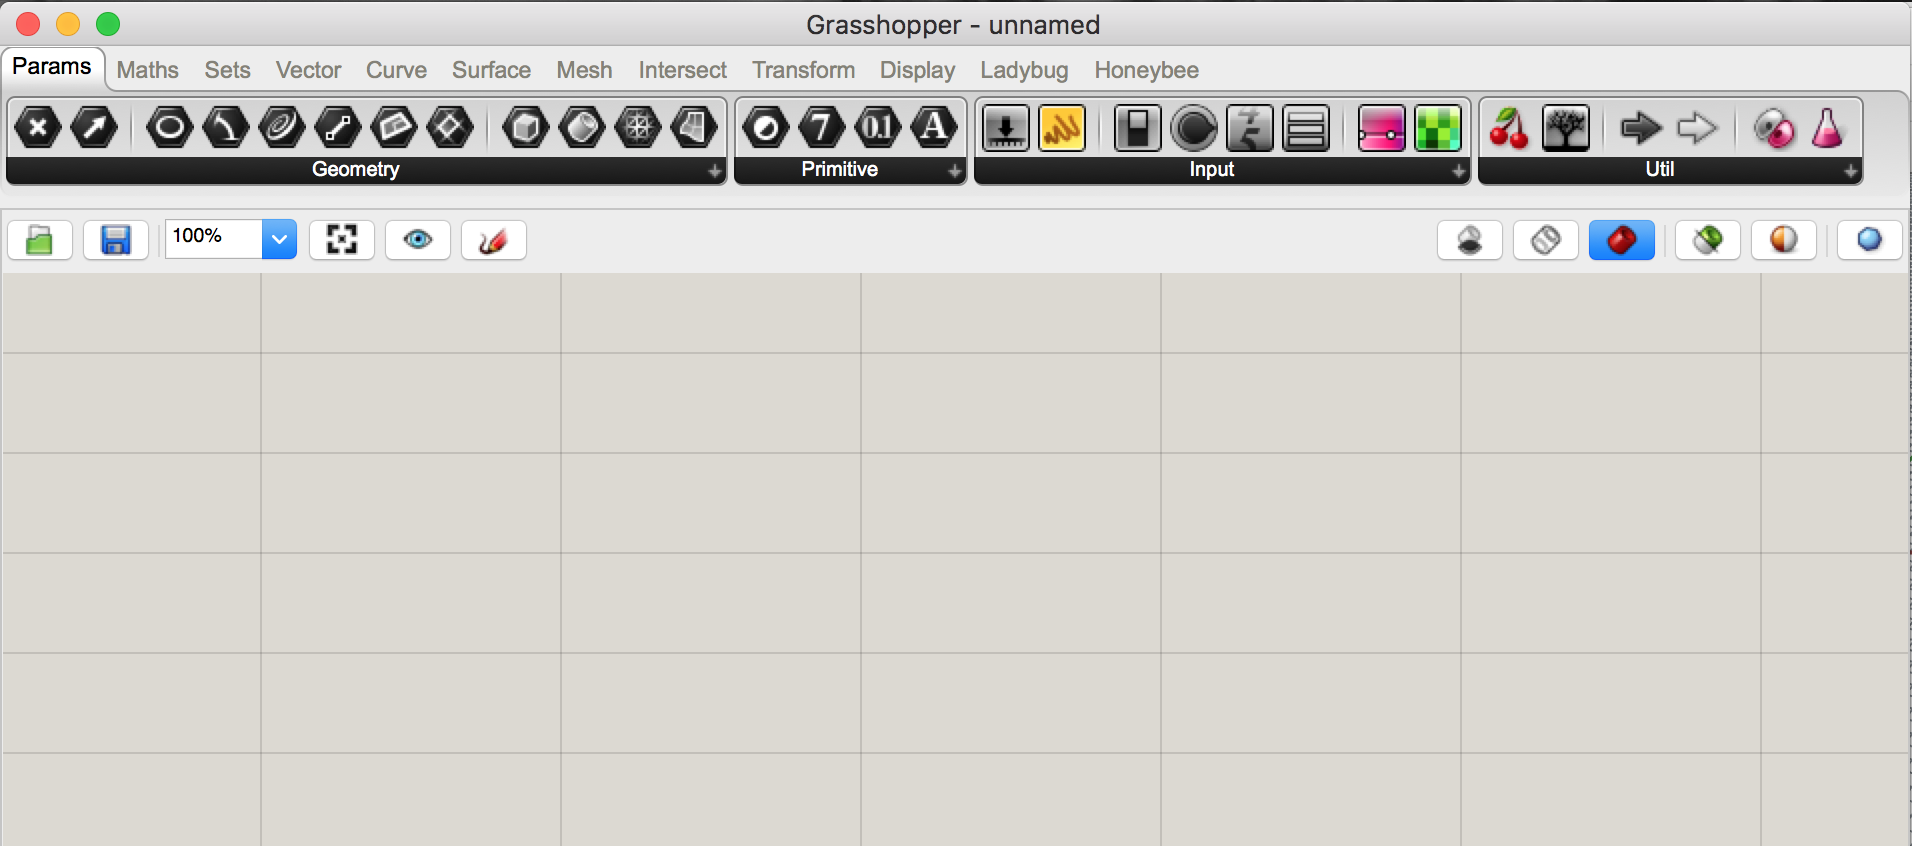
Grasshopper has lots of different tools you can use to alter the geometry you make in Rhino. Grasshopper itself doesn’t have any geometry, it’s just a way of writing unique instructions to alter your geometry in Rhino. Nothing will be saved in your Rhino file until you “bake” it, which is like exporting it from a Grasshopper preview into a Rhino geometry. Still confused? Check out the Grasshopper website, read along with my tutorials, check out this helpful tutorial, or go play with it yourself!
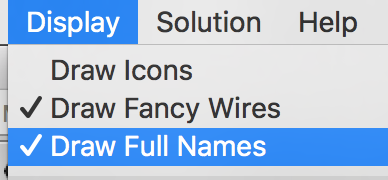
Step Two: Set Up the Display
Make sure the icons are off and the full names are on. This isn’t a major step but it’ll help you follow along the tutorial.
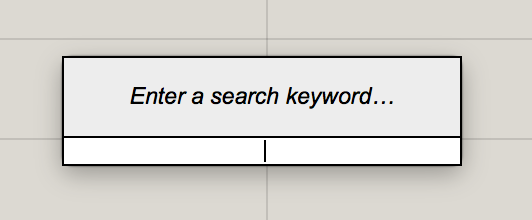
Step Three: Add Components
Double click anywhere on the canvas to get started. A search bar will pop up like this.
Type the name of the component you want to use into the search bar, for example I am using Solid Intersection.
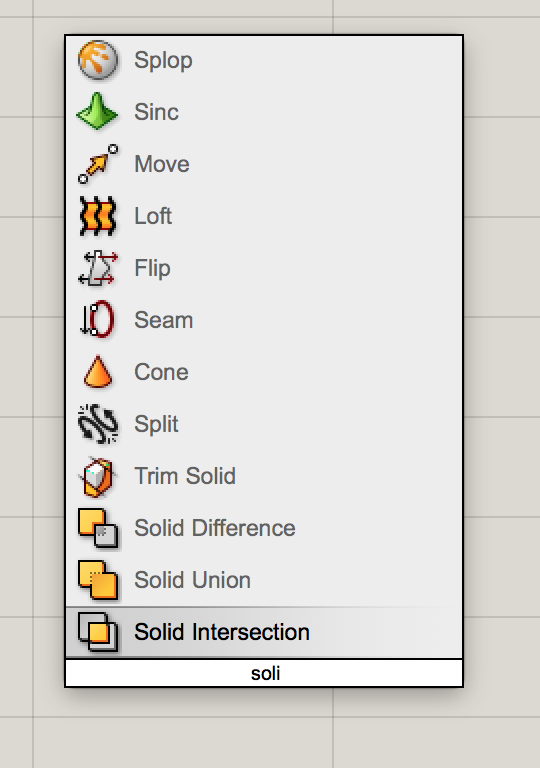
If you want more information about a component, simply hover your cursor over it. The little orange flag at the top right corner is a warning that nothing has been plugged into it yet so it is not working. This makes problem-solving a larger string of components super easy!

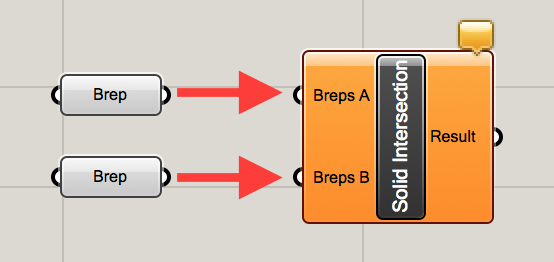
So, what’s a “brep”?
You might be wondering, what in the world is a “brep”?! Well, it’s a Boundary REPresentation, a collection of multiple trimmed surfaces. It’s what Grasshopper calls most of your basic Rhino geometry and it’s perfect for playing with boolean operations.
Add two breps to the canvas and “plug them in” to the breps A and B ports on the left side of the solid intersection component by clicking and dragging from the white half-circle on the right side of the brep to the white half circle on the left side of the intersection component.
Step Four: Link Geometry from Rhino
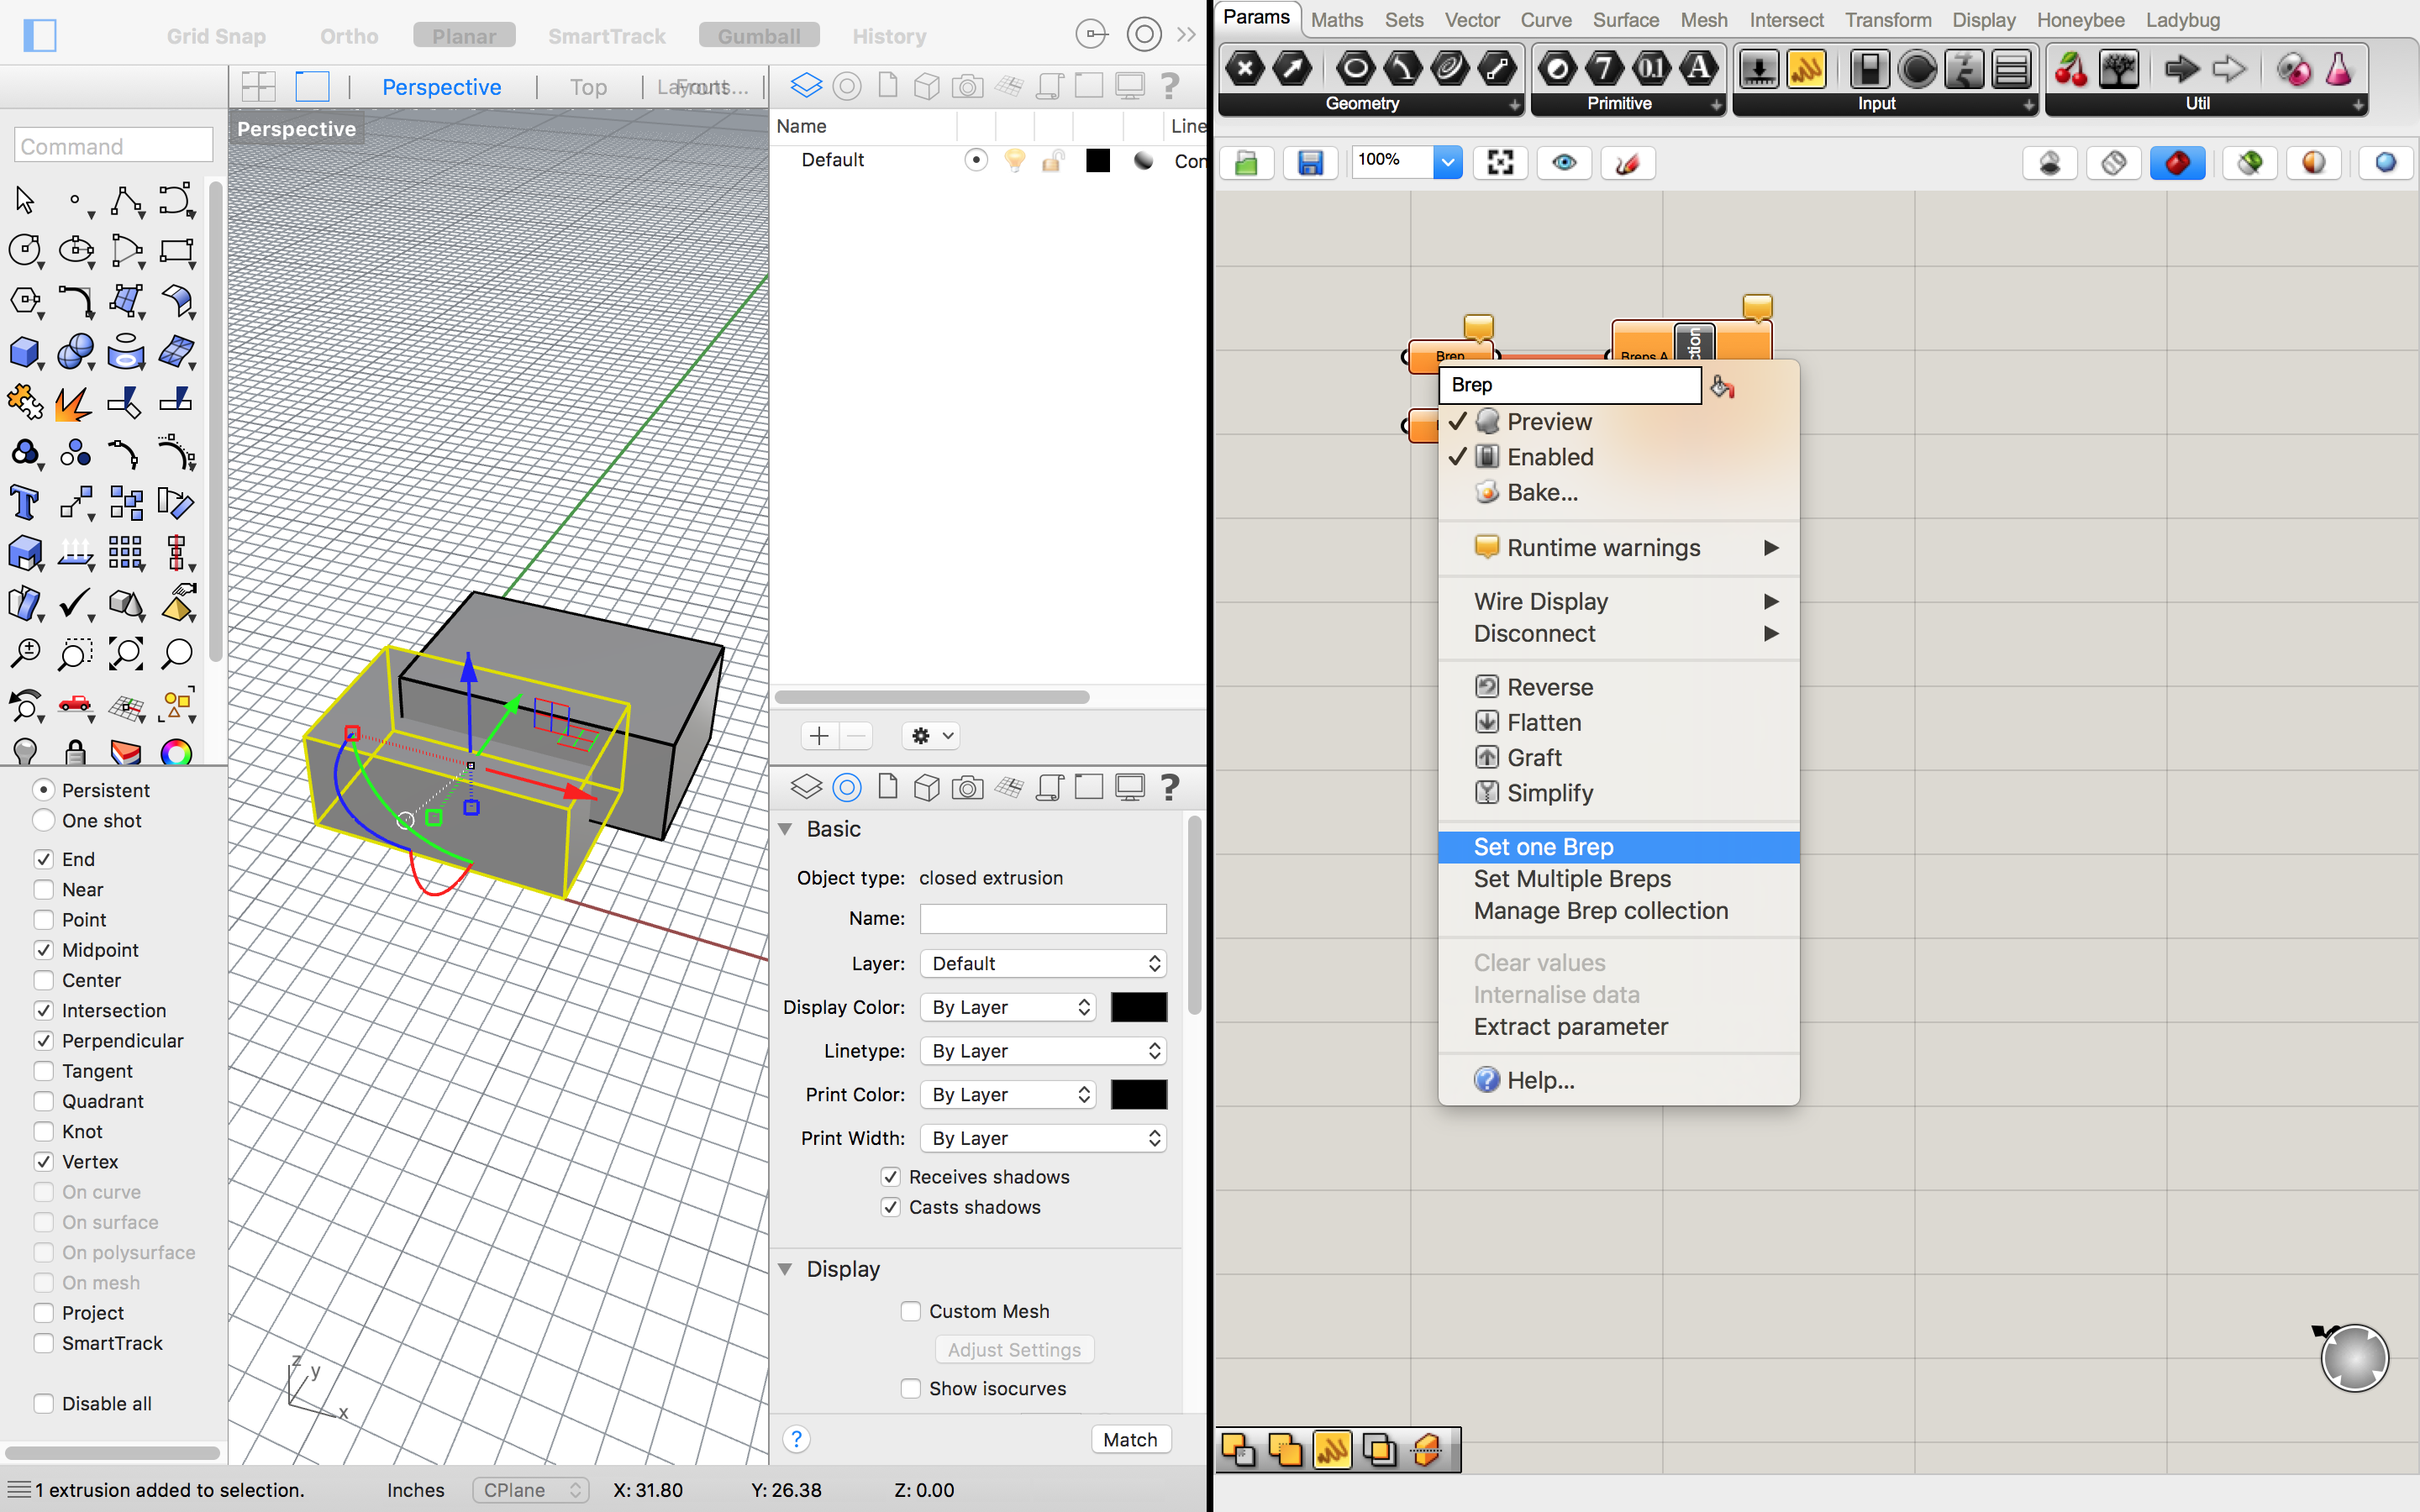
Link your geometry from Rhino to the components in Grasshopper. I am using two overlapping boxes in Rhino but this should work with any shape (as long as they are overlapping, for the intersection command). Select one of your boxes and then right click on the first brep and select “set one brep”. This should automatically link the selected geometry to that brep component. Then, select the other box in Rhino and right click on the other brep in Grasshopper and set that brep.
Step Five: Play!
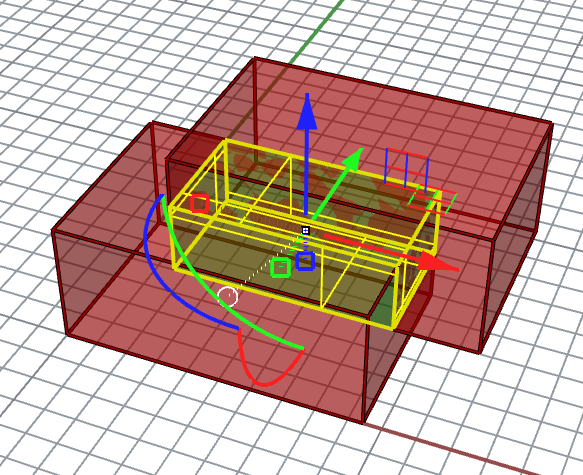
Now is the fun part! You can play around with your shapes in Rhino until you’ve found a geometry you want to save. This makes it really easy to work iteratively and test out a lot of ideas really quickly. While we could do a boolean intersection like this in Rhino without using Grasshopper, we wouldn’t have the flexibility of making so many iterations so quickly.
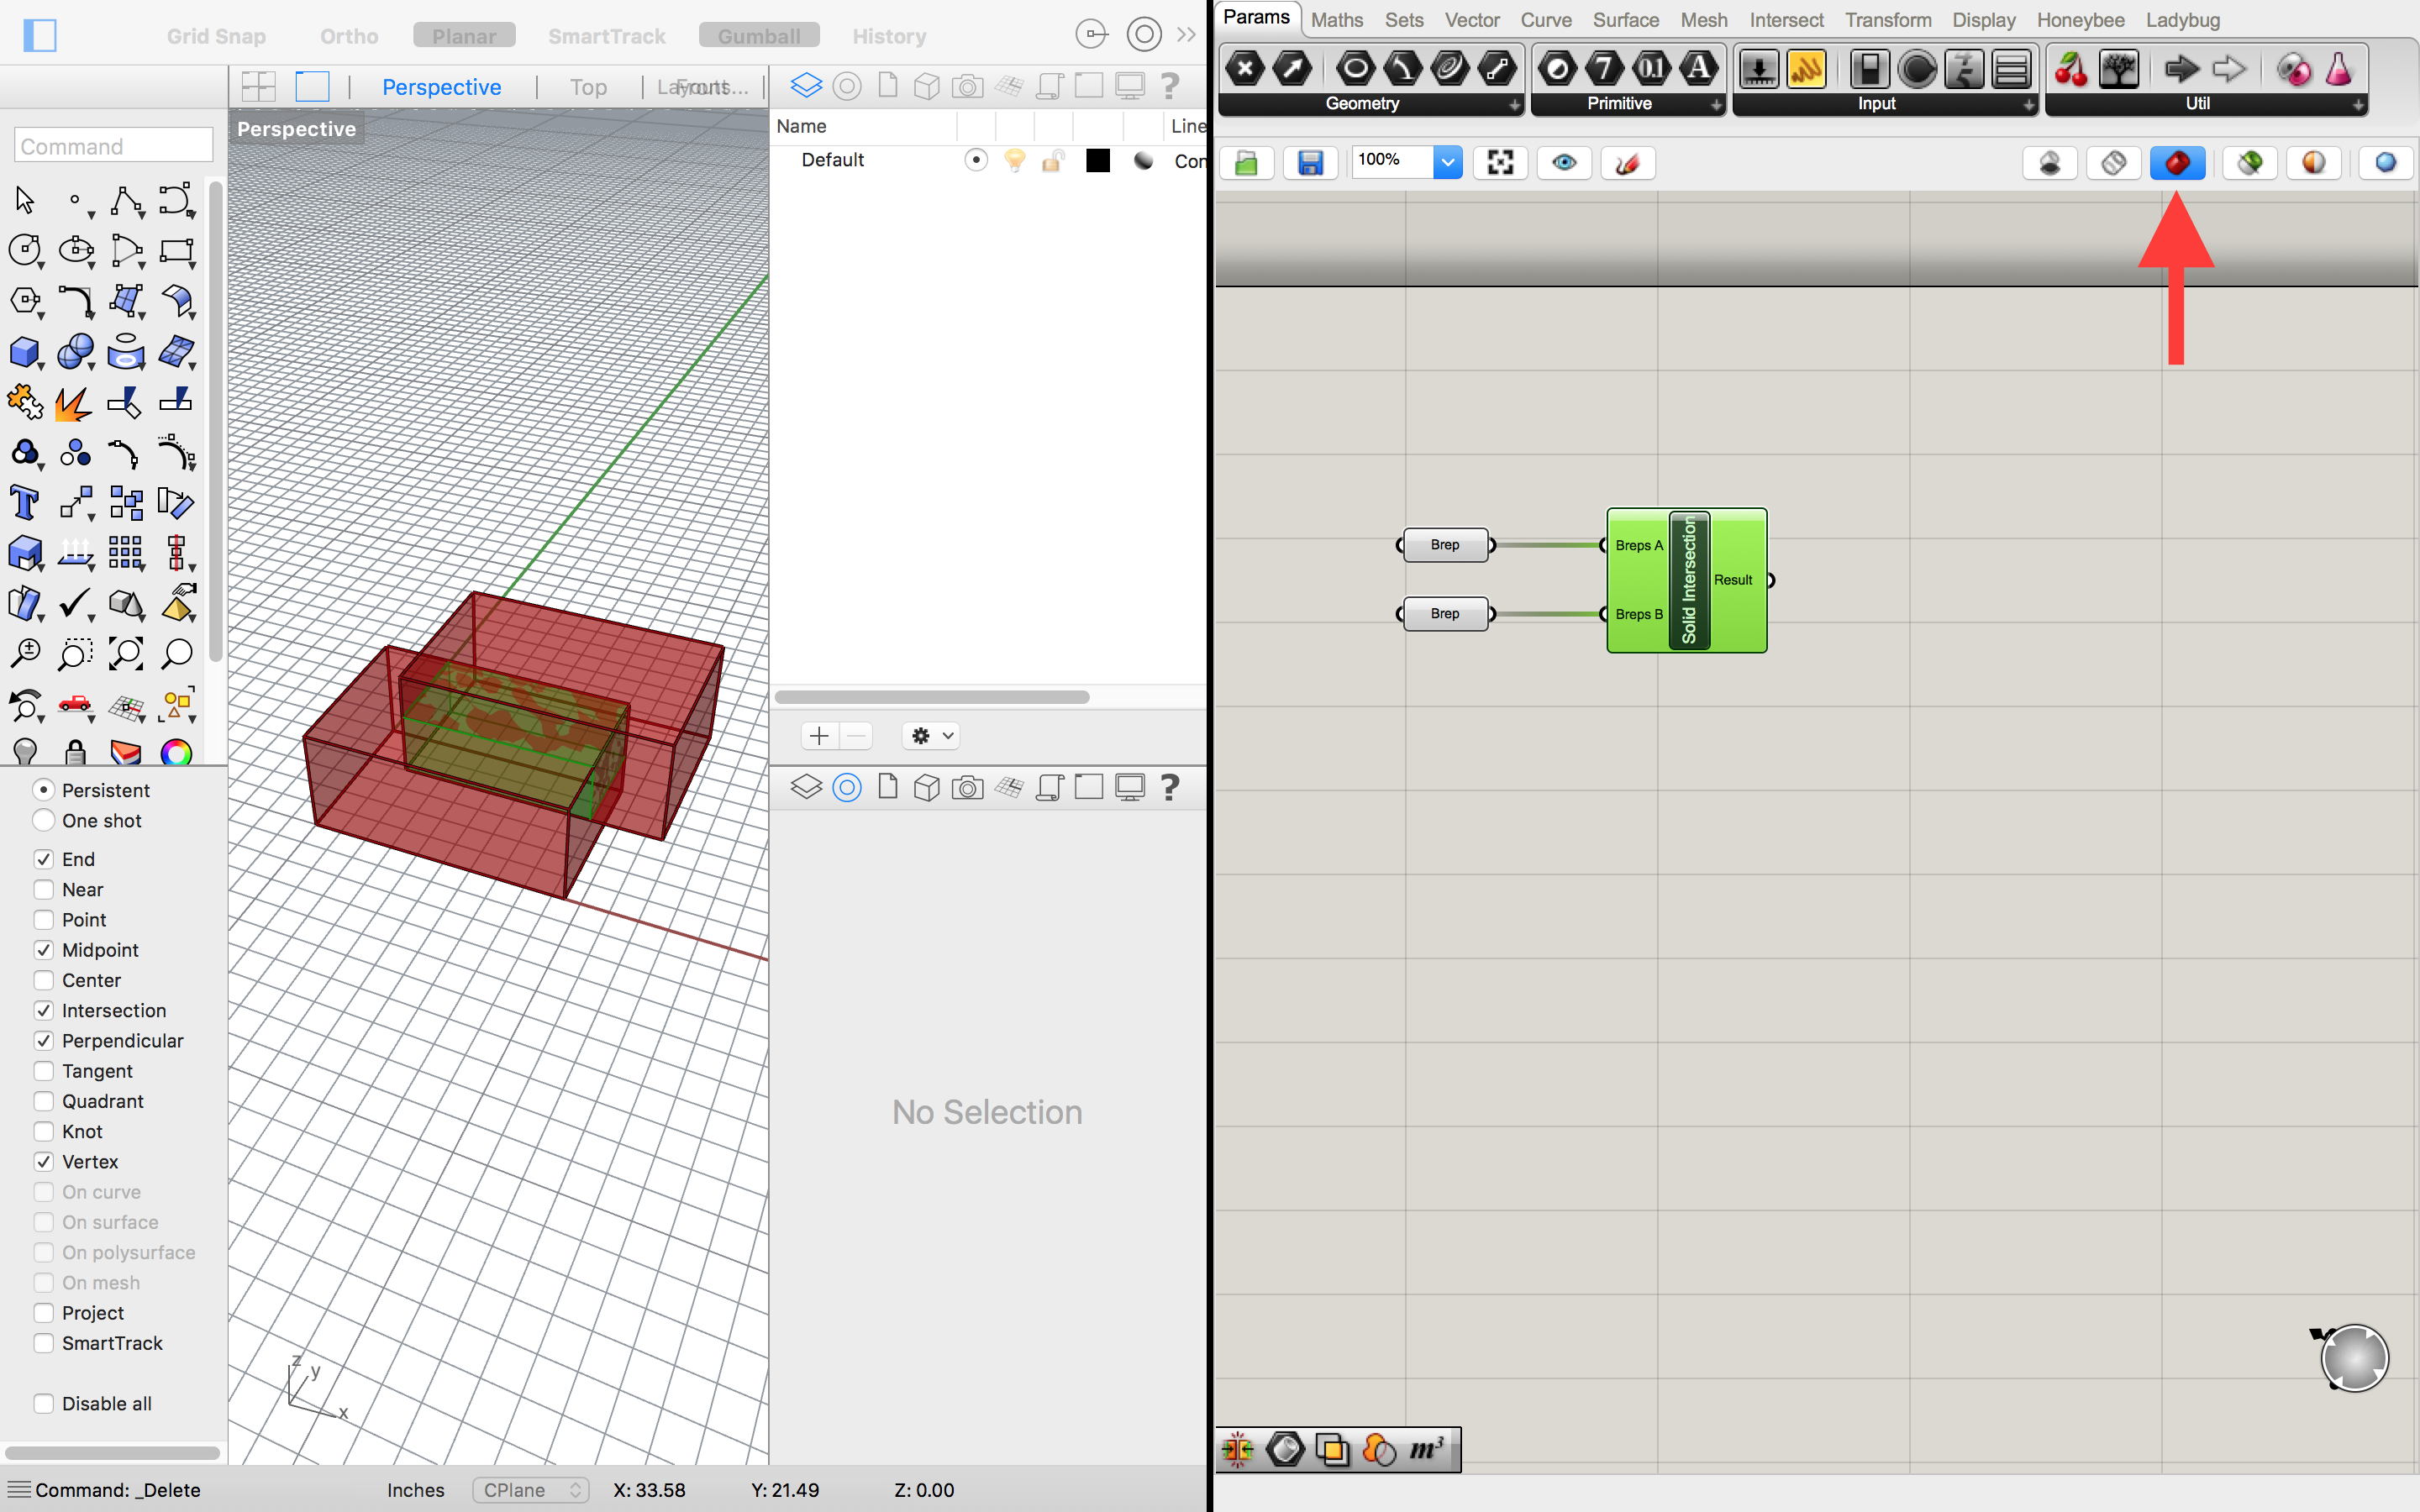
For this step, you want to make sure your Rhino view is set to WIREFRAME and you clicked the red icon on the upper left of Grasshopper, and that the final component in your train is selected. This will make your input geometry red and your Grasshopper result green! Now you can move the input shapes around in Rhino to see how that changes the output.
Step Six: Bake
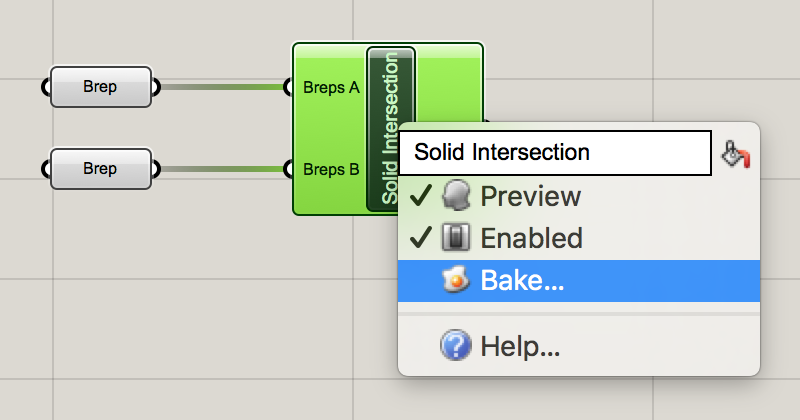
Once you have found a result you like, the final step is to “bake” the geometry, which is like exporting it back into Rhino. Simply right click on the Solid Intersection component and select “bake.”
Now your final geometry is in Rhino and it will be saved in your Rhino file after you close Grasshopper.
Additional Boolean Operations
If you want to do even more with basic boolean operations, try out this simple Solid Difference operation:
Want more of a challenge? Check out this Solid Union operation that calculates the percent by volume of the result as compared to the original bounding box:
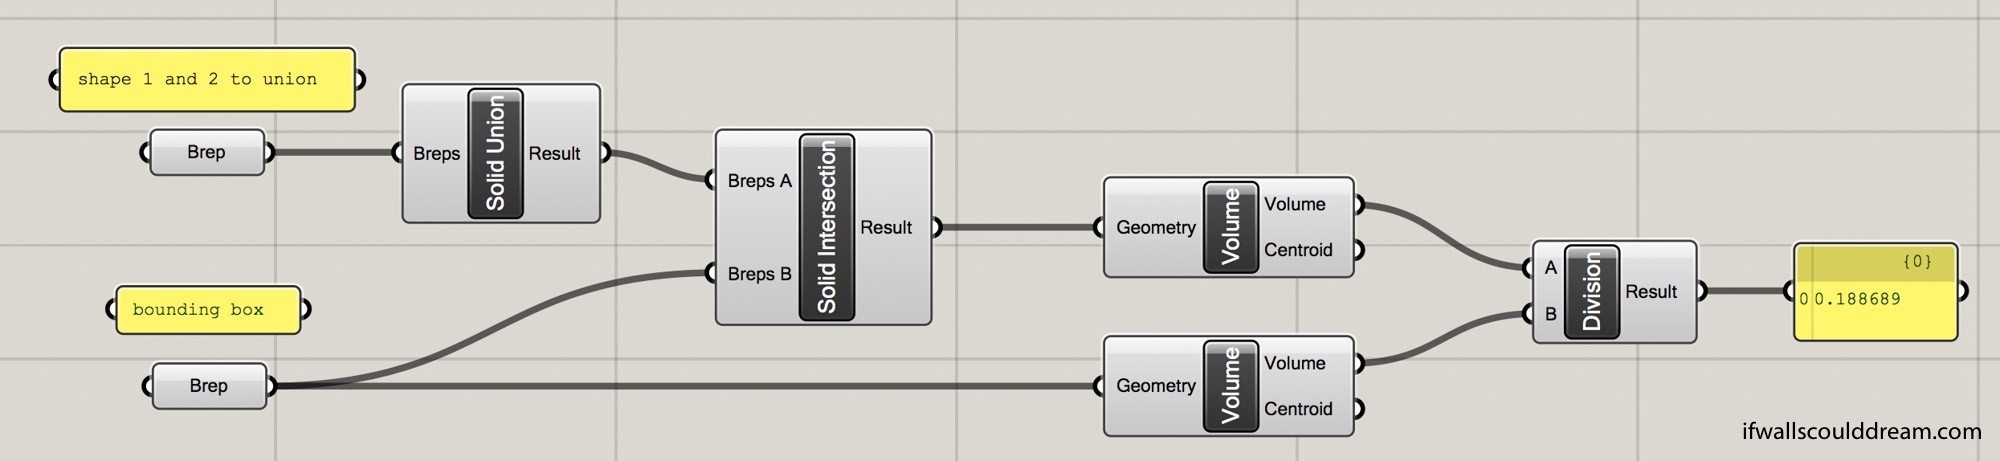
This operation unions two shapes, intersects them with a bounding box, and then calculates the volume percentage (as a decimal, so this example would be 19%.
If walls could dream… they’d dream of playing with Grasshopper all day!

Less Shape, More Geometry
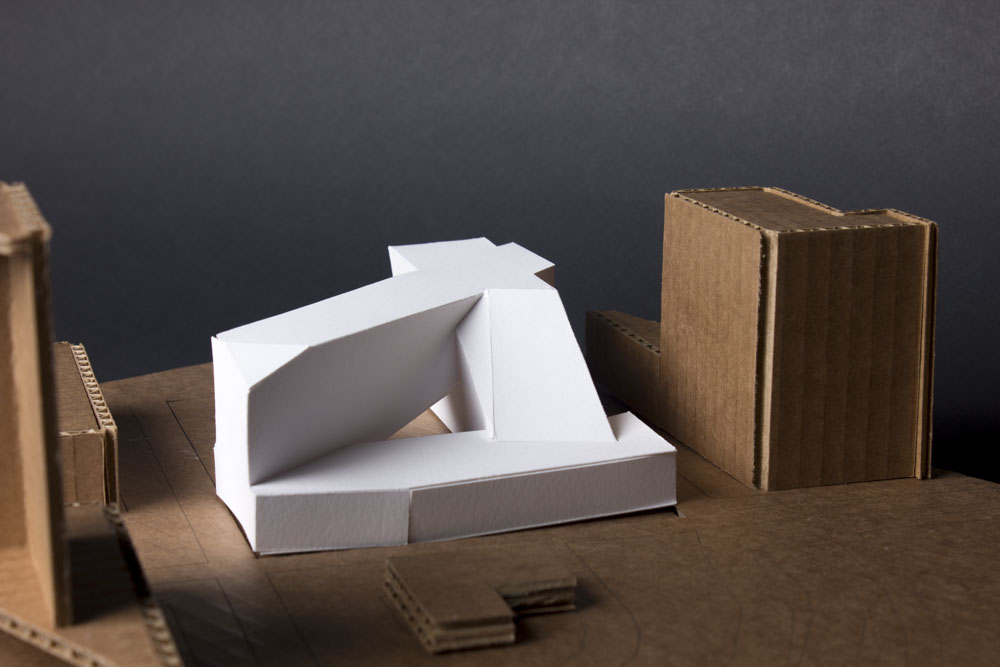
As a warm-up project my fall quarter of third year, and to introduce us to Grasshopper, an algorithmic modeling software in Rhino, my professor had us make complex geometries by adding and subtracting primitive shapes such as boxes, cones, pyramids, cylinders, and spheres. The motto for this studio was, “less shape, more geometry”!
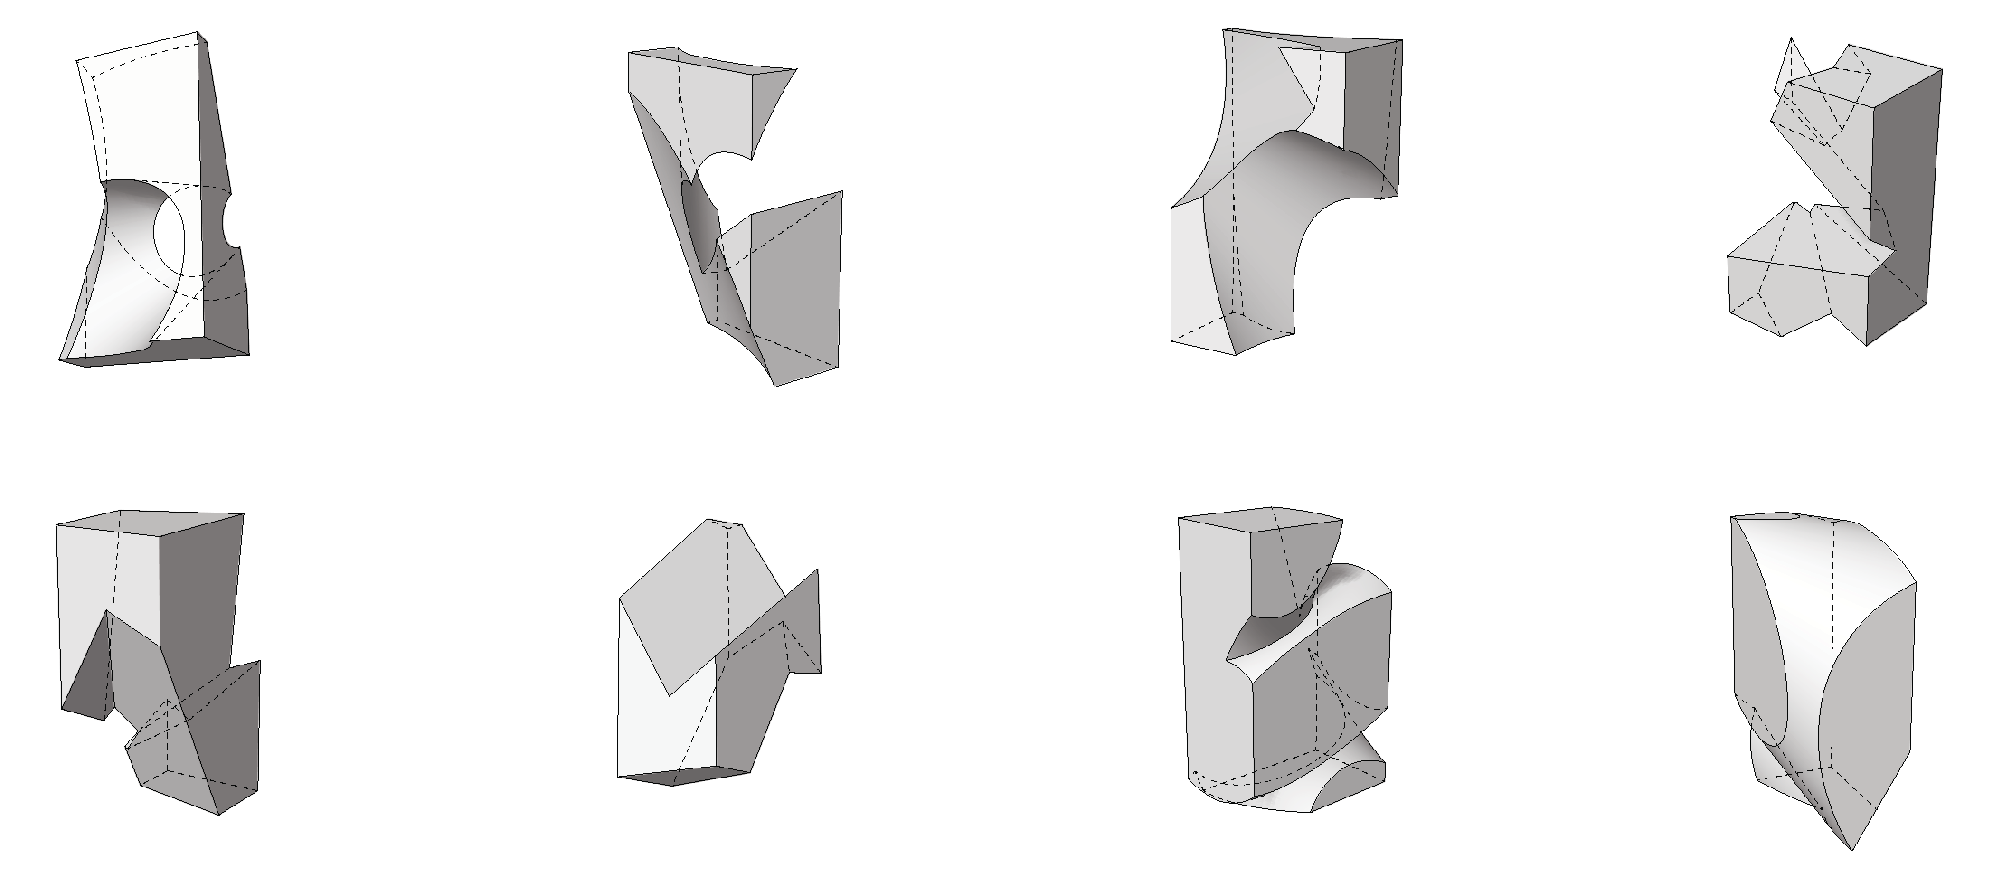
Throughout the process, I made study models by laser cutting and stacking chipboard, folding bristol, and 3d printing. It was helpful to be able to get out of the computer and see the shapes in real life.

After a lot of iteration, I settled on using pyramids because they have straight sides so they are easier to build but more dynamic than boxes.
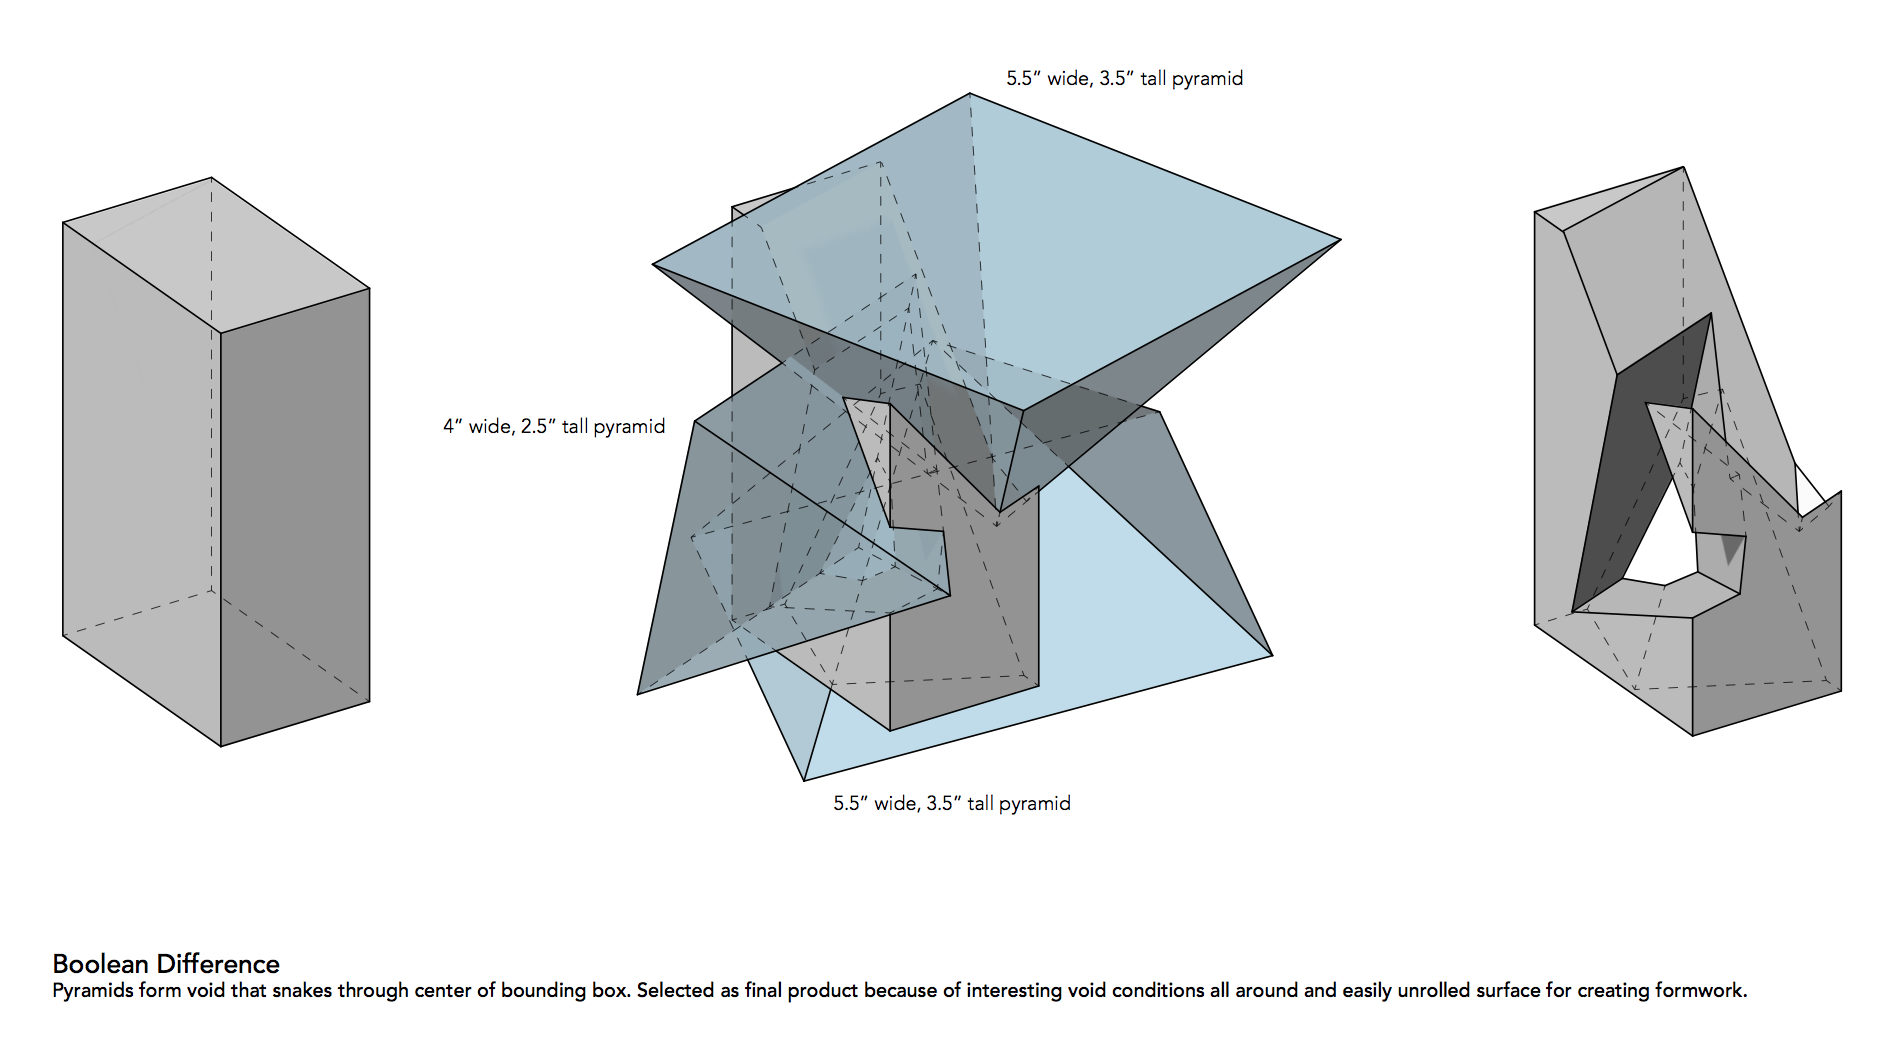
I constructed the form out of laser cut bristol. I also made the void of that form out of rockite.
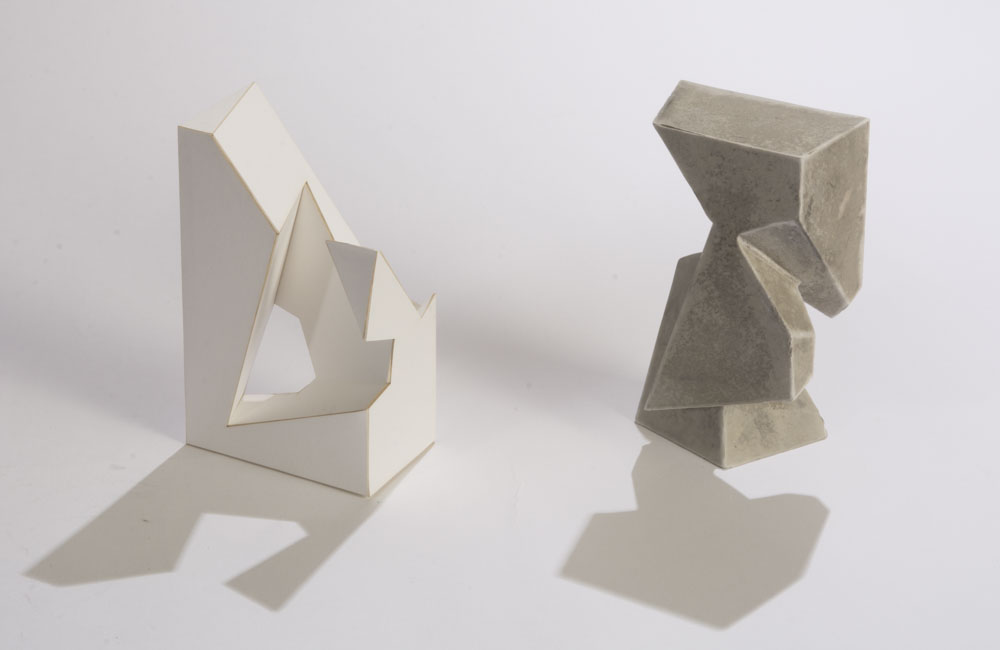
The final step in the project was to create a site for one of the previous models, so I used the rockite void as my model. I took the lines from the model and cut them out of stacked chipboard. The void became a bridge.
I learned so much in this short project and I am really happy with the results.
If walls could dream… they’d dream of less shape and more geometry!

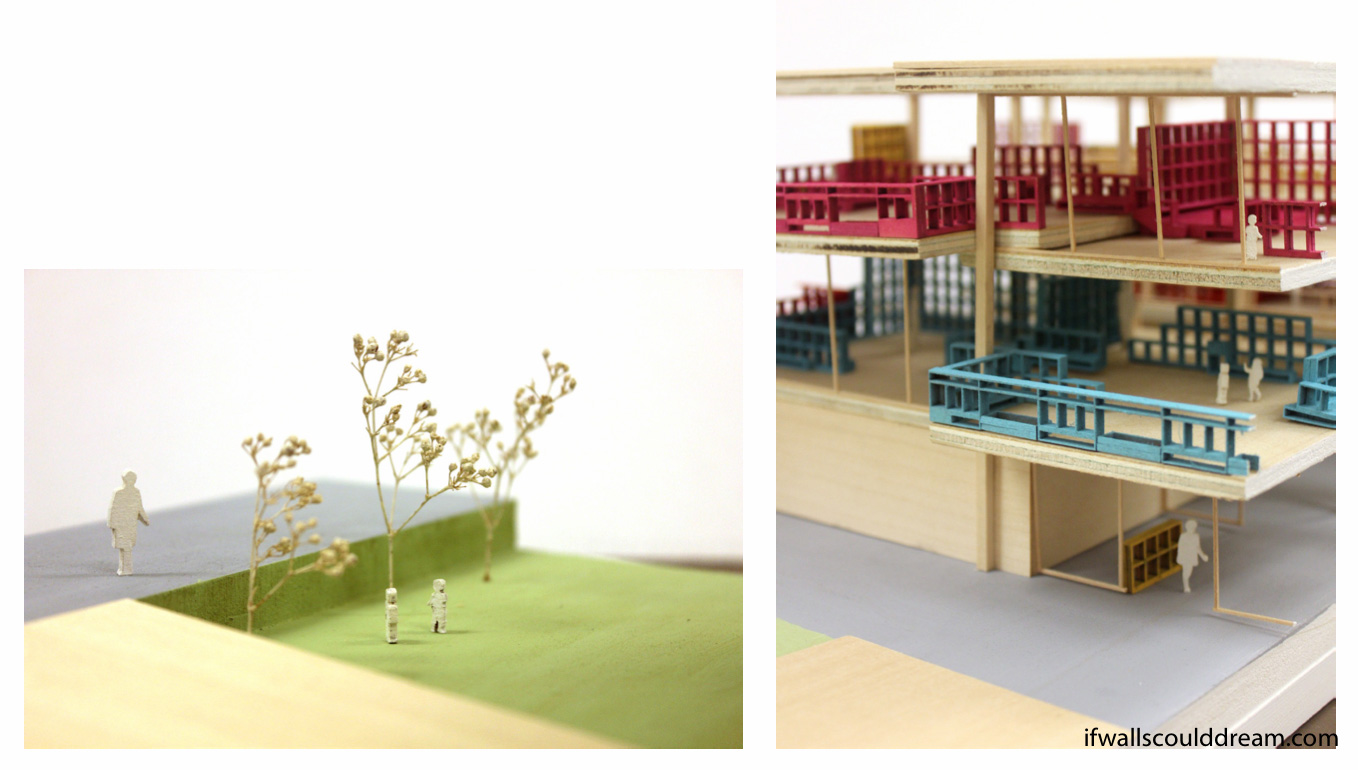
Nature Elementary School
Spring quarter of my second year, I designed a nature-focused elementary school. We started the quarter by designing one element of a classroom. I decided to pick a cubbie wall. It gives students a place to store their stuff and a place to call their own. My cubbie wall design would be double-sided so that students and teachers could interact with it differently at their different work heights.
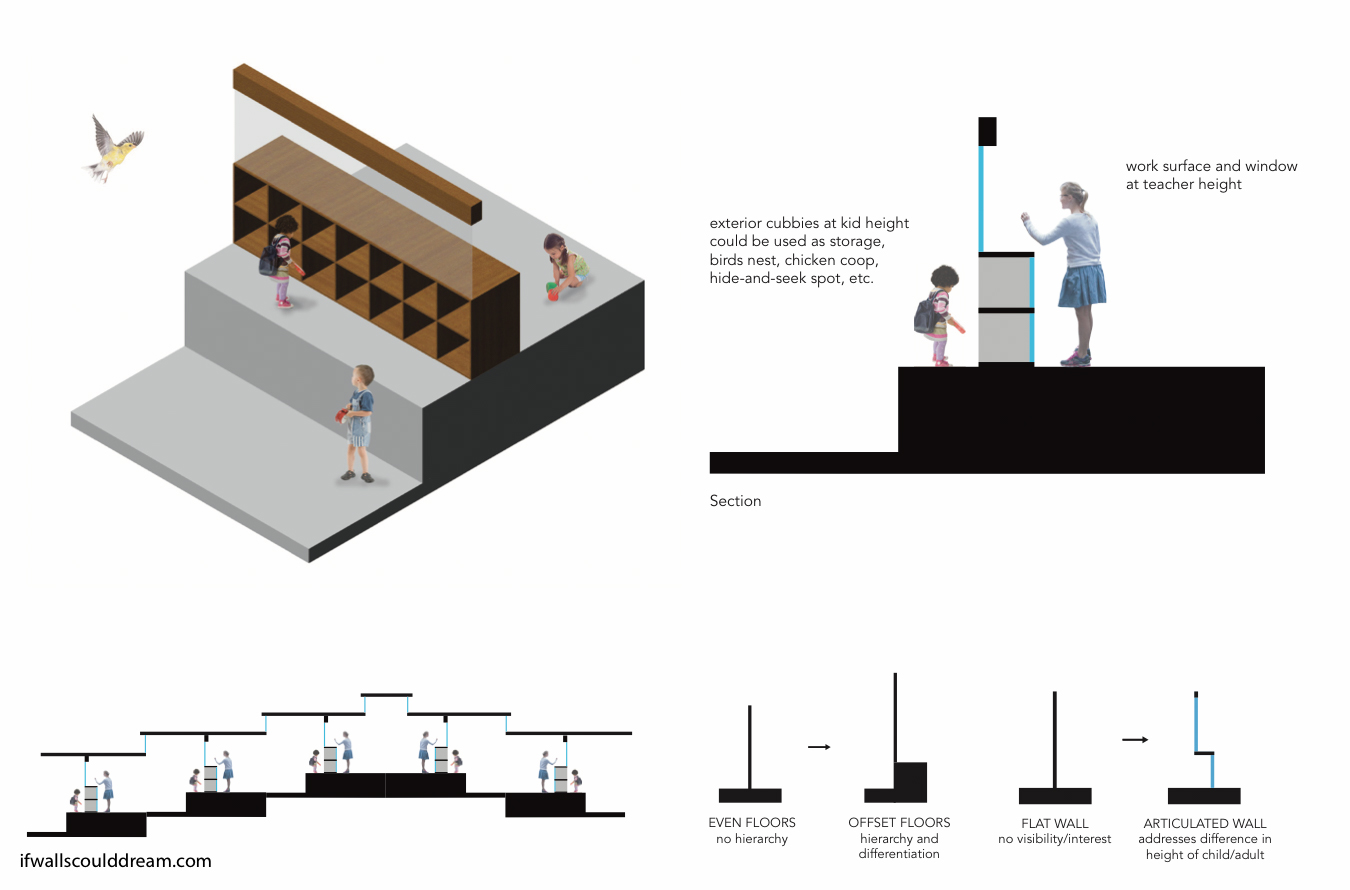
The idea of different interactions at different elevations gave rise to a split-level type classroom with an outdoor space a few steps down from the indoor space.
This classroom idea created a lot of interesting sectional possibilities. However, when it came to stacking the classroom modules into an urban school building, I had to abandon the slanted roofs and go back to the drawingboard.
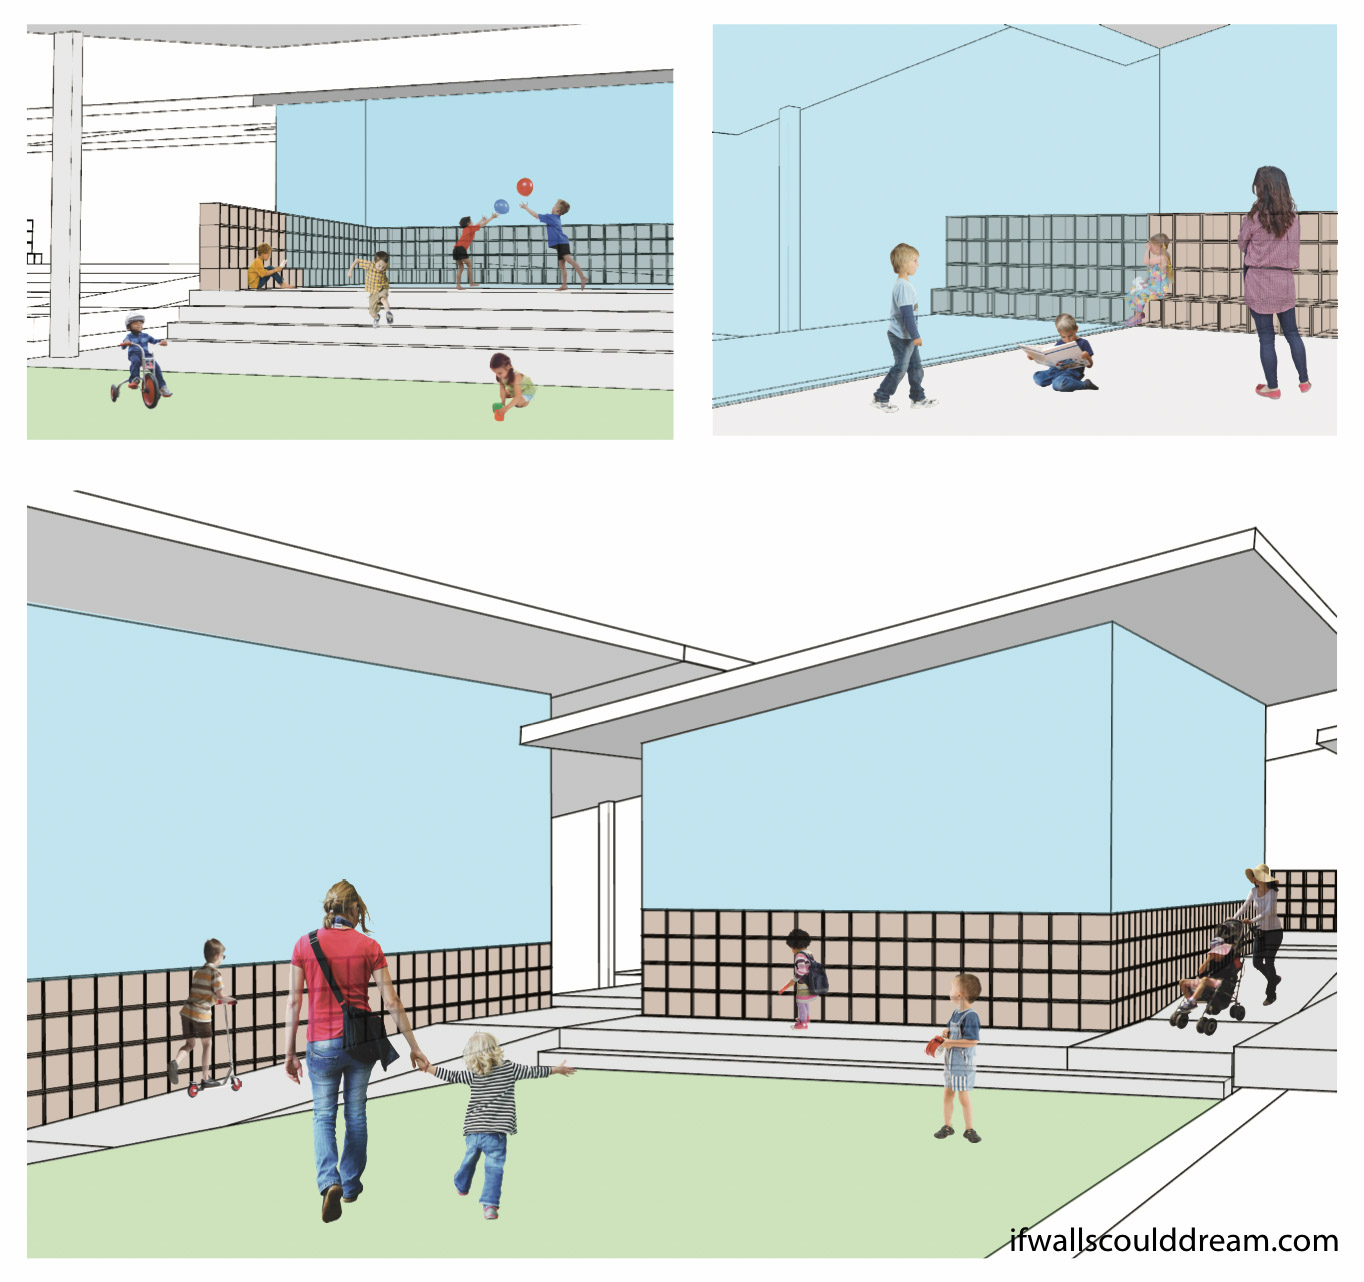
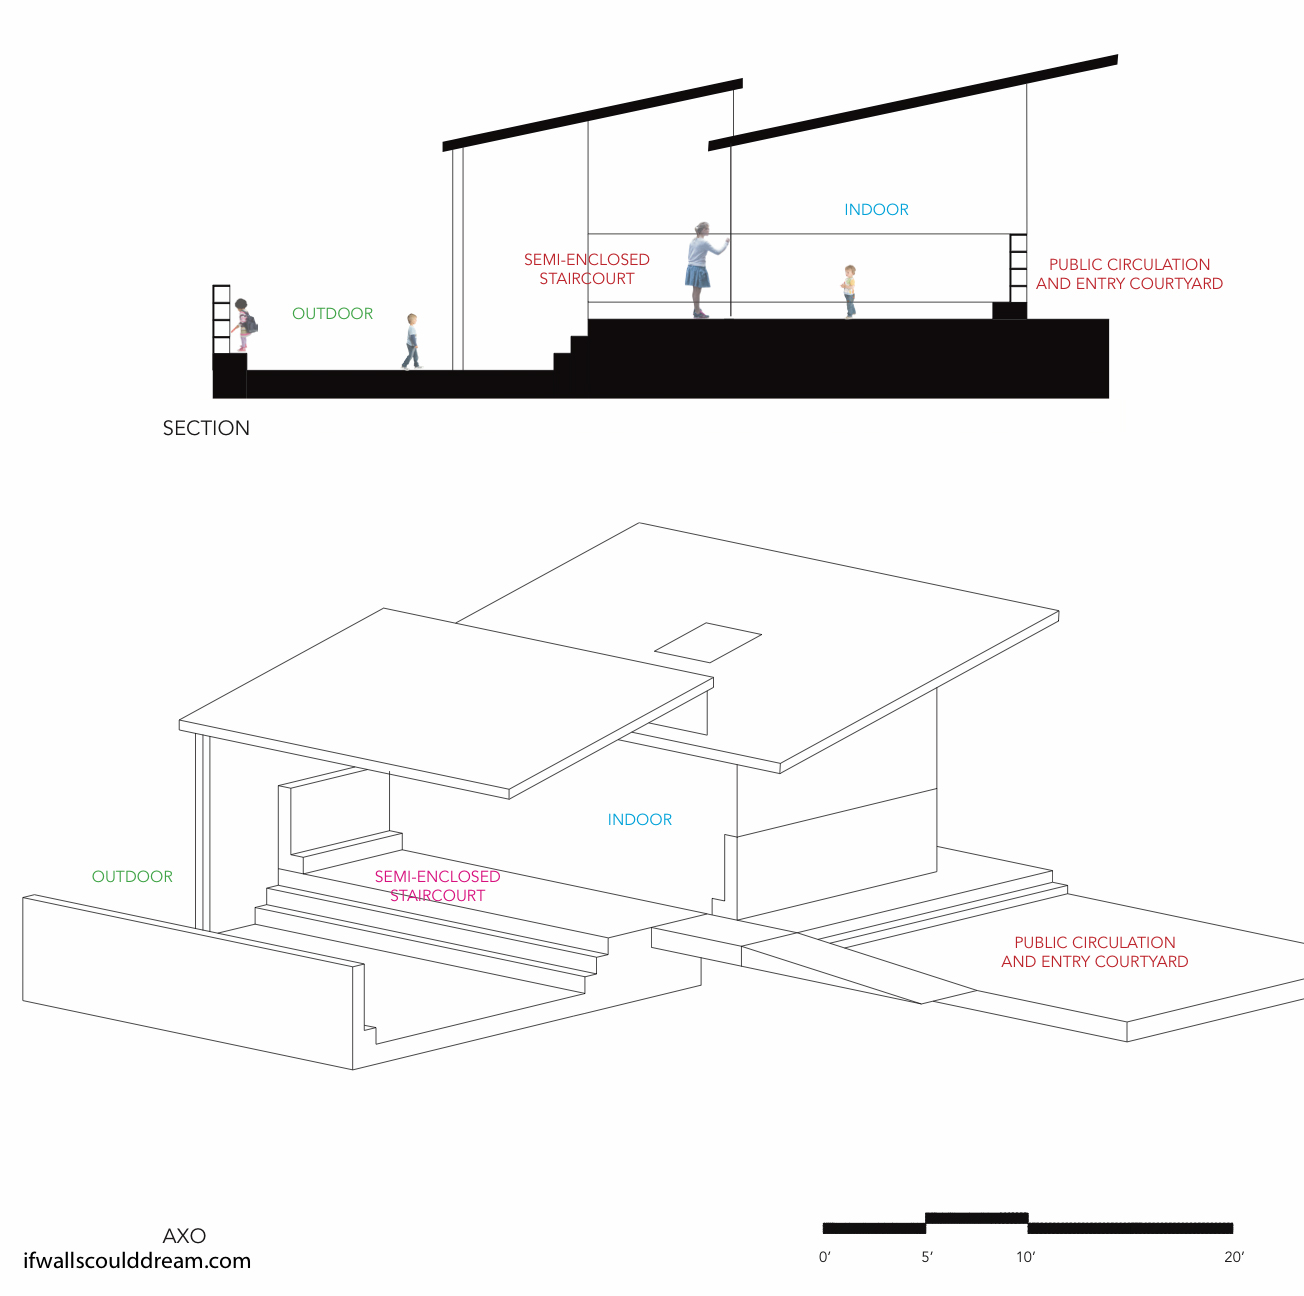
My final classroom design had more separate indoor and outdoor classrooms. I also switched the indoor and outdoor classrooms so now you have to go down a few steps to get to the indoor classroom instead of the other way around. The indoor classroom is fully enclosed with glass and cubbie walls as well as a floor and roof. The outdoor classroom doesn’t have any walls besides the open cubbies, just a floor and a ceiling only over half the room. This provides the children with a variety of different spaces within one classroom.
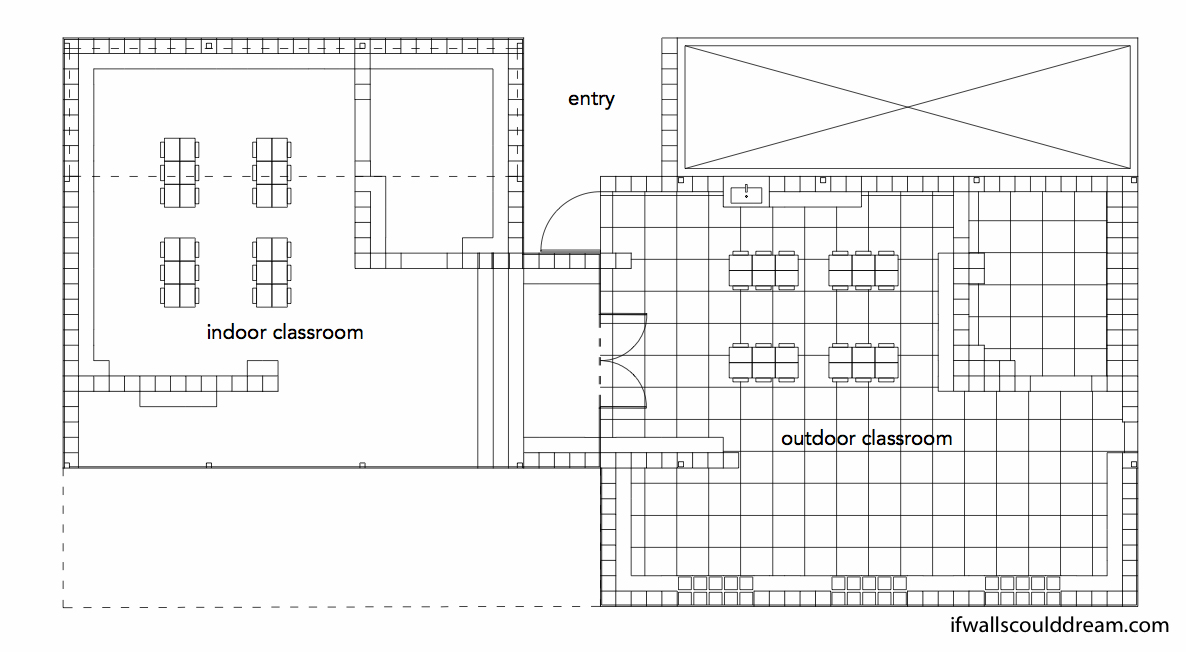
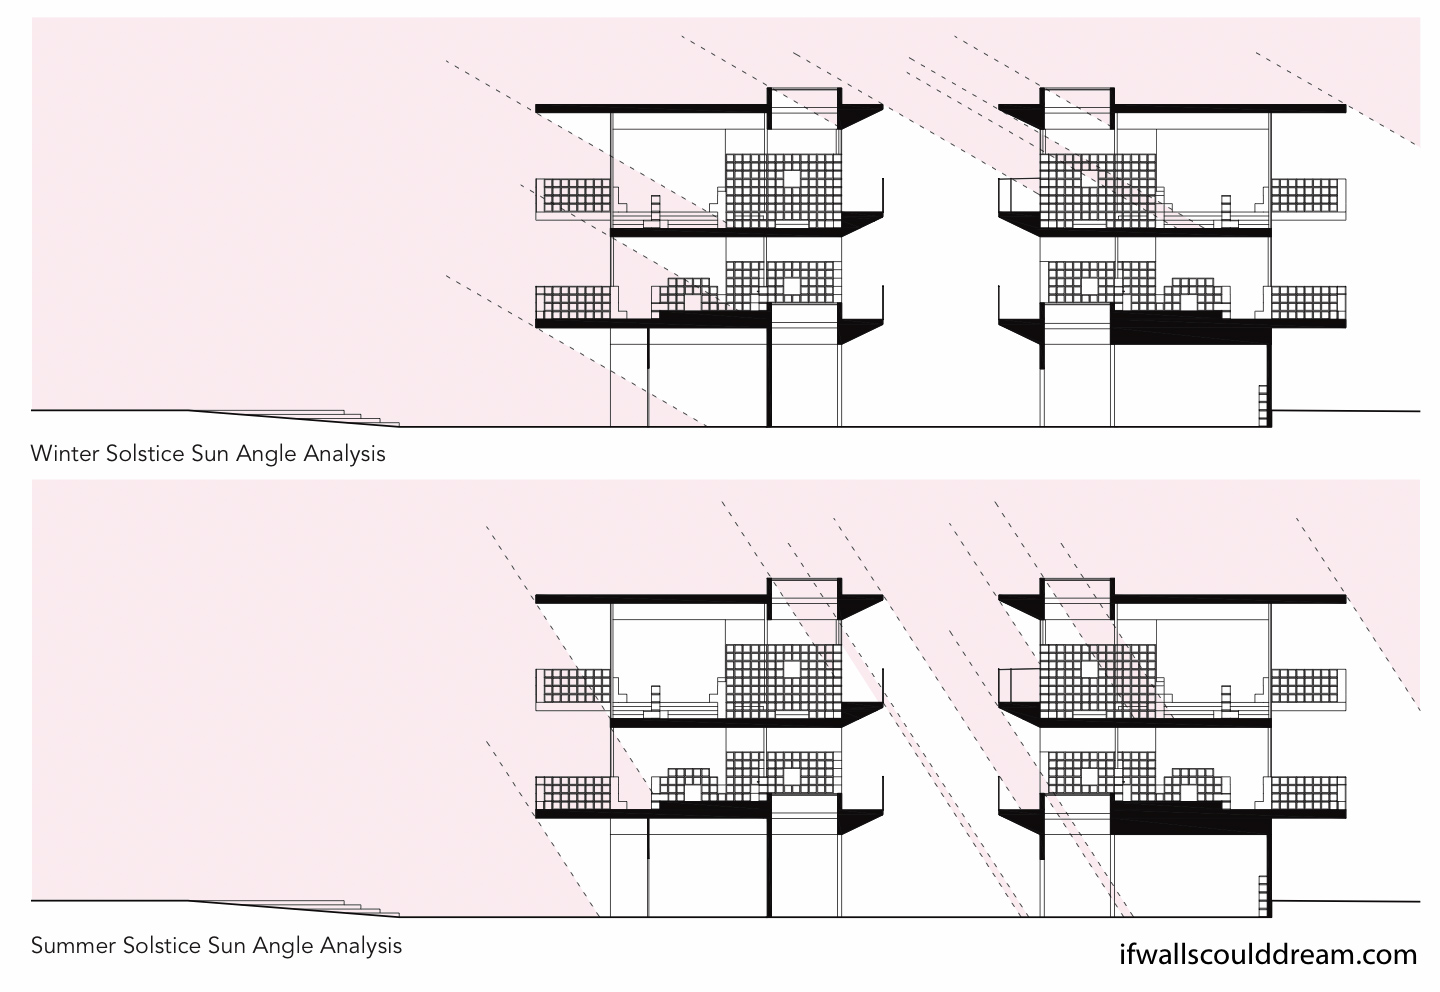
The massing of the building overall is boxy, with alternating indoor and outdoor classrooms. The site is long and narrow and the classrooms take advantage of the southern sunlight.
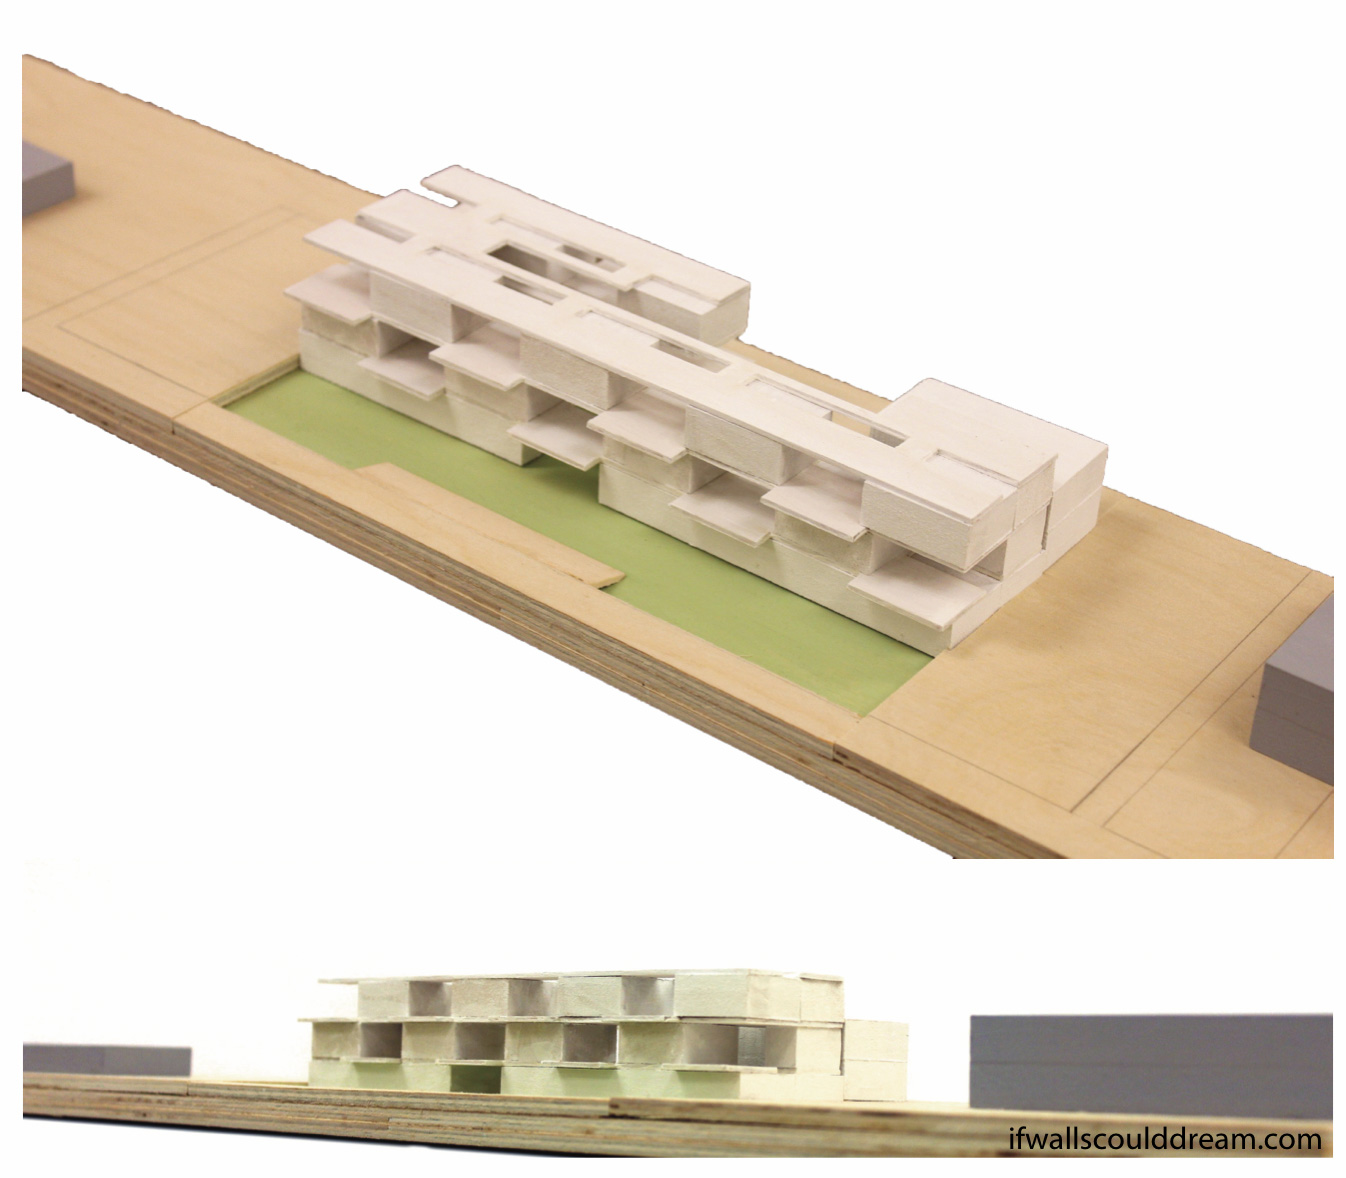
Large skylights and an open courtyard in the center of the school bring a lot of light and sunshine into the classrooms.
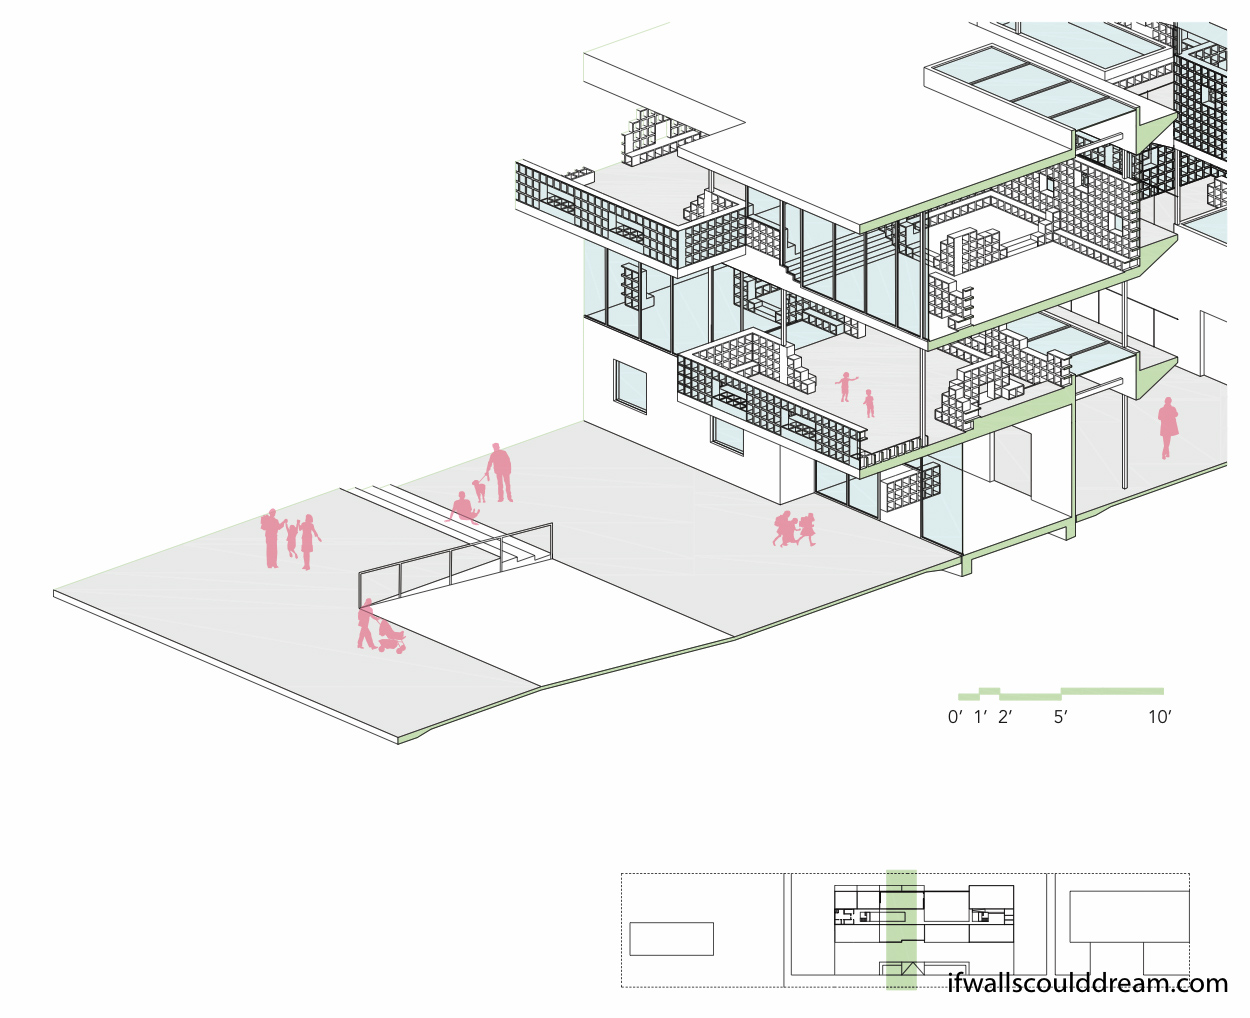
In this section perspective of the entry to the school, you can see the interaction between the indoor and outdoor classrooms. You can also see the cubbie walls carried on from the beginning of the quarter. They provide devision between different spaces within the classroom as well as furniture, seating, windows, and more.
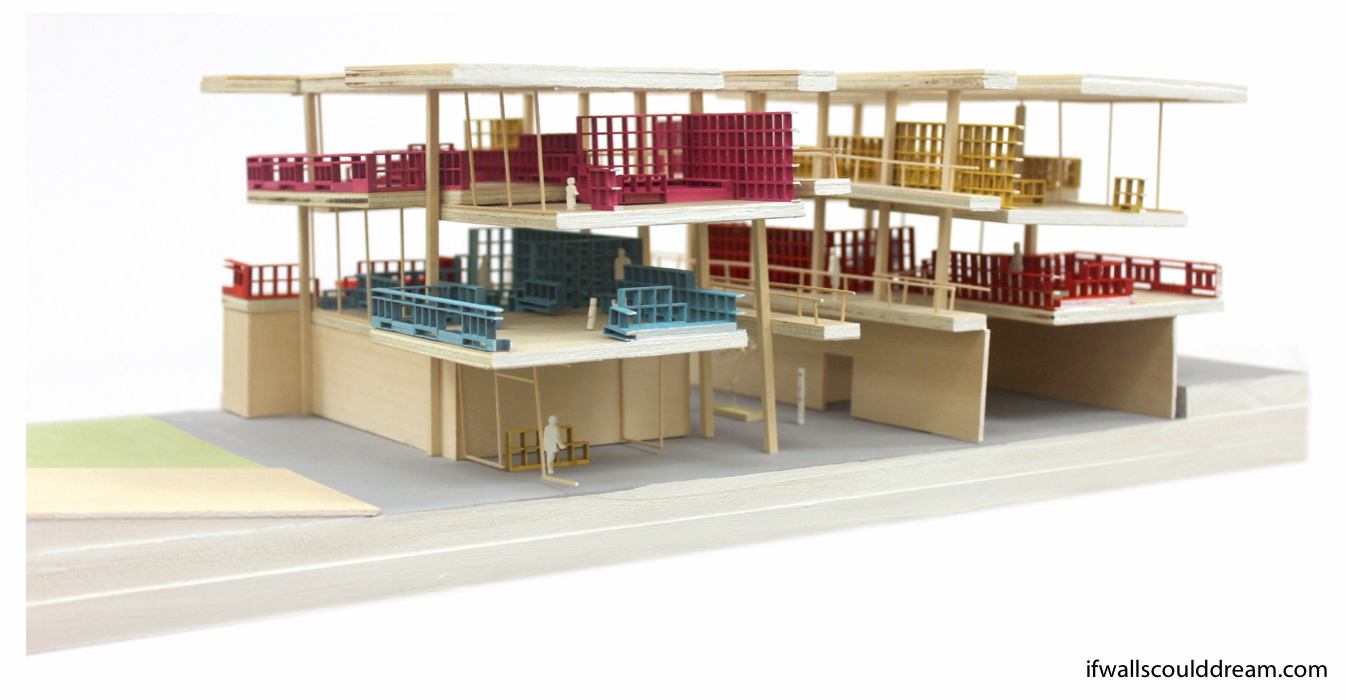
 This section model, taken from the same view as the above drawing, illustrates the relationship between different classrooms.
The school design allows children to connect to nature, both inside and outside of the classroom.